SpringBoot 使用redis並實現cache機制
2019/11/27 09:54:21
3
21459
一、前言
在這篇文章中,以Springboot結合Redis及MySQL,實現cache機制。
我們平常在專案中查找資料往往都是直接訪問資料庫,但現今資料的量越來越大,訪問的次數及時間過於頻繁,這樣會對我們的資料庫帶來很大的負擔及效能上的問題,為了解決這個狀況,這邊採用NoSQL-Redis來實現。本文將透過簡單的實作,展示springBoot結合Redis並且實現快取。
二、實作步驟
1.先建立一個SpringBoot maven專案,在pom.xml加入相關的依賴項目
這邊Spring Data JPA存取資料
<?xml version="1.0" encoding="UTF-8"?>
<project xmlns="http://maven.apache.org/POM/4.0.0" xmlns:xsi="http://www.w3.org/2001/XMLSchema-instance"
	xsi:schemaLocation="http://maven.apache.org/POM/4.0.0 https://maven.apache.org/xsd/maven-4.0.0.xsd">
	<modelVersion>4.0.0</modelVersion>
	<parent>
		<groupId>org.springframework.boot</groupId>
		<artifactId>spring-boot-starter-parent</artifactId>
		<version>2.2.0.RELEASE</version>
		<relativePath/> <!-- lookup parent from repository -->
	</parent>
	<groupId>com.example</groupId>
	<artifactId>demo</artifactId>
	<version>0.0.1-SNAPSHOT</version>
	<name>demo</name>
	<description>Demo project for Spring Boot</description>

	<properties>
		<java.version>1.8</java.version>
	</properties>

	<dependencies>
		<dependency>
	    	<groupId>org.springframework.boot</groupId>
	    	<artifactId>spring-boot-starter-data-jpa</artifactId>
		</dependency>
		<dependency>
            <groupId>org.springframework.boot</groupId>
            <artifactId>spring-boot-starter-data-redis</artifactId>
        </dependency>
        <dependency>
		    <groupId>redis.clients</groupId>
		    <artifactId>jedis</artifactId>
		</dependency>
        <dependency>
			<groupId>org.springframework.boot</groupId>
			<artifactId>spring-boot-starter-data-redis-reactive</artifactId>
		</dependency>
		<dependency>
            <groupId>mysql</groupId>
            <artifactId>mysql-connector-java</artifactId>
        </dependency>
		<dependency>
			<groupId>org.springframework.boot</groupId>
			<artifactId>spring-boot-starter-web</artifactId>
		</dependency>

		<dependency>
			<groupId>org.springframework.boot</groupId>
			<artifactId>spring-boot-devtools</artifactId>
			<scope>runtime</scope>
			<optional>true</optional>
		</dependency>
		<dependency>
			<groupId>org.springframework.boot</groupId>
			<artifactId>spring-boot-starter-test</artifactId>
			<scope>test</scope>
			<exclusions>
				<exclusion>
					<groupId>org.junit.vintage</groupId>
					<artifactId>junit-vintage-engine</artifactId>
				</exclusion>
			</exclusions>
		</dependency>
		<dependency>
			<groupId>io.projectreactor</groupId>
			<artifactId>reactor-test</artifactId>
			<scope>test</scope>
		</dependency>
		<dependency>
		    <groupId>com.fasterxml.jackson.core</groupId>
		    <artifactId>jackson-databind</artifactId>
		</dependency>
	</dependencies>

	<build>
		<plugins>
			<plugin>
				<groupId>org.springframework.boot</groupId>
				<artifactId>spring-boot-maven-plugin</artifactId>
			</plugin>
		</plugins>
	</build>

</project>
2.application.properties配置Redis及MySQL及JPA
# REDIS (RedisProperties)
# Redis資料庫索引(預設為0)
spring.redis.database=0
# Redis伺服器地址
spring.redis.host=127.0.0.1
# Redis伺服器連線埠
spring.redis.port=6379
# Redis伺服器連線密碼(預設為空)
spring.redis.password=
# 連線池最大連線數(使用負值表示沒有限制)
spring.redis.jedis.pool.max-active=8
# 連線池最大等待時間(使用負值表示沒有限制)
spring.redis.jedis.pool.max-wait=-1
# 連線池中的最大空閒連線
spring.redis.jedis.pool.max-idle=8
# 連線池中的最小空閒連線
spring.redis.jedis.pool.min-idle=0
# 連線超時時間(毫秒)
spring.redis.timeout=0


#DB Configuration:

spring.datasource.driverClassName=com.mysql.cj.jdbc.Driver

spring.datasource.url=jdbc:mysql://localhost:13306/template

spring.datasource.username=root

spring.datasource.password=root

server.port=8080


#JPA Configuration:

spring.jpa.hibernate.ddl-auto=update

spring.jpa.database=mysql

spring.jpa.show-sql=true

spring.jpa.properties.hibernate.globally_quoted_identifiers=true
spring.jpa.properties.hibernate.dialect = org.hibernate.dialect.MySQL8Dialect
3.建立Redis的Configuration
Redis保存資料的方式是以key-value,所以config配置中透過KeyGenerator設定key值
以及可以透過CacheManager來設定cache資料的預期時間
@Configuration
@EnableCaching
public class RedisConfig extends CachingConfigurerSupport {

	@Bean
	public JedisConnectionFactory redisConnectionFactory() {

		return new JedisConnectionFactory();
	}

	// key值命名
	@Bean
	public KeyGenerator wiselyKeyGenerator() {
		return new KeyGenerator() {
			@Override
			public Object generate(Object target, Method method, Object... params) {
				StringBuilder sb = new StringBuilder();
               sb.append(target.getClass().getName());
				sb.append(method.getName());
				for (Object obj : params) {
					sb.append(obj.toString());
				}

				return sb.toString();
			}
		};
	}

	@Bean
	public RedisTemplate<String, String> redisTemplate(RedisConnectionFactory factory) {
		RedisTemplate<String, String> redisTemplate = new RedisTemplate<String, String>();
		redisTemplate.setConnectionFactory(factory);
		return redisTemplate;
	}

	@Bean
	public CacheManager cacheManager(RedisConnectionFactory factory) {

		RedisSerializationContext.SerializationPair<Object> pair = RedisSerializationContext.SerializationPair
				.fromSerializer(new GenericJackson2JsonRedisSerializer());
		RedisCacheConfiguration defaultCacheConfig = RedisCacheConfiguration.defaultCacheConfig()
				.serializeValuesWith(pair) // 序列化方式
				.entryTtl(Duration.ofHours(1)); // 過期時間

		return RedisCacheManager.builder(RedisCacheWriter.nonLockingRedisCacheWriter(factory))
				.cacheDefaults(defaultCacheConfig).build();

	}

}
4. 接著建立實體USER,以及DAO
@Entity
@Table(name = "user")
public class User implements Serializable {

	private static final long serialVersionUID = 1L;

	@Id
	@GeneratedValue
	private Integer id;
	@Column(name = "username")
	private String userName;
	@Column(name = "password")
	private Integer passWord;

	public User() {
		super();
	}

	public Integer getId() {
		return id;
	}

	public void setId(Integer id) {
		this.id = id;
	}

	public String getUserName() {
		return userName;
	}

	public void setUserName(String userName) {
		this.userName = userName;
	}

	public Integer getPassWord() {
		return passWord;
	}

	public void setPassWord(Integer passWord) {
		this.passWord = passWord;
	}
public interface UserRepository extends JpaRepository<User, Integer> {
}5.撰寫Service介面及實作serviceimpl
public interface UserService

{
    List<User> getAllUsers();

    User findById(Integer pId);

    void clearAllUserCache();

    void clear(Integer pId);
}
@Service
@CacheConfig(cacheNames = "userService")
public class UserServiceImpl implements UserService{
@Autowired
private UserRepository userDao;
/**
* cacheNames 與 value 定義一样,若設置了 value 的值,cacheNames 配置就無效。<br>
* 使用 keyGenerator ,注意是否在config中定義好。
*/
@Override
// @Cacheable(value = "getAllUsers")
@Cacheable(value = "getAllUsers", keyGenerator = "wiselyKeyGenerator")
public List<User> getAllUsers()
{
return userDao.findAll();
}
/**
* 執行時,將清除value = getAllUsers cache
* 【cacheNames = "userService"】
* 也可指定清除的key 【@CacheEvict(value="abc")】
*/
@CacheEvict(value = "getAllUsers",allEntries=true)
public void clearAllUserCache()
{
}
/**
* key ="#p0" 表示已第一個參數作為key
*/
@Override
@Cacheable(value="redis", key ="#p0")
public User findById(Integer pId)
{
Optional<User> _User = userDao.findById(pId);
System.out.println("從資料庫查找完.....");
return Optional.ofNullable(_User).get().orElse(null);
}
@CacheEvict(value="user", key ="#p0")
public void clear(Integer pId)
{
}
}
6.此時配置作業都已準備好即可run as---->spring boot app
可以看到已經自動建立此表

手動插入幾筆資料後,執行API
第一次查找
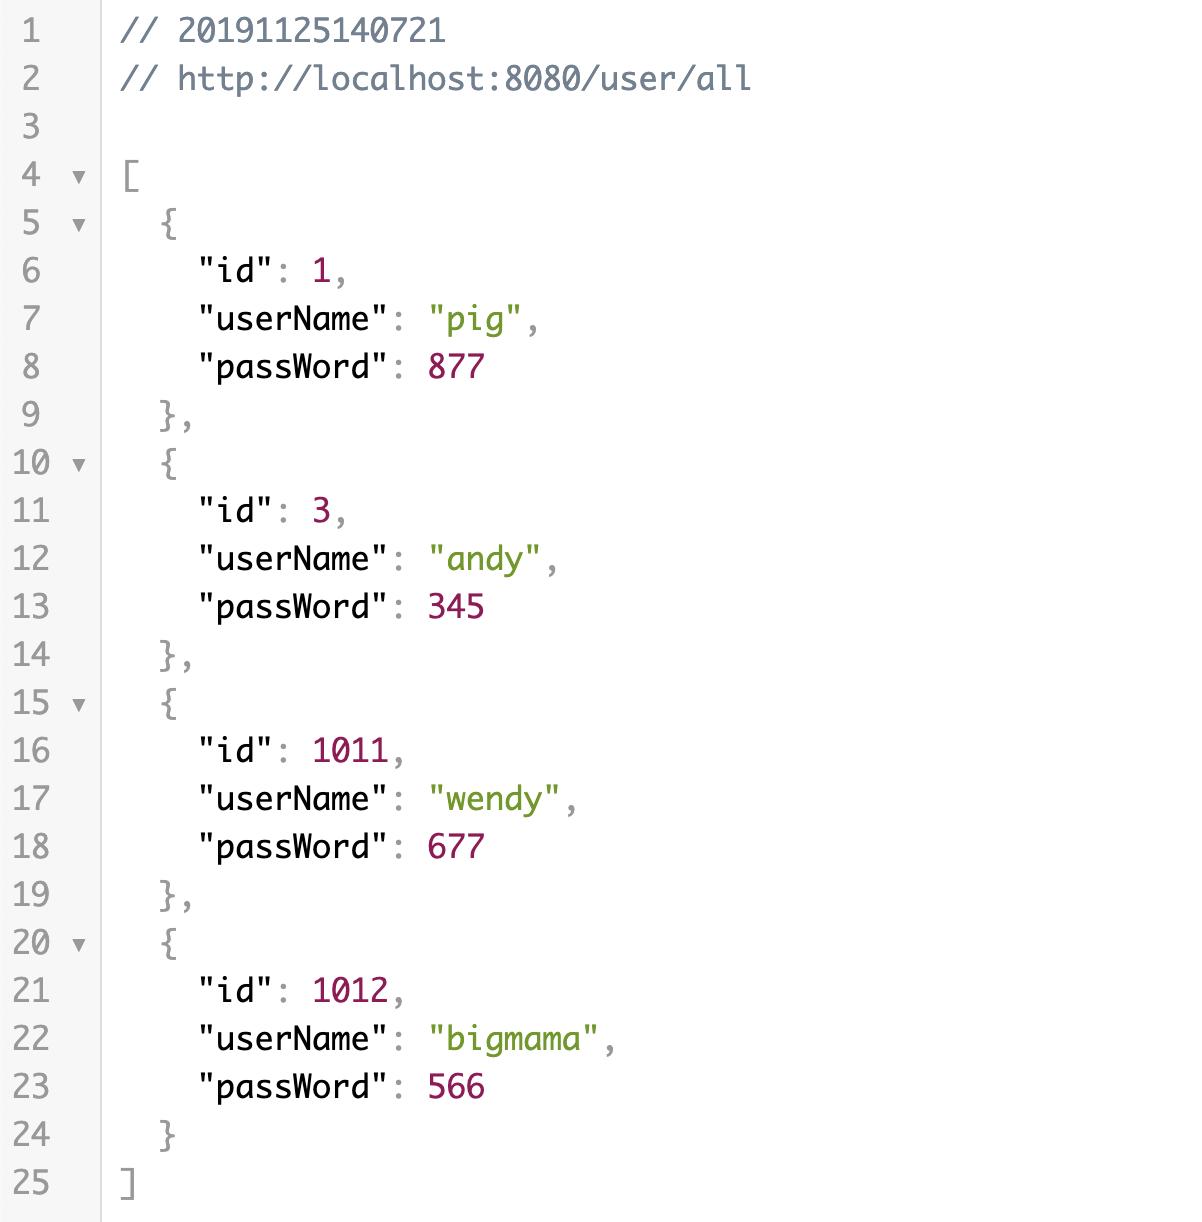
查找數據成功
發現Console打印出SQL語句

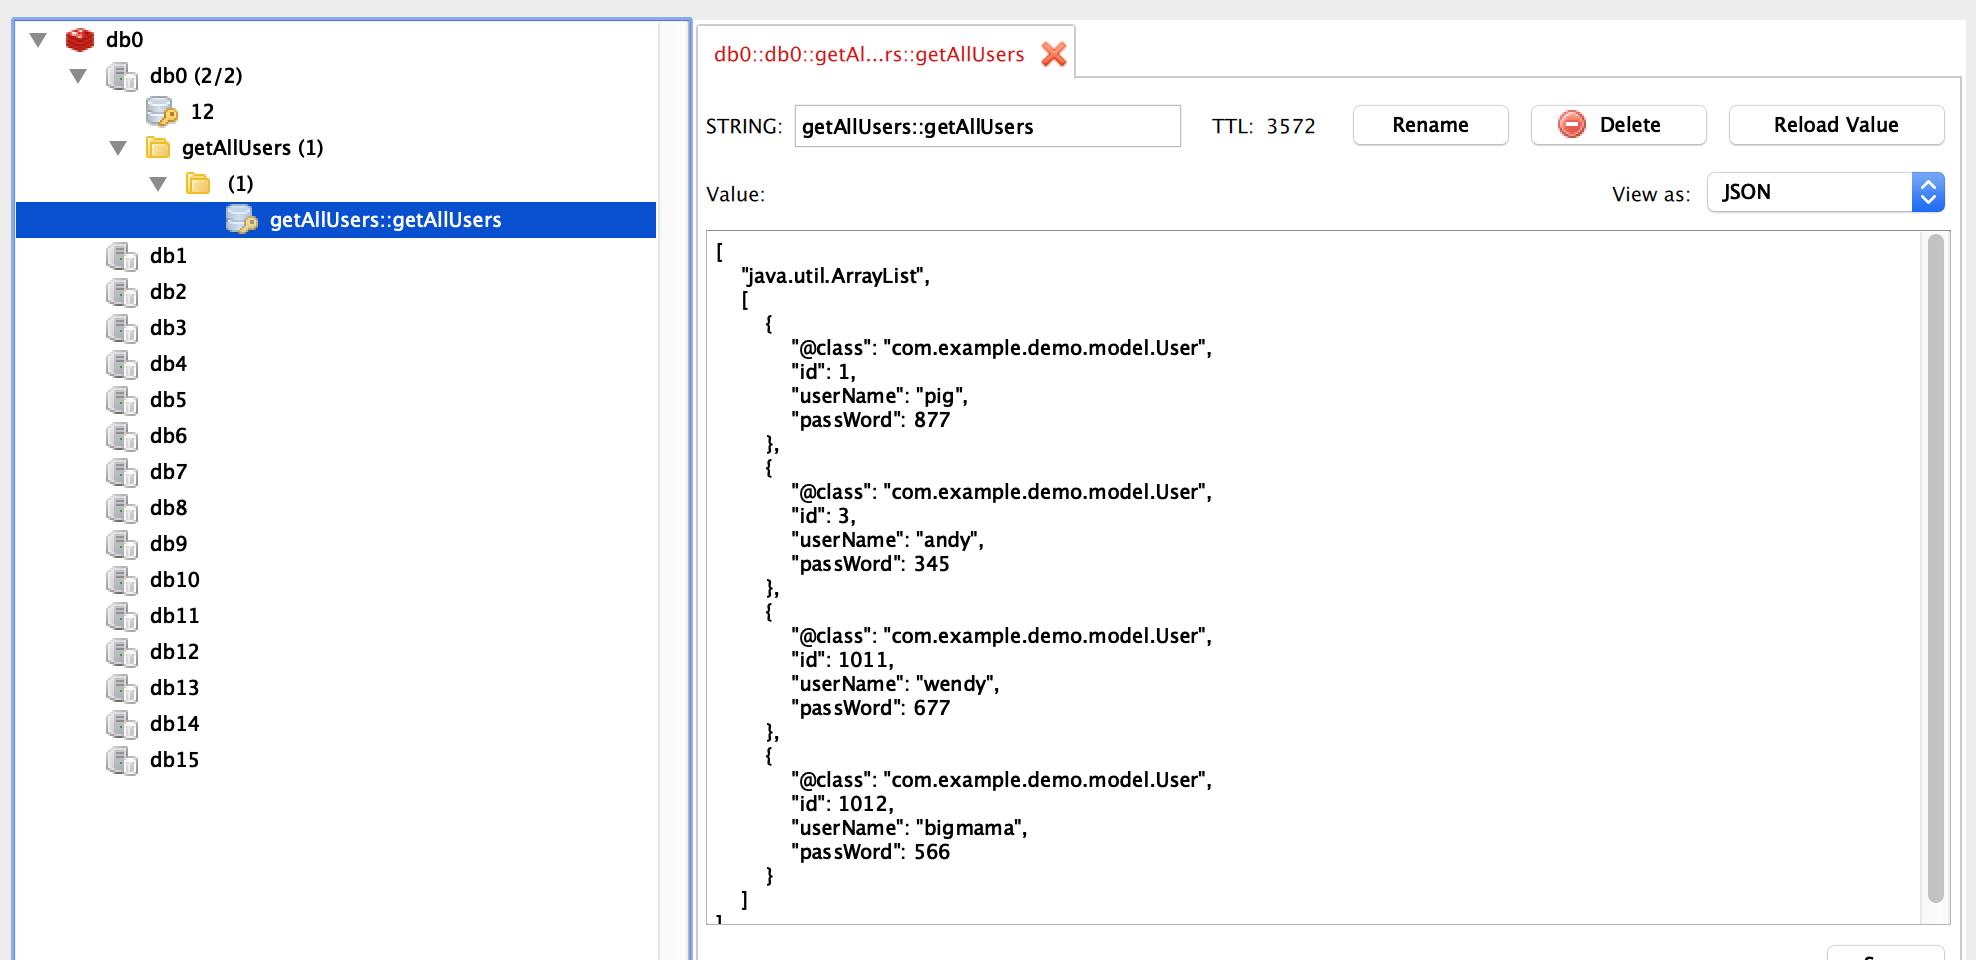
查看Redis
發現已將撈取到的資料存在Redis,key值為 getAllUsers
再次查找,一樣取得資料
但發現Console沒有打印出SQL,代表沒有到mySQL中撈取數據
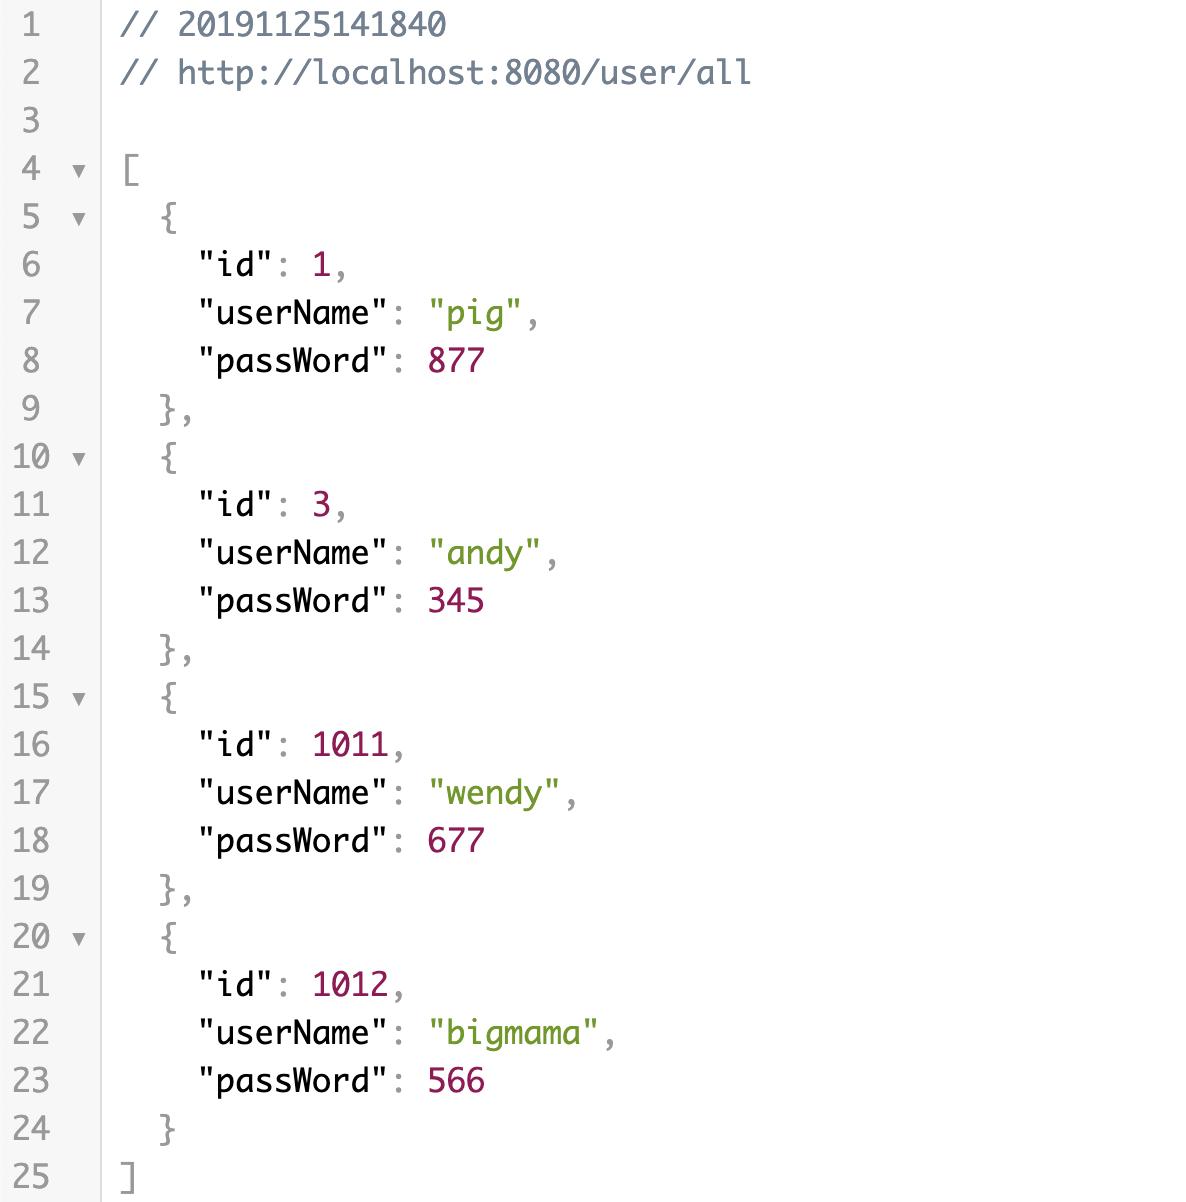

這樣redis的快取機制就完成了
接下來測試清除快取,這裡以單筆資料作為演示
http://localhost:8080/user/findById?id=3
以同樣方式查找單筆資料,可發現一樣有SQL語句以及存放進Redis


執行清除快取
Reload Redis後發現 user::3 已經被清除了
結論
由此可證確實達到降低資料庫的壓力,獲取資料的速度上也提升了,並能應用在專案中。
這個Demo只是為了讓工程師們能更快的上手並可依照需求
靈活的運用@Cacheable@CacheEvict@CachePut@Caching@CacheConfig
達到目的地

相關文章