Spring 攔截處理器
前言
在開發程式時,會有需要全局處理的程式邏輯,傳統的Servlet容器中,可以使用過濾器(Filter)和監聽器(Listener),而在Spring的框架中,可以使用攔截器(Interceptor)和面向切面程式aop(Aspect-Oriented Programming),本文主要簡單的介紹 Filter、Listener、Interceptor和aop的區別,且如何在spring中做使用。
監聽器 (Listener)
- 監聽器(Listener)是依賴於Servlet容器,可以監聽程式中某些對象,訊息的創建,銷毀和修改等動作的發生,然後進行相對應的處理。
- 根據監聽對象,將監聽器分為3類:
- ServletContext:對應application,interface為ServletContextListener。在整個服務中只有一個,服務啟動時初始化,服務關閉時銷毀。可用於session的緩存,Ex:結合redis,在服務啟動時,從資料庫讀取資料到session中。
- HttpSession:對應session,interface為HttpSessionListener。在session啟用時建立,而關閉後會被銷毀。
- ServletRequest:對應request,interface為ServletRequestListener。request是客戶發送請求時所創建的,用於請求數據的處理,請求處理完後銷毀。可以用於客戶訊息的包裝。
- 實現監聽器(Listener)
1. 建立監聽器
u 實現ServletContextListener或HttpSessionListener或ServletRequestListener
u 覆寫方法,範例使用的是ServletContextListener,所以覆寫contextInitialized()和contextDestroyed()的方法
u Configuration新增@WebListener
u Application新增@ServletComponentScan
@WebListener
public class ServletContextListenerConfig implements ServletContextListener {
private static final Logger LOGGER = LoggerFactory.getLogger(ServletContextListenerConfig.class);
@Override
public void contextInitialized(ServletContextEvent sce) {
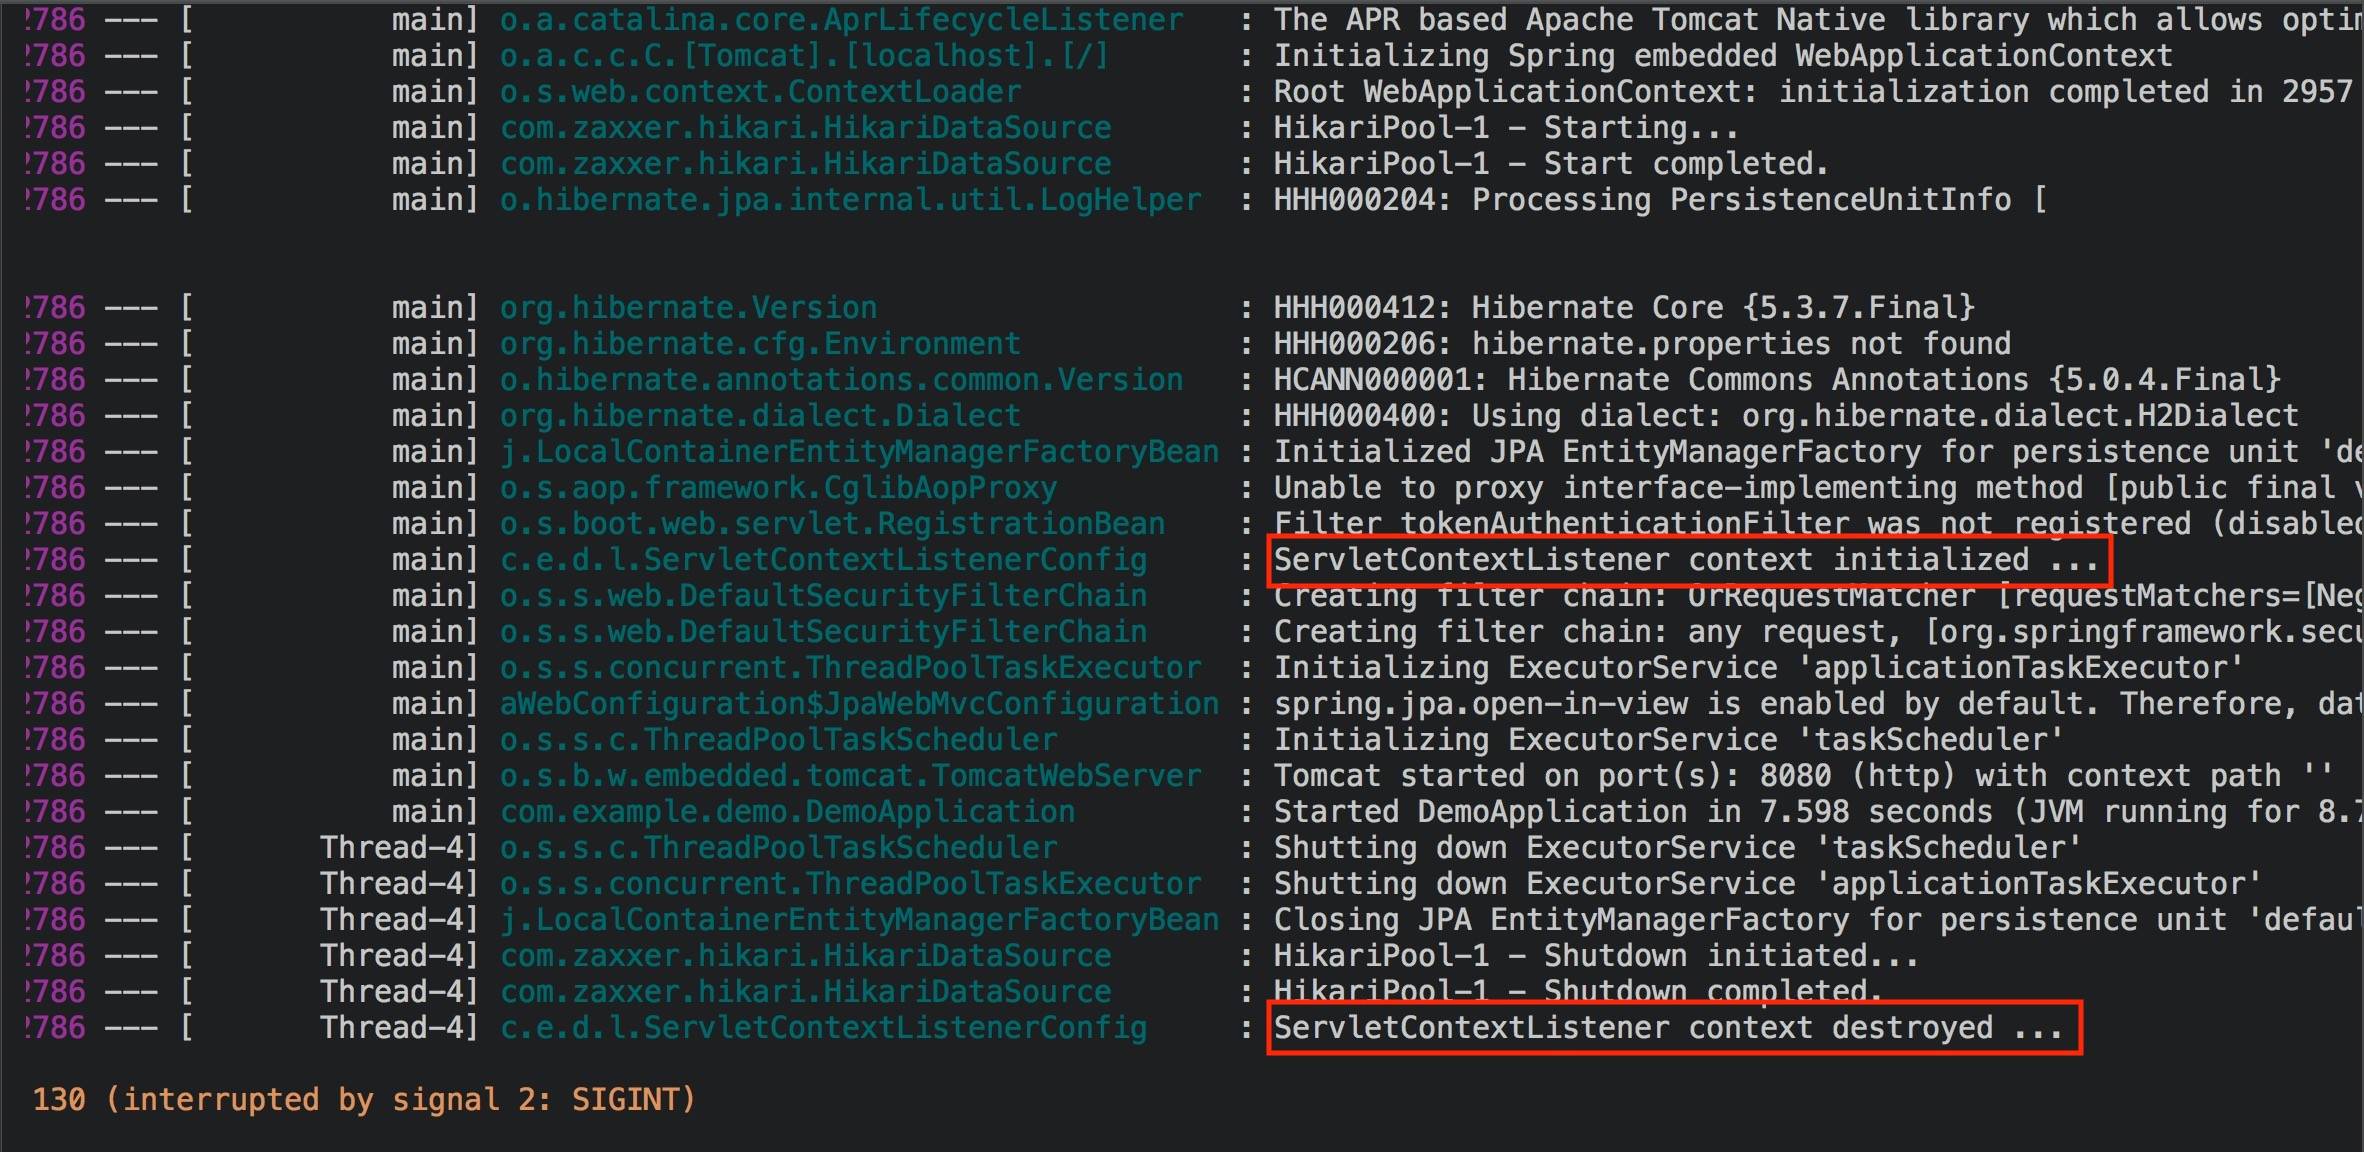
LOGGER.info("ServletContextListener context initialized ...");
}
@Override
public void contextDestroyed(ServletContextEvent sce) {
LOGGER.info("ServletContextListener context destroyed ...");
}
}@SpringBootApplication
@ServletComponentScan
public class DemoApplication {
public static void main(String[] args) {
SpringApplication.run(DemoApplication.class, args);
}
}2. 啟動服務和關閉服務就可以看到監聽器執行的動作
過濾器 (Filter)
- 過濾器(Filter)是依賴於Servlet容器,可以對幾乎所有請求進行過濾。過濾器是對資料進行過濾,可以預先處理這些需要被處理的資料,過濾器也可以操作權限的控制,在沒有授權的情況下,可以有效地把無權限的資源或請求給過濾掉。
- 實現過濾器(Filter)
1. 建立過濾器
u 實現Filter
u 覆寫doFilter()的方法
u Configuration新增@WebFilter
u Application新增@ServletComponentScan
@WebFilter(filterName = "RequestFilter", urlPatterns = "/book")
public class RequestFilter implements Filter {
private static final Logger LOGGER = LoggerFactory.getLogger(RequestFilter.class);
@Override
public void doFilter(ServletRequest request, ServletResponse response, FilterChain chain) throws IOException, ServletException {
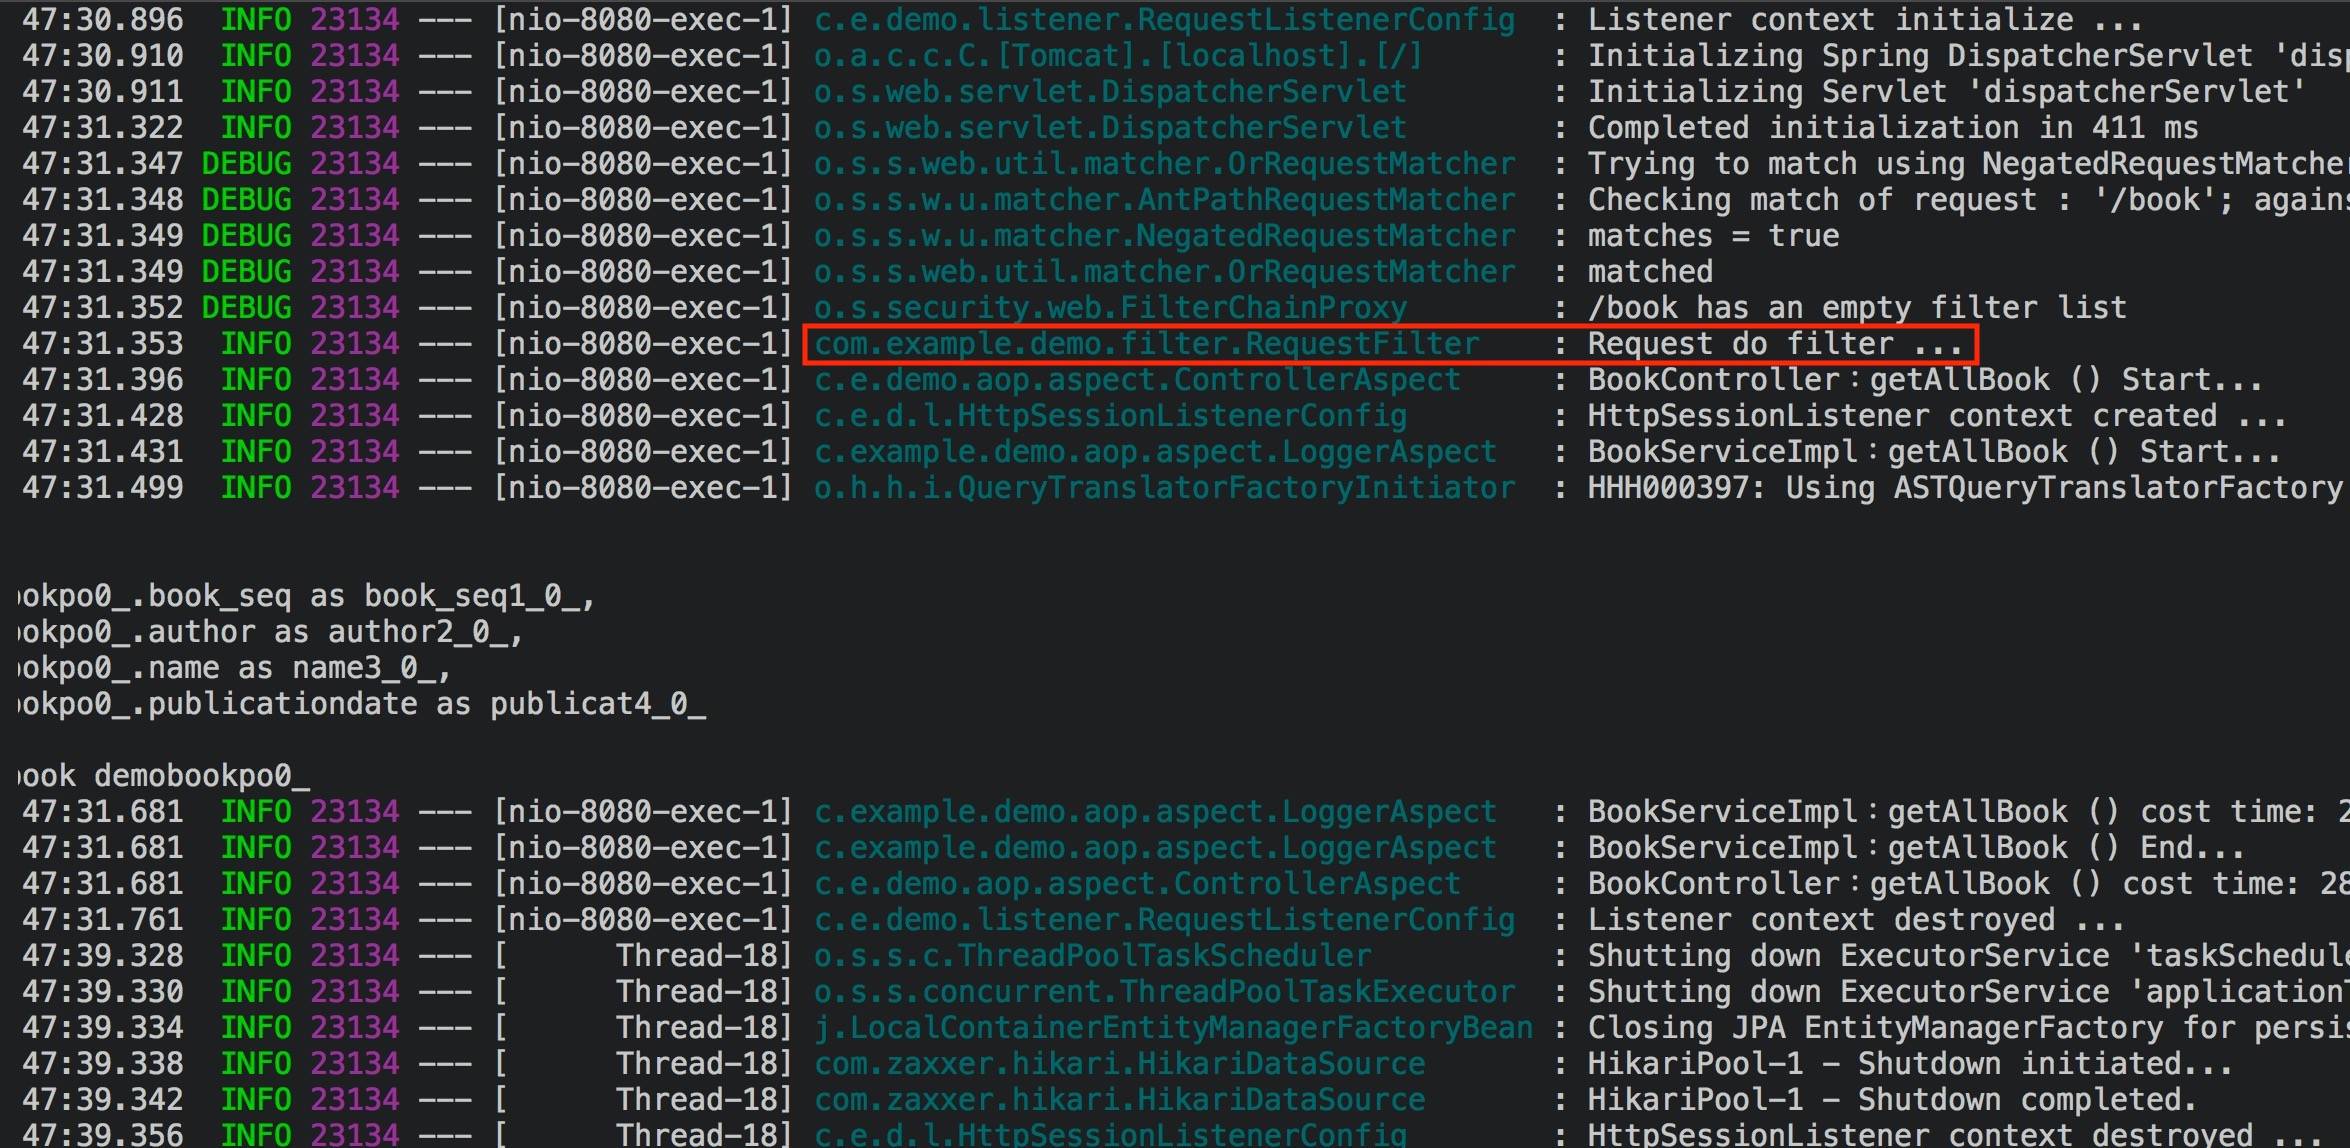
LOGGER.info("Request do filter ...");
chain.doFilter(request, response);
}
}@SpringBootApplication
@ServletComponentScan
public class DemoApplication {
public static void main(String[] args) {
SpringApplication.run(DemoApplication.class, args);
}
}2. 發動請求就可以看到過濾器執行的動作
攔截器 (Interceptor)
- 攔截器(Interceptor)是依賴於於Spring的框架,是基於Java的動態代理實現。用於切點來執行方法,避免過多重複的程式,可以用於記錄Log和全局的配置,非常類似aop(Aspect-Oriented Programming)。
- 通過實現 HandlerInterceptor接口,實現三種方法。
- preHandle():在請求前執行,回傳值為布林值,如果是true則通過攔截器,false則不通過攔截器。
- postHandle():請求處理完後執行。
- afterCompletion():請求及回應結束後執行。
- 透過Configuration配置攔截器,實現WebMvcConfigurer的interface,實現addInterceptors方法。
- 實現攔截器(Interceptor)
1. 建立攔截器
u 實現HandlerInterceptor
u 覆寫preHandle()、postHandle()、afterCompletion()方法
public class DemoInterceptor implements HandlerInterceptor {
private static final Logger LOGGER = LoggerFactory.getLogger(DemoInterceptor.class);
@Override
public boolean preHandle(HttpServletRequest request, HttpServletResponse response, Object handler) throws Exception {
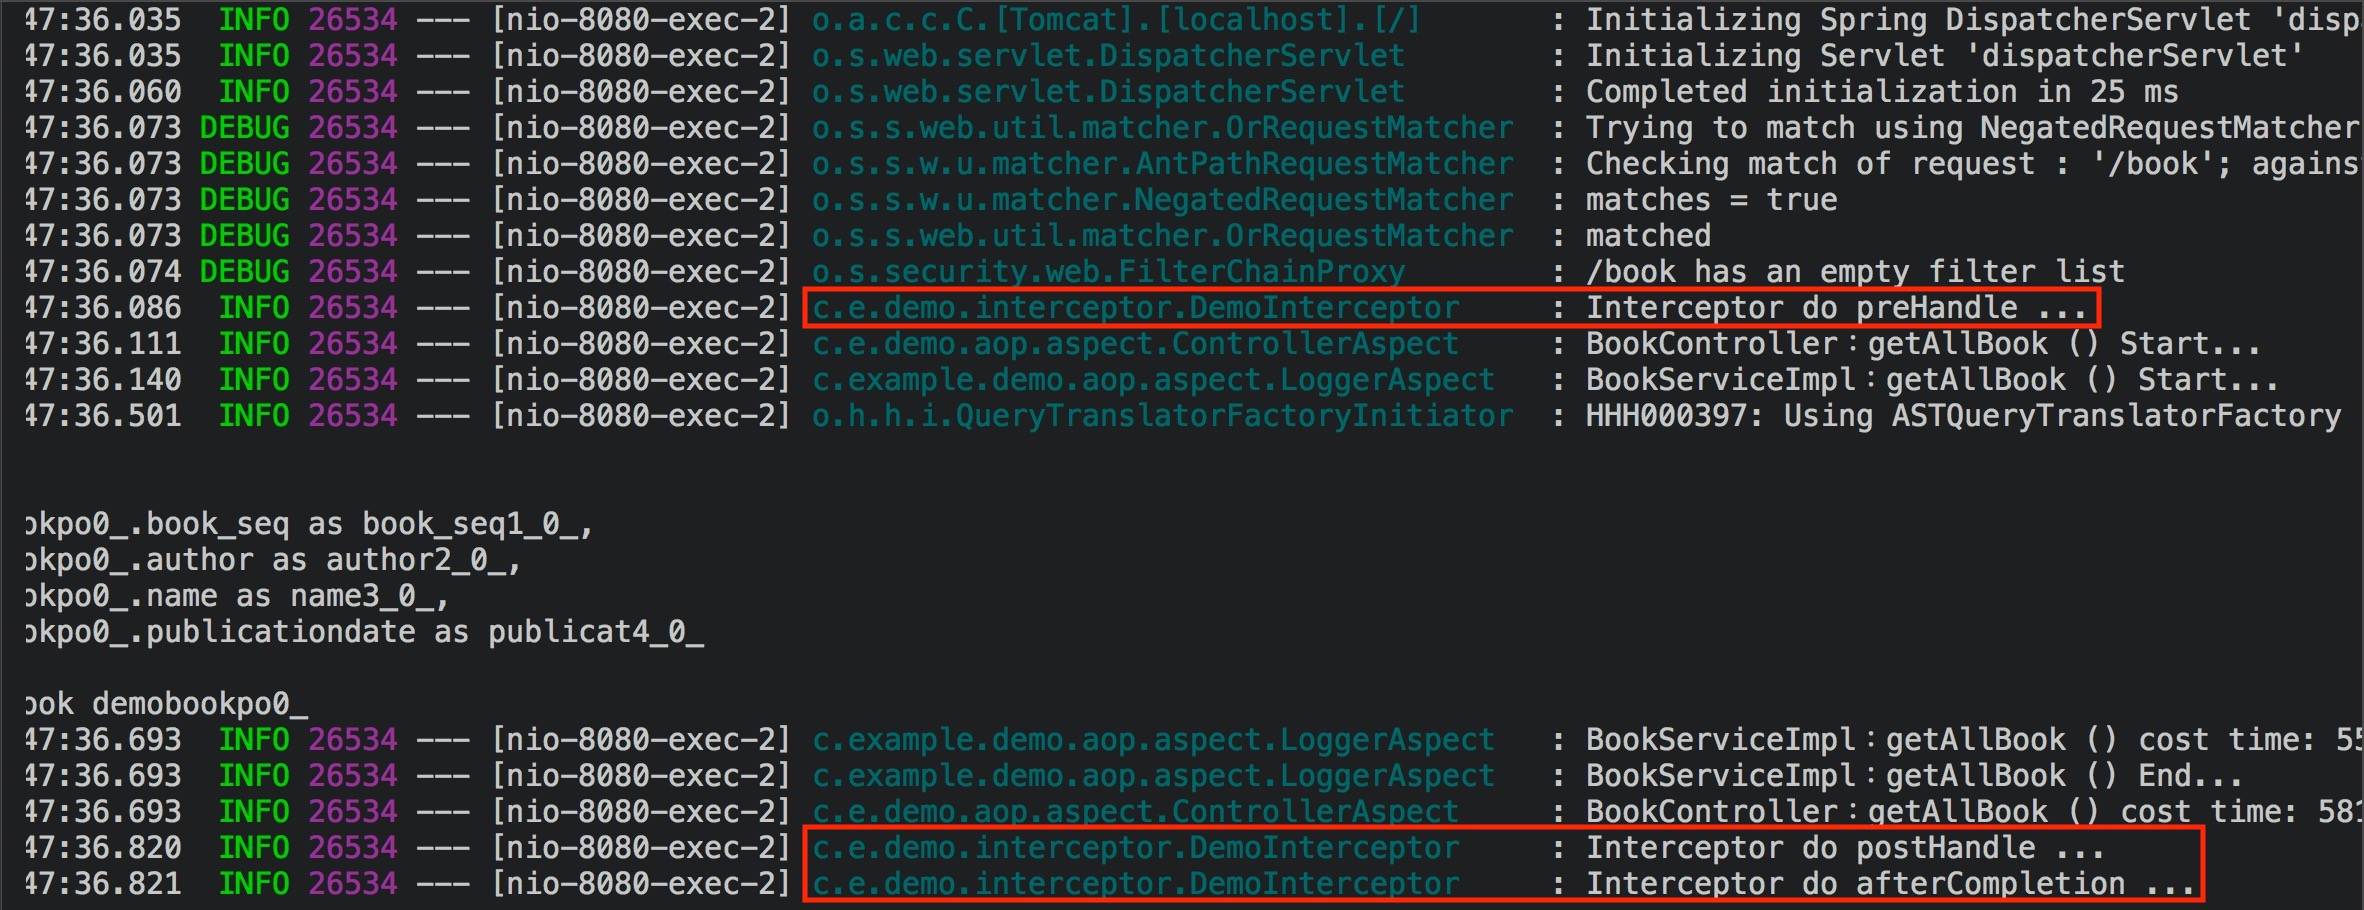
LOGGER.info("Interceptor do preHandle ...");
return true;
}
@Override
public void postHandle(HttpServletRequest request, HttpServletResponse response, Object handler, ModelAndView modelAndView) throws Exception {
LOGGER.info("Interceptor do postHandle ...");
}
@Override
public void afterCompletion(HttpServletRequest request, HttpServletResponse response, Object handler, Exception ex) throws Exception {
LOGGER.info("Interceptor do afterCompletion ...");
}
}2. 建立Web MVC的配置將此攔截器註冊進去
u 實現WebMvcConfigurer
u 覆寫addInterceptors()的方法
i. 使用addInterceptor()將攔截器註冊進去
ii. 使用addPathPatterns()告訴攔截器,需要攔截的路徑
u Configuration新增@Configuration
u Application新增@EnableWebMvc
攔截器
public class DemoInterceptor implements HandlerInterceptor {
    private static final Logger LOGGER = LoggerFactory.getLogger(DemoInterceptor.class);

    @Override
    public boolean preHandle(HttpServletRequest request, HttpServletResponse response, Object handler) throws Exception {
        LOGGER.info("Interceptor do preHandle ...");
        return true;
    }

    @Override
    public void postHandle(HttpServletRequest request, HttpServletResponse response, Object handler, ModelAndView modelAndView) throws Exception {
        LOGGER.info("Interceptor do postHandle ...");
    }

    @Override
    public void afterCompletion(HttpServletRequest request, HttpServletResponse response, Object handler, Exception ex) throws Exception {
        LOGGER.info("Interceptor do afterCompletion ...");
    }

}
Web MVC的配置
@Configuration
public class WebMvcConfig implements WebMvcConfigurer {

    @Override
    public void addInterceptors(InterceptorRegistry registry) {
        registry.addInterceptor(new DemoInterceptor()).addPathPatterns("/**");
    }

}
@SpringBootApplication
@EnableWebMvc
public class DemoApplication {
public static void main(String[] args) {
SpringApplication.run(DemoApplication.class, args);
}
}3. 發動請求就可以看到攔截器執行的動作
AOP (Aspect-Oriented Programming)
- AOP類似於攔截器,但Spring的aop功能更強大,且只需要簡單的配置就能輕鬆的達成目的。
- 定義AOP時,不需要像攔截器那麼麻煩,只需要透過註解就能實現
- AOP常用的註解
- @Aspect:定義java為一個切面類別。
- @Pointcut:定義一個節點,可以使用表達式定義。
- @Before:進入節點的開頭,開始執行切面的方法。
- @After:進入節點的結尾,開始執行切面的方法。
- @AfterReturning:進入節點的結尾且返回值時,開始執行切面的方法。
- @Around:在節點前後執行切面的方法,並控制和執行節點本身的內容。相對於@Before和@After的結合。
- @Order:定義aop執行的優先順序,order的值越小,會越被先執行。
- 實現AOP(Aspect-Oriented Programming)
1. 載入jar
u Gradle
dependencies {
	implementation('org.springframework.boot:spring-boot-starter-aop')
}
u Maven
<dependency>
    <groupId>org.springframework.boot</groupId>
    <artifactId>spring-boot-starter-aop</artifactId>
</dependency>
2. 建立AOP
u 新增@Aspect和@Component,讓Spring知道,這個類別為切面類別的組件。
u 新增@Around並且定義節點,節點定義在:只要經過RestController,就會執行切面的方法。
@Aspect
@Order(1)
@Component
public class ControllerAspect {
private static final Logger LOGGER = LoggerFactory.getLogger(ControllerAspect.class);
@Around(value = "within(@org.springframework.web.bind.annotation.RestController *)")
public Object controllerAround(ProceedingJoinPoint jp) throws Throwable {
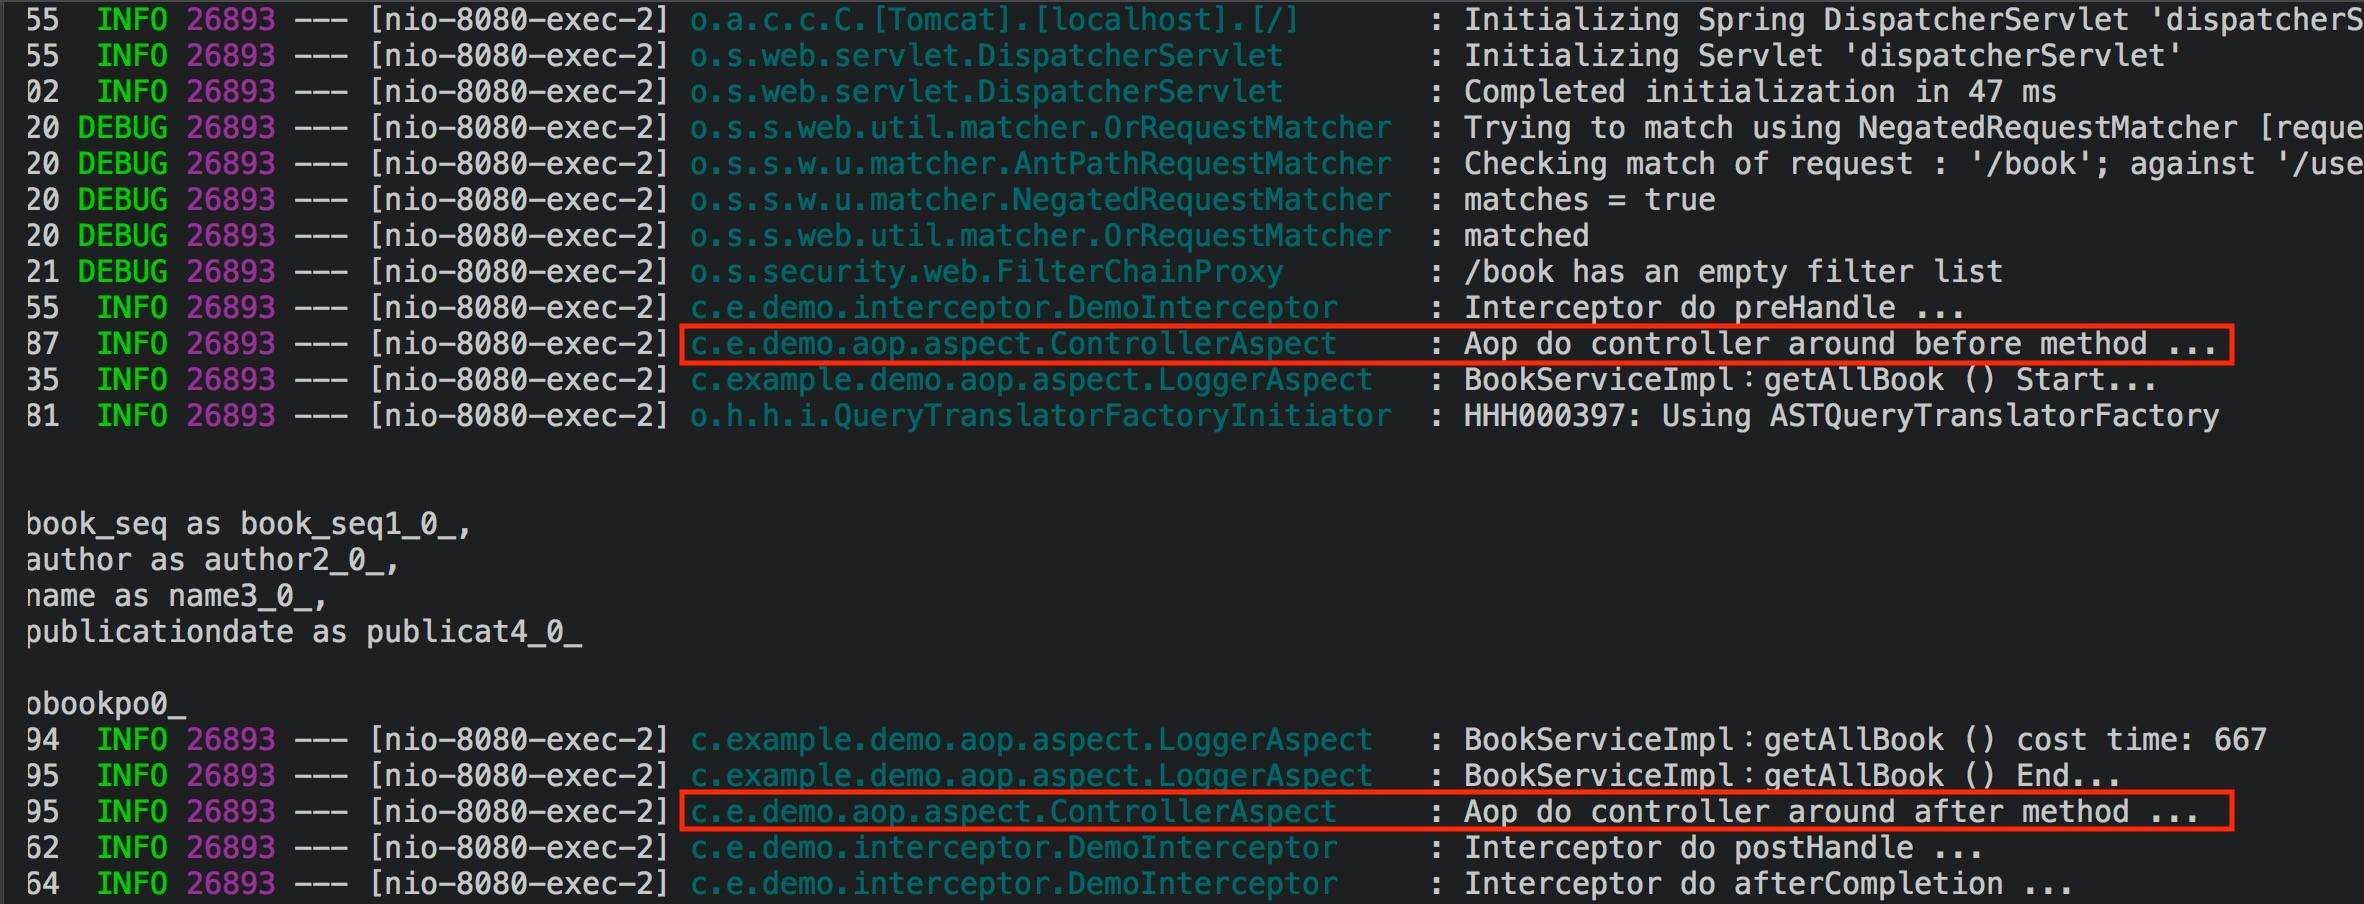
LOGGER.info("Aop do controller around before method ...");
Object result = jp.proceed();
LOGGER.info("Aop do controller around after method ...");
return result;
}
}3. 發動請求就可以看到切面類別執行的動作
執行順序
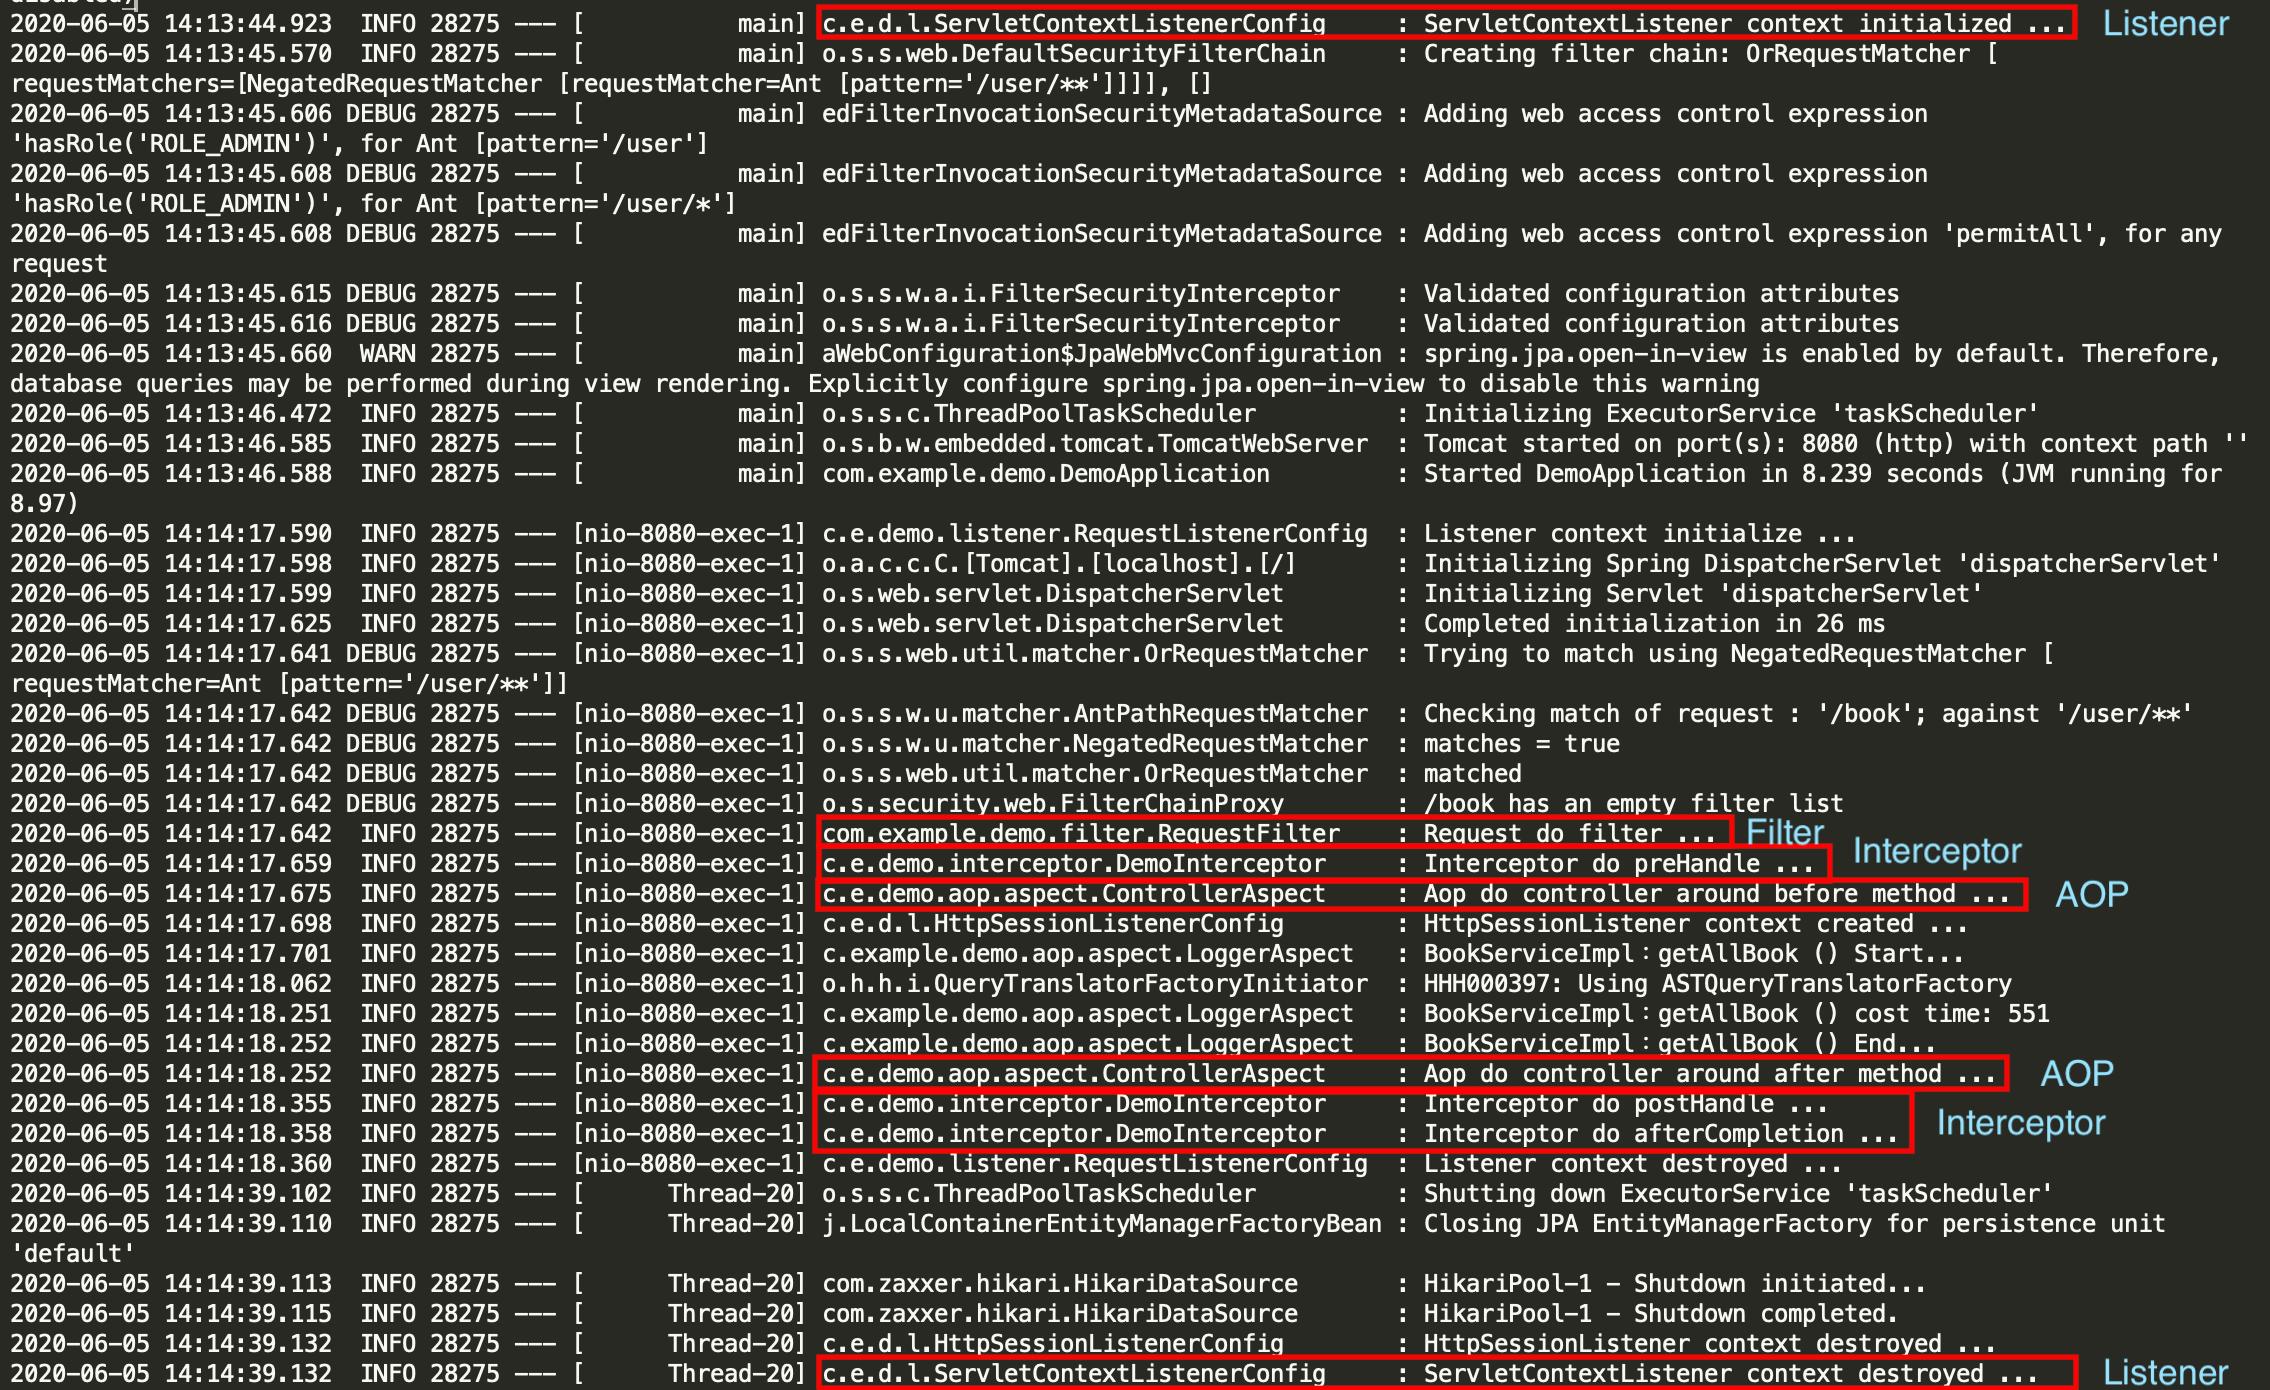
- 攔截的順序
Listener -> Filter -> Interceptor -> AOP -> 執行的方法 -> AOP -> Interceptor -> Filter -> Listener
結語
透過這些過濾或攔截的方式,不管是在對於請求的資料做驗證或修改,還是在每一個步驟必須執行的動作,都是可以有效且避免重複的程式出現,從Listener -> Filter -> Interceptor -> AOP,越後面,功能則是更細緻且更強大
換言之,順序也是越後面,請求首先進入Servlet,越早過濾或攔截,對於系統的性能的消耗也相對會變少,在開發時,必須根據實際的業務情況進行分析與評估,這樣就可以更有效的控制過濾器與攔截器。