從Avalon js轉換到Vue js - 基礎實用篇
練習前需要:
1.引入Vue CDN
<script src="https://cdn.jsdelivr.net/npm/vue/dist/vue.js"></script>2.在Chorom 或 Firefox 下載 除錯工具 - vue-devtools (可以較快理解vue原理,非常好用!!!)
一、建立Vue實例及v-model,v-text及v-html的用法:
     <div id="app">
        <h4>這是使用v-model雙向綁定,呈現文字方式</h4>
        <div class="form-group col-6 mt-3">
            <!-- input 標籤並透過 v-model 綁定我們所自訂的 msg 資料名稱 -->
            <input type="text" class="form-control" v-model="msg">
        </div>
        <!-- 將 msg 這個資料動態的呈現在畫面上 (在文字上呈現相同) -->
        <div>雙括號 -- {{ msg }}</div>
        <div>v-text綁定呈現msg--<span v-text="msg"></span></div>
        <div>v-html綁定呈現msg--<span v-html="msg"></span></div>
        <hr>
        <h4>這是要輸出html方式</h4>
        <h6>v-text綁定</h6>
        <div v-text="img"></div>
        <br>
        <h6>v-html綁定</h6>
        <div v-html="img"></div>
    </div>
var app = new Vue({
el:'#app', // 將 Vue 綁定我們所自訂(也就是最外層的<div id="app">)的元素上
data:{ // data 是用來:1.儲存元件內部狀態或資料 2.和 v-model 合作實現雙向綁定
msg:'',// 自訂的資料名稱(先定義原始值)
img:`<img src="https://picsum.photos/300/200?random=1"/>`
},
})
// 一個網頁上可以多個 Vue 實例,但在實務上只會建立一個Vue實例 ex:var app2..var app3....以此類推
# v-model用於兩種用法 :
1.基礎用法,用於表單輸入绑定,像是<input>、<textarea> 及 <select>
2.在组件(Vue Component)上使用 (變動來影響組件) 介紹組件時會再提到
#v-text VS. v-html
兩者其實在本質上的差異不同,讓我們來看看官方的介紹:
1.
v-text:如同更新 DOM 元素內容的 textContent 語法,若其中有原始內容,則會直接覆蓋。
2.
v-html:如同插入 DOM 元素內容的 innerHTML 語法,安全性較低,但支援 HTML 元素使用,常見為 img 用法。
**安全性**
由於 v-html 會解析 HTML 元素內容,因此,若是在表單或是留言區使用,很有可能會被有心人力從外部寫入惡意程式碼(script)。
因此,若是真的要使用的話,請特別確保資料來源是安全可靠的(比如說從自己資料庫輸入的),不要由使用者所提供的輸入值。
* Avalon與Vue使用方式:
1. avalon中的ms-controller 是作用域綁定($id: "app"),在Vue中使用id,註冊實例使用el掛載(el:'#app')
2. avalon中的ms-duplex="@text",在Vue中使用v-model="text"來做雙向綁定
3. avalon中的ms-text, ms-html,在Vue中使用v-text v-html
二、v-bind 的用法:
主要用於動態屬性綁定,像是class屬性,style屬性,value屬性,href屬性等等,只要是屬性,就可以用v-bind指令進行綁定。另外最方便的是還可以使用 v-bind 來動態傳遞父值到子值中=>props(父元件的數據需要透過 props 才能傳遞到子元件中)在下方component中會再做詳細介紹。
縮寫 " : " ( :src :class ....)
    <div id="app">
        <img :src="imgUrl" :alt="imgAlt">
        <div>
            <div class="box" :class="isShow ? 'show' : ''" :style="isShow ? 'display:block' : 'display:none'"></div>
            <p>我是觀察狀態 : {{ isShow }}</p>
        </div>
        <button class="btn btn-primary mt-1" type="button" @click="show">改變box顯示,及class名稱</button>
        <!-- 利用v-bind 動態綁定 class及style屬性 搭配v-on:click事件變動狀態
             當 isShow 為 true 時 class增加show 及 style為display:block,反之狀態。-->
    </div>
var app = new Vue({
el: '#app',
data: {
imgAlt: '我是圖片',
imgUrl: 'https://picsum.photos/300/200?random=1',
isShow:false
},
methods: {
show(){
this.isShow = !this.isShow
}
},
})
* Avalon與Vue使用方式:
1.類名切換(ms-class) :class
2.樣式绑定(ms-css) :style
3.屬性绑定(ms-attr) :src ...
三、v-on 事件監聽的用法:
說明:利用v-on指令,監聽網頁上的事件,並在觸發時,運行一些Vue定義的方法
縮寫 " @ " ( @click )
因為基本用法在官方已說明相當完整(其他篇已
做詳盡介紹),在此用第一個範例簡單呈現;然後下方第二個範例,會用scroll此方法做更進階的事件操作
(一)範例一:v-on官方定義方法基本使用:
     <div id="app">
        <div class="wrap" >
            <div>
                <!-- 文字的輸入欄位 -->
                <input type="text" class="form-control mt-3 col-6" v-on:keyup.enter="reverseText" v-model="text">
                <!-- 點擊反轉字串的按鈕 -->
                <button type="button" class="btn btn-primary mt-1" v-on:click="reverseText">反轉字串</button>
                <!-- 反轉字串後的顯示處 -->
                <div class="mt-3">
                    {{ newText }}
                </div>
            </div>
            <hr>
        </div>
    </div>
var app = new Vue({
el:"#app",
data:{
text:"",
newText:""
},
methods: {
reverseText:function(){
this.newText = this.text.split('').reverse().join('');
// this,是把資料指向既有的 data 內容。
},
},
})(二)範例二:進階用法@scroll事件:
scroll此事件監聽作法有兩種:
1.直接綁定在window階段,使用原生js監聽事件:
在created 或 mounted 裡監聽
document.addEventListener('scroll',function(){})
2.使用@scroll監聽滾動事件:
@scroll="scrollEvent",在methods執行。
    <div id="app2">
        <div class="wrap" >
             <!-- div 加 ref="box" 為了通過$refs獲取dom元素 -->
            <h6>1.使用原生js監聽事件</h6>
            <div class="box" id="divBox1" ref="box1">
                <img src="https://picsum.photos/500/400?random=1" alt="">
                <img src="https://picsum.photos/500/400?random=1" alt="">
                <img src="https://picsum.photos/500/400?random=1" alt="">
                <img src="https://picsum.photos/500/400?random=1" alt="">
            </div>
            <hr>
            <h6>2.使用@scroll監聽滾動事件</h6>
            <div class="box" id="divBox2" ref="box2" @scroll="scrollEvent">
                <img src="https://picsum.photos/500/400?random=1" alt="">
                <img src="https://picsum.photos/500/400?random=1" alt="">
                <img src="https://picsum.photos/500/400?random=1" alt="">
                <img src="https://picsum.photos/500/400?random=1" alt="">
            </div>
        </div>
    </div>
var app2 = new Vue({
el:"#app2",
mounted() {
this.box = this.$refs.box1
this.box.addEventListener('scroll', () => {
let boxScrollTop1 = this.$refs.box1.scrollTop;
console.log('原生js監聽事件boxScrollTop1:',boxScrollTop1)
}, false)
},
methods: {
scrollEvent:function(e){ //我是2.使用@scroll監聽滾動事件
let boxScrollTop2 = this.$refs.box2.scrollTop;
console.log('我是@scroll監聽事件boxScrollTop2:',boxScrollTop2);
}
},
})注意:scroll事件 會遇到無法監測問題
解決方法:
1. 設定div高度及overflow
    .box {
          overflow: auto;
          height: 100vh;
     }
2.利用fixed定位
    .box {
           position: fixed;
           top:0;
           left: 0;
           right:0;
           bottom: 0;
           overflow: auto
     }
* Avalon與Vue使用方式:
事件绑定(ms-on,……) v-on:click ...@click
四、v-if, v-else, v-else-if 及 v-if vs v-show的用法:
說明:v-if用於條件的方式渲染一個區塊,當指令的內容回傳值為true時,會置入該區塊的結構內容。
(一)使用v-if,v-else切換物件呈現
        <div class="alert alert-success" v-if="isSuccess">成功!</div>
        <div class="alert alert-danger" v-else="!isSuccess">失敗!</div>
        <div class="form-control" style="width: 30%;margin: 20px;">
            <input type="checkbox" class="form-check-checkbox" name="" id="checkbox" v-model="isSuccess">
            <label class="form-check-label" for="checkbox">切換狀態</label>
        </div>
checkbox 利用 v-model 來綁定isSuccess變數改變顯示alert,isSuccess預設值為true。
當isSuccess 為 true 時,符合v-if="isSuccess"畫面顯示為 成功!;點擊checkbox改變isSuccess 等於 false 時,符合v-else="!isSuccess"畫面顯示為 失敗!
(二)使用v-else-if做出分頁頁籤
<ul class="nav nav-tabs">
             <li class="nav-item">
                 <a class="nav-link" :class="{'active':link == 'a'}" v-on:click.prevent="link = 'a'" href="#">
                     分頁1
                 </a>
            </li>
             <li class="nav-item">
                 <a class="nav-link" :class="{'active':link == 'b'}" v-on:click.prevent="link = 'b'" href="#">
                     分頁2
                 </a>
            </li>
             <li class="nav-item">
                 <a class="nav-link" :class="{'active':link == 'c'}" v-on:click.prevent="link = 'c'" href="#">
                     分頁3
                 </a>
            </li>
         </ul>
         <div class="content mt-3">
            <div v-if="link == 'a'">內容1</div>
            <div v-else-if="link == 'b'">內容2</div>
            <div v-else-if="link == 'c'">內容3</div>
         </div>
解析:
1. v-on:click.prevent事件切換link資料內容,例如:點擊分頁2時,link值變更為b
2. :class="{}"依照link資料內容變動切換active
3. v-if 及 v-else-if的條件來變更頁籤內容,例如:link == 'b' 時,顯示 內容2 資料
(三)v-if vs v-show
        <div class="content mt-3" >
            <div v-if="!isShow">
                <img src="https://picsum.photos/500/400?random=1" alt="">
            </div>
            <div v-show="!isShow">
                <img src="https://picsum.photos/500/400?random=2" alt="">
            </div>
            <button class="btn btn-primary mt-1" type="button" @click="toggle">圖片開關</button>
        </div>
var app = new Vue({
el:'#app',
data:{
isSuccess: true, //切換成功失敗開關
link:"a", //讓一開始頁籤出現在分頁1
isShow: false //圖片開關
},
methods: {
toggle(){
this.isShow = !this.isShow;
}
},
})v-if 與 v-show 的差異:
1.是否有else情況
使用上,差異在於是否有 else 的狀況。若有其他狀況,則使用v-if;否則v-if和v-show效果相同。
2.DOM元素隱藏與否
(1)v-if
注:會完整移除 DOM 元素,使其從 DOM 結構上消失。當使用此方法切換 Vue 元件時,元件的生命週期會重新計算。
* isShow = true :
使用v-if只會出現符合條件的 DOM 元素,進而渲染畫面。
* isShow = false :
在DOM 元素上,完全消失 變成
(2)v-show (就是改變style css)
注:DOM 元素不會被移除,只有讓物件從視覺上不可見。
* isShow = true :
style = display:block 顯現
* isShow = false :
style = display:none隱藏
3.是否可搭配template使用
<template>可用v-if決定是否出現,但無法使用v-show。
* Avalon與Vue使用方式:
顯示绑定(ms-visible) v-show
條件绑定(ms-if) v-if, v-else, v-else-if
五、v-for
可以針對一組陣列或物件進行渲染
(一)陣列渲染
        <ul>
            <li v-for="(item , index) in arrayData">
                    {{ index }} - {{ item.name }} {{ item.age }} 歲
             </li>
        </ul>
item:陣列迭代的元素別名,名稱可自訂,使用item.name或item.age可帶出資料的屬性。
index:陣列則為該迭代的索引位置
array:是陣列或資料的來源
(二)物件渲染
       <ul>
            <li v-for="(item,key,index ) in objectData">
                {{ key }} - {{ index }} - {{ item.name }} {{ item.age }} 歲
            </li>
       </ul>
item:陣列迭代的元素別名,名稱可自訂,使用item.name或item.age可帶出資料的屬性。
key 是鍵值(該迭代的物件屬性)
index:物件則為該迭代的索引位置
objectData:是物件或資料的來源
參數 key 會呈現 ObjectData [0]、ObjectData [1]、ObjectData [2],相對應的資訊為 ming、hua、jay。
此外,可透過 :key="item.age" 取得該筆資料的唯一值,避免資料渲染時有錯誤產生。
(三)v-for :key使用
由於 v-for 在運作上是採用快速替換的形式。因此,有部分元素會沒有完整的被替換,可參考以下範例:
        <h6>缺少 :key</h6>
        <ul>
            <li v-for="(item, index) in arrayData" >
            {{ index }} - {{ item.name }} {{ item.age }} 歲 <input type="text">
            </li>
        </ul>
        <h6>加上 :key</h6>
        <ul>
            <li v-for="(item, index) in arrayData" :key="item.age">
            {{ index }} - {{ item.name }} {{ item.age }} 歲 <input type="text">
            </li>
        </ul>
        <button class="btn btn-outline-primary" @click="reverseArray">反轉陣列</button>
ps.v-for的全部範例js:
        var app = new Vue({
            el:"#app",
            data:{
                arrayData:[
                    { name: "小明", age:16 },
                    { name: "大華", age:26 },
                    { name: "阿傑", age:20 }
                ],
                objectData:{
                    ming: { name:"小明", age:17 },
                    hua: { name:"大華", age:26 },
                    jay: { name:"阿傑",age:20 }
                }
            },
            methods: {
                reverseArray: function () {
                    this.arrayData.reverse()
                    console.log(this.arrayData)
                }
            },
        })
注意:
避免 v-if 和 v-for 用在一起
為了避免不要的錯誤,Vue.js 的規範中建議不要將 v-for 與 v-if 混合使用。搭配進階工具如 Vue Cli 及 ESLint 時,兩者混合使用會跳出錯誤。
參考資料:https://cn.vuejs.org/v2/style-guide/#避免-v-if-和-v-for-用在一起-必要
* Avalon與Vue使用方式:
迴圈绑定(ms-for) v-for
注意,v-for和ms-for item和index順序不一致
ms-for="(index, item) in @list" => v-for="(item, index) in list
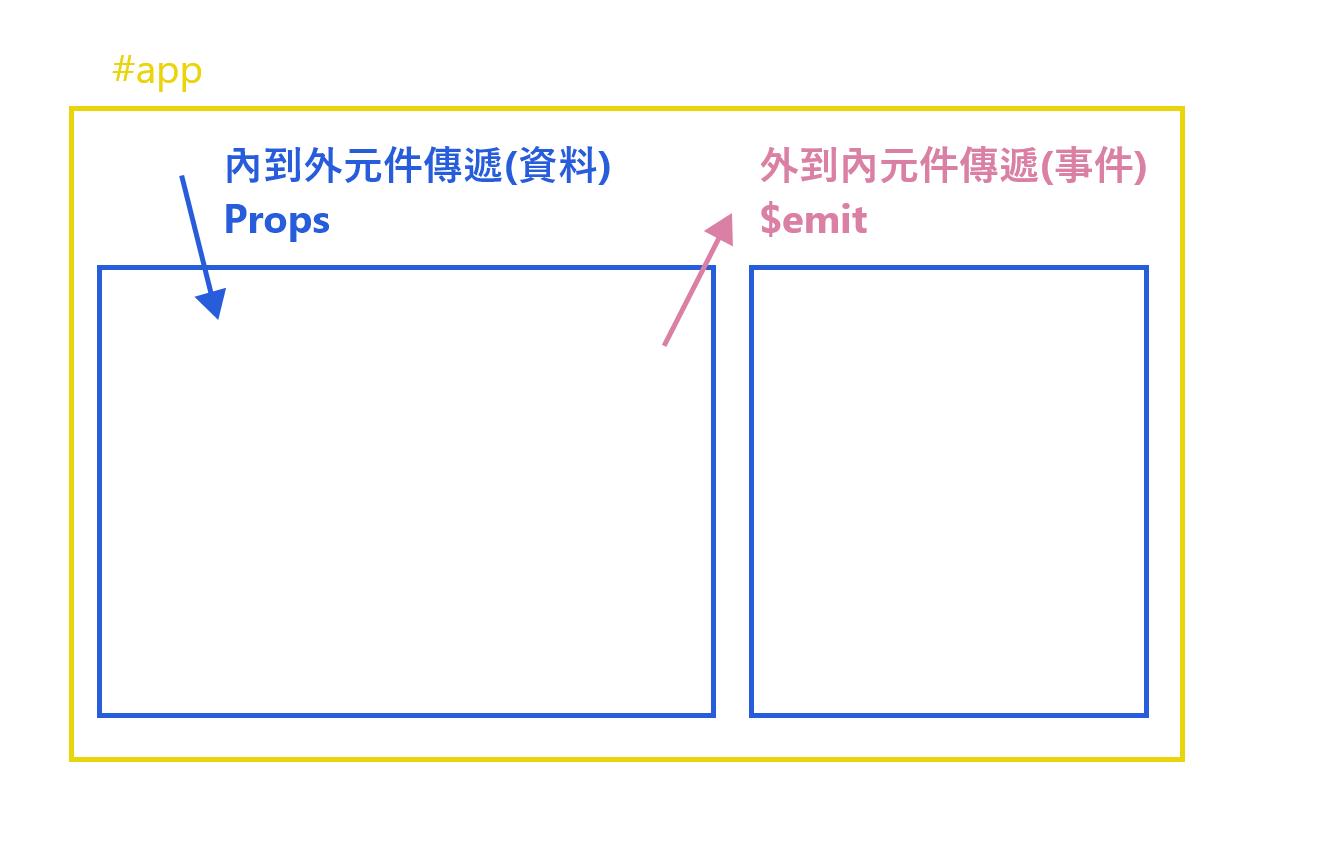
六、component 元件
(一)什麼是元件?
Vue主要是以Vue component 元組成,而每個component中的data都是互相獨立的,資料在傳遞(傳值)需仰賴主要兩種做法(還有其他...):
1.props:由父傳子,特性為資料一更新,傳入data,隨即更新頁面。(向內部組件傳遞數據)
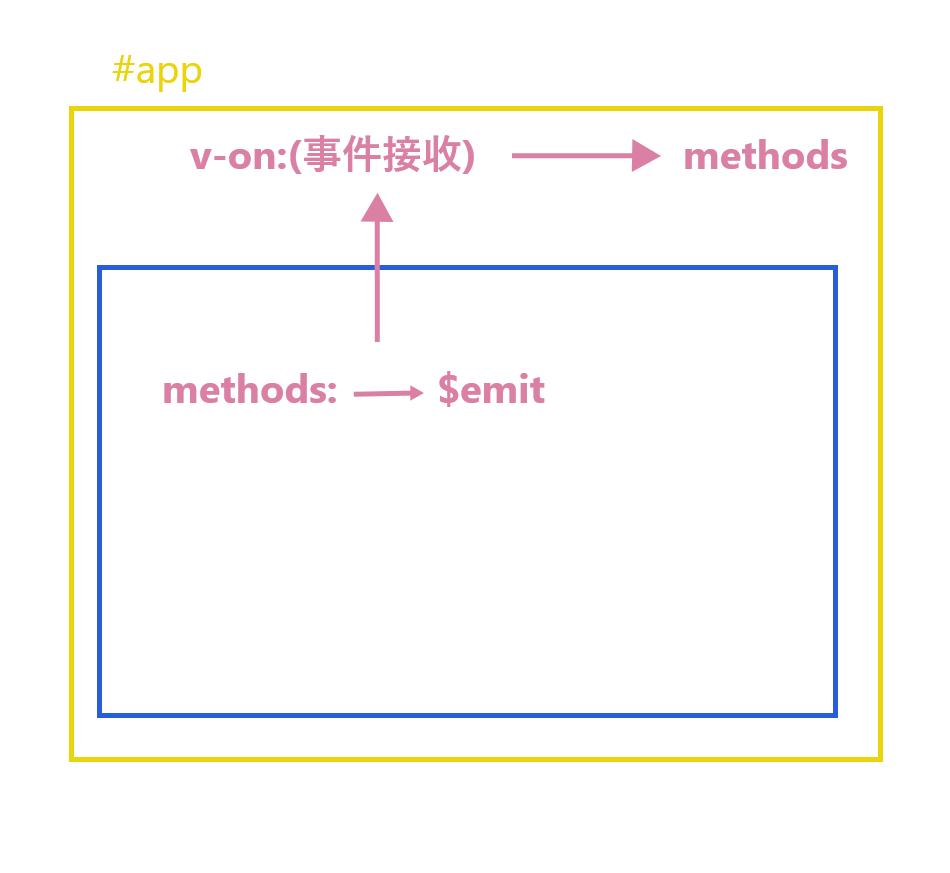
2.emit:由子傳父,特性為事件觸發才更新,屬事件類型。(觸發事件將資料往外送)
(二)為什麼需要元件?
1.避免單一個檔案過大
2.會共用到的部分,可以單獨拉出來,以方便重複使用及管理。
(三)元件使用的方式:
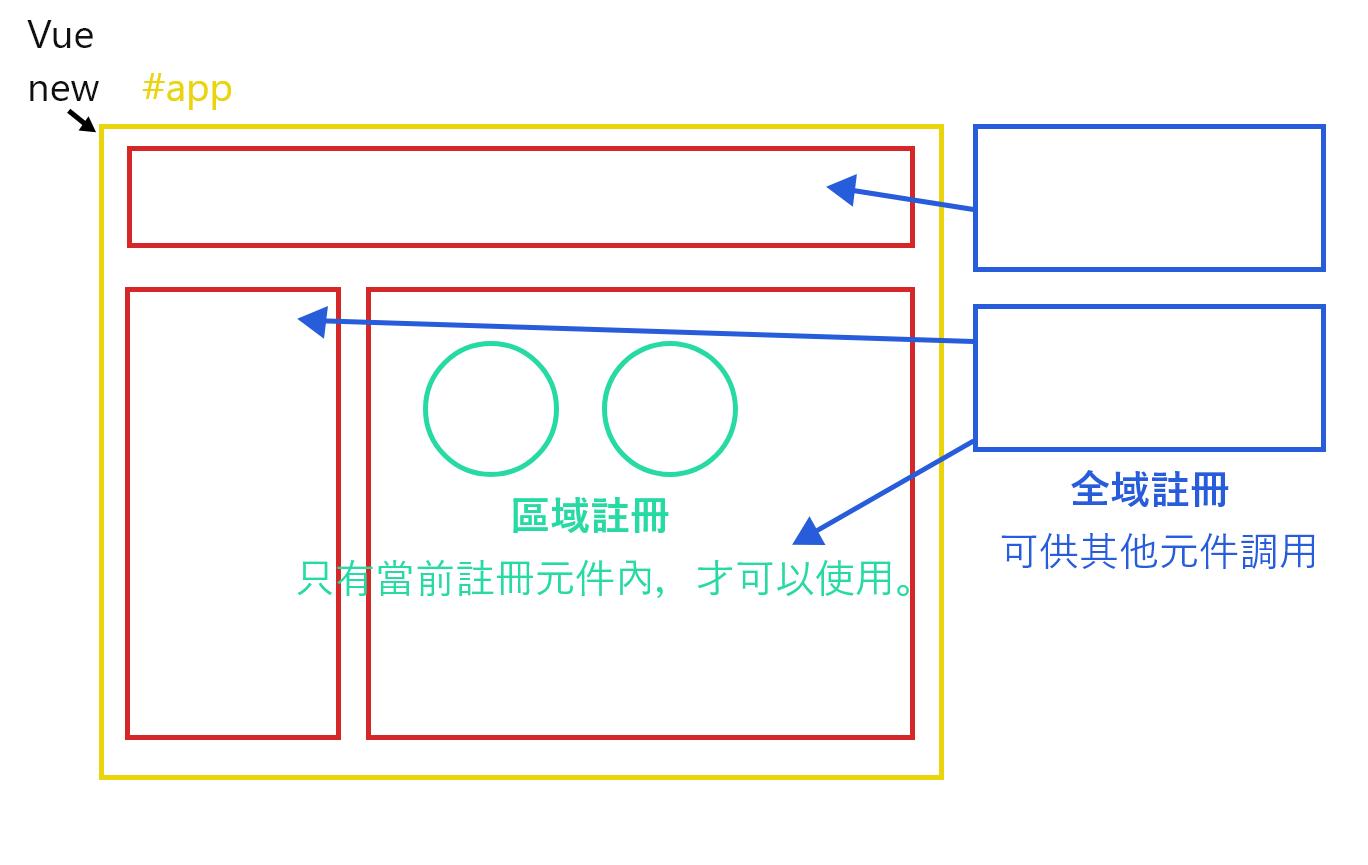
1.全域註冊:
   //整個Vue內其他元件都可以使用。
     Vue.component('元件名稱',{  //元件名稱 ex:'component-layout'
            template:`html內容`,
   });
2.區域註冊:
  //只有當前註冊元件內,才可以使用。
   var app = new Vue({
      components: { //component`s`,有s喔
      '元件名稱':{ //元件名稱 ex:'component-local'
       template: `html內容`,
         }
      }
   })
(四)元件模板引用:
1.Template Literial:
使用方法:template中,通過樣板字面值(反引號),填入HTML內容。
template: `html內容`2.x-template
使用方式:
在 <script> 元素中,帶上 text/x-template 的類型,通過 id 將模板引用。
因為隨著專案越來越大,為了方便閱讀及管理,可以把 html 結構拉出來。(但目前有cli,若初學練習時覺得最好用的方式)
<script type="text/x-template" id="my-component">
   <div>
       <h5 class="card-title">{{ text }}</h5>
   </div>
</script>
Vue.component('my-component', {
                template: '#my-component'
});
* 注意:此方式有雷點
不能在外層暴露結構,也就是必須要有 div 包著 h5,否則會報錯
(五)元件中 data 必須是函式:
每個元件都是獨立的,如果它們共用一個物件(函式),在更改資料時,會影響其他元件,因此必須是函式,才不會互相干擾。
(六)元件資料傳遞:props,$emit .sync, v-model
在Vue的世界 component資料都是單向傳輸的(單向資料流)
1. 父傳子值 props (外元件傳內元件)
以資料形式,將資料由父層元件傳遞到子層元件 (資料)
    <div id="app">
         <h5>我是父元件:{{ msg }}</h5>
         <!-- 1-1. 父元件中 msg 資料 -->
         <hr>
         <my-component v-bind:parent-msg="msg"></my-component>
         <!--
             1-2.
             利用 v-bind 傳值給子元件(動態傳遞) ps.靜態傳遞不需加v-bind
             解析:
             parent-msg ->是子元件接收值的名稱
             msg -> 父元件的資料
         -->
    </div>
<!-- x-template 子元件 -->
<script type="text/x-template" id="myComponent">
<div class="component">
<div>接收父元件資料:{{ parentMsg }}</div>
</div>
</script> //全域註冊 (我是子元件的)
Vue.component('my-component',{
props:["parentMsg"], //1-3.透過props將:parent-msg屬性傳入元件
template:`#myComponent`,
});
// 我是父元件的
var app = new Vue({
el: '#app',
data: {
msg:'---我要傳值給子層元件--'
},
})2.子傳父emit(內元件傳外元件)
以事件的形式傳遞資料,由子元件內容將資料傳遞到父元件 (事件)
    <div id="app2">
        <hr>
        <p>我是子元件傳過來的值:{{ message }}</p>
        <hr>
        <p>
            <!-- 子元件 my-emit 顯現-->
            <my-emit @update="selfUpdate"></my-emit>
            <!-- 1.selfUpdate自定義父元件事件 -->
        </p>
    </div>
由於子元件的props:["parentMsg"]的值,是不可更動的,需要藉由$emit,.sync修飾符或v-model方式,讓他的值可以被動態更改。
3.動態變更值 (prop 進行'雙向綁定')
(1)$emit
由props父傳子,再由$emit 由子傳回父,形成循環傳值
    <div id="app3">
        <hr>
        <h5>$emit我要做一個開關,開modal</h5>
        <p>觀察開關{{ isShow }}</p>
        <button type="button" @click="openModal">打開modal</button>
        <emsg-modal :is-show="isShow" v-on:switch="upSwitch"></emsg-modal>
        <!-- 2. :is-show 動態傳值到子元件 isShow 是父元件資料 -->
    </div>
<!-- x-template 子元件 -->
<script type="text/x-template" id="emsgModal">
<div v-if="isShow" class="emsgModal">
<div class="content">
<p>我是內容1</p>
<button type="button" @click="closeModal">關閉modal</button>
<!-- 5.利用點擊事件 -->
</div>
</div>
</script> // 全域註冊 子元件
Vue.component('emsg-modal',{
template:`#emsgModal`,
props:{
isShow:Boolean //3.透過props將:is-show屬性傳入元件
},
methods: {
closeModal(){
this.$emit('switch',false)
// 6.使用$emit方法把值傳到父元件 :isShow接收的資料 ,false直接給值
}
},
})
// 我是父元件的
new Vue({
el:'#app3',
data:{
isShow:false
},
methods:{
openModal(){
this.isShow = true; // 1.打開msg-modal
},
upSwitch(data){ // 7.接收值
console.log(data)
this.isShow = data // 8.改值
}
}
})(2) .sync 修飾符 (此方法較方便,不需再父元件用v-on:打入方法改值)
    <div id="app4">
        <hr>
        <h5>.sync 我要做一個開關,開modal</h5>
        <p>觀察開關{{ isShow }}</p>
        <button type="button" @click="openModal">打開modal</button>
        <smsg-modal :is-show.sync="isShow"></smsg-modal>
        <!-- 2. :is-show.sync 動態傳值到子元件 isShow 是父元件資料 -->
    </div>
<!-- x-template 子元件 -->
<script type="text/x-template" id="smsgModal">
<div v-if="isShow" class="msgModal">
<div class="content">
<p>我是內容2</p>
<button type="button" @click="closeModal">關閉modal</button>
<!-- 5.利用點擊事件 -->
</div>
</div>
</script> // 全域註冊 子元件
Vue.component('smsg-modal',{
template:`#smsgModal`,
props:{
isShow:Boolean //3.透過props將:is-show屬性傳入元件
},
methods: {
closeModal(){
this.$emit('update:isShow',false)
// 6.使用$emit方法把值傳到父元件 :isShow接收的資料 ,false直接給值
}
},
})
// 我是父元件的
new Vue({
el:'#app4',
data:{
isShow:false
},
methods:{
openModal(){
this.isShow = true; // 1.打開msg-modal
}
}
})(3) v-model
一個組件上的 v-model 默認會利用名為 value 的 prop 和名為 input 的事件
    <div id="app5">
        <hr>
        <h5> v-model 我要做一個開關,開modal</h5>
        <p>觀察開關{{ isShow }}</p>
        <button type="button" @click="openModal">打開modal</button>
        <msg-modal v-model="isShow"></msg-modal>
        <!-- 2. 使用雙向動態綁定v-model傳值到子元件 isShow 是父元件資料 -->
    </div>
<!-- x-template 子元件 -->
<script type="text/x-template" id="msgModal">
<div v-if="value" class="msgModal">
<div class="content">
<p>我是內容2</p>
<button type="button" @click="closeModal">關閉modal</button>
<!-- 5.利用點擊事件 -->
</div>
</div>
</script> // 全域註冊 子元件
Vue.component('msg-modal',{
template:`#msgModal`,
props:{
value:Boolean //3.透過props將:value屬性傳入元件
},
methods: {
closeModal(){
this.$emit('input', !this.value)
// 6.使用$emit方法把值傳到父元件
}
},
})
// 我是父元件的
new Vue({
el:'#app5',
data:{
isShow:false
},
methods:{
openModal(){
this.isShow = true; // 1.打開msg-modal
}
}
})這幾種方法使用起來得出結果都一樣,其中兩個需要注意,在Vue 3.x版中 .sync 修飾符 已被取消,而v-model在Vue 2.x版中只能傳一組資料,但是在Vue 3.x版新增了多組v-model!所以,總結來說,這幾種方法,選自己需要即可。
以上傳值方法都是父子間傳值,那如果要網狀(跨區,元件跟元件(同層級))要如何傳值?答案是:Vuex但在此,不會做介紹...
或許你會想,那event bus可以嗎?據查詢各資料得出結果小專案,可能會用,但中大型專案,不推薦,因為維護不易,還有在Vue3.x版中已被取消(據說有其他方式!?)
七、$refs的用法:
1. 可取得DOM元素資訊
    <div id="app">
        <h5>$refs</h5>
        <!--
            1.取得DOM元素資訊
        -->
        <div ref="child">
            <child-component></child-component>
        </div>
        <button @click="showDOM">我要取得子元件的DOM元素</button>
    </div>
// 子元件
Vue.component('child-component', {
template: `<div class="box" style="height: 200px;background: #ccc;">
子元件
</div>`,
});
var app = new Vue({
el:'#app',
methods: {
showDOM(){
let boxHeight = this.$refs.child.clientHeight;
console.log('用$refs取得div高:',boxHeight);
}
},
})2.從父元件取得子元件的資料(執行子元件function)
    <div id="app2">
        <h5>$refs</h5>
        <data-component ref="data"></data-component>

        我是取子元件的值{{ total }}
        <button @click="getValue">我要取得子元件的-值-</button>
        <button @click="executiveFunction">我要執行子元件的-function-</button>
    </div>
// 子元件
Vue.component('data-component', {
template: `<div class="box" style="height: 200px; border:1px solid #ccc;">
子元件
{{ count }}
</div>`,
data() {
return {
count:0
}
},
methods:{
addCount(){
this.count++;
}
}
});
var app = new Vue({
el:'#app2',
data(){
return {
total:0
}
},
methods: {
getValue(){
this.total = this.$refs.data.count;
console.log('取得子元件的值:',this.total);
},
executiveFunction(){ // 執行子元件的function
let showAddCount = this.$refs.data.addCount();
}
},
})注意:ref在元件內是獨立的,名稱必須唯一(類似DOM的id)
這個方法無敵好用的!讓你不再害怕怎麼和元件溝通~~~
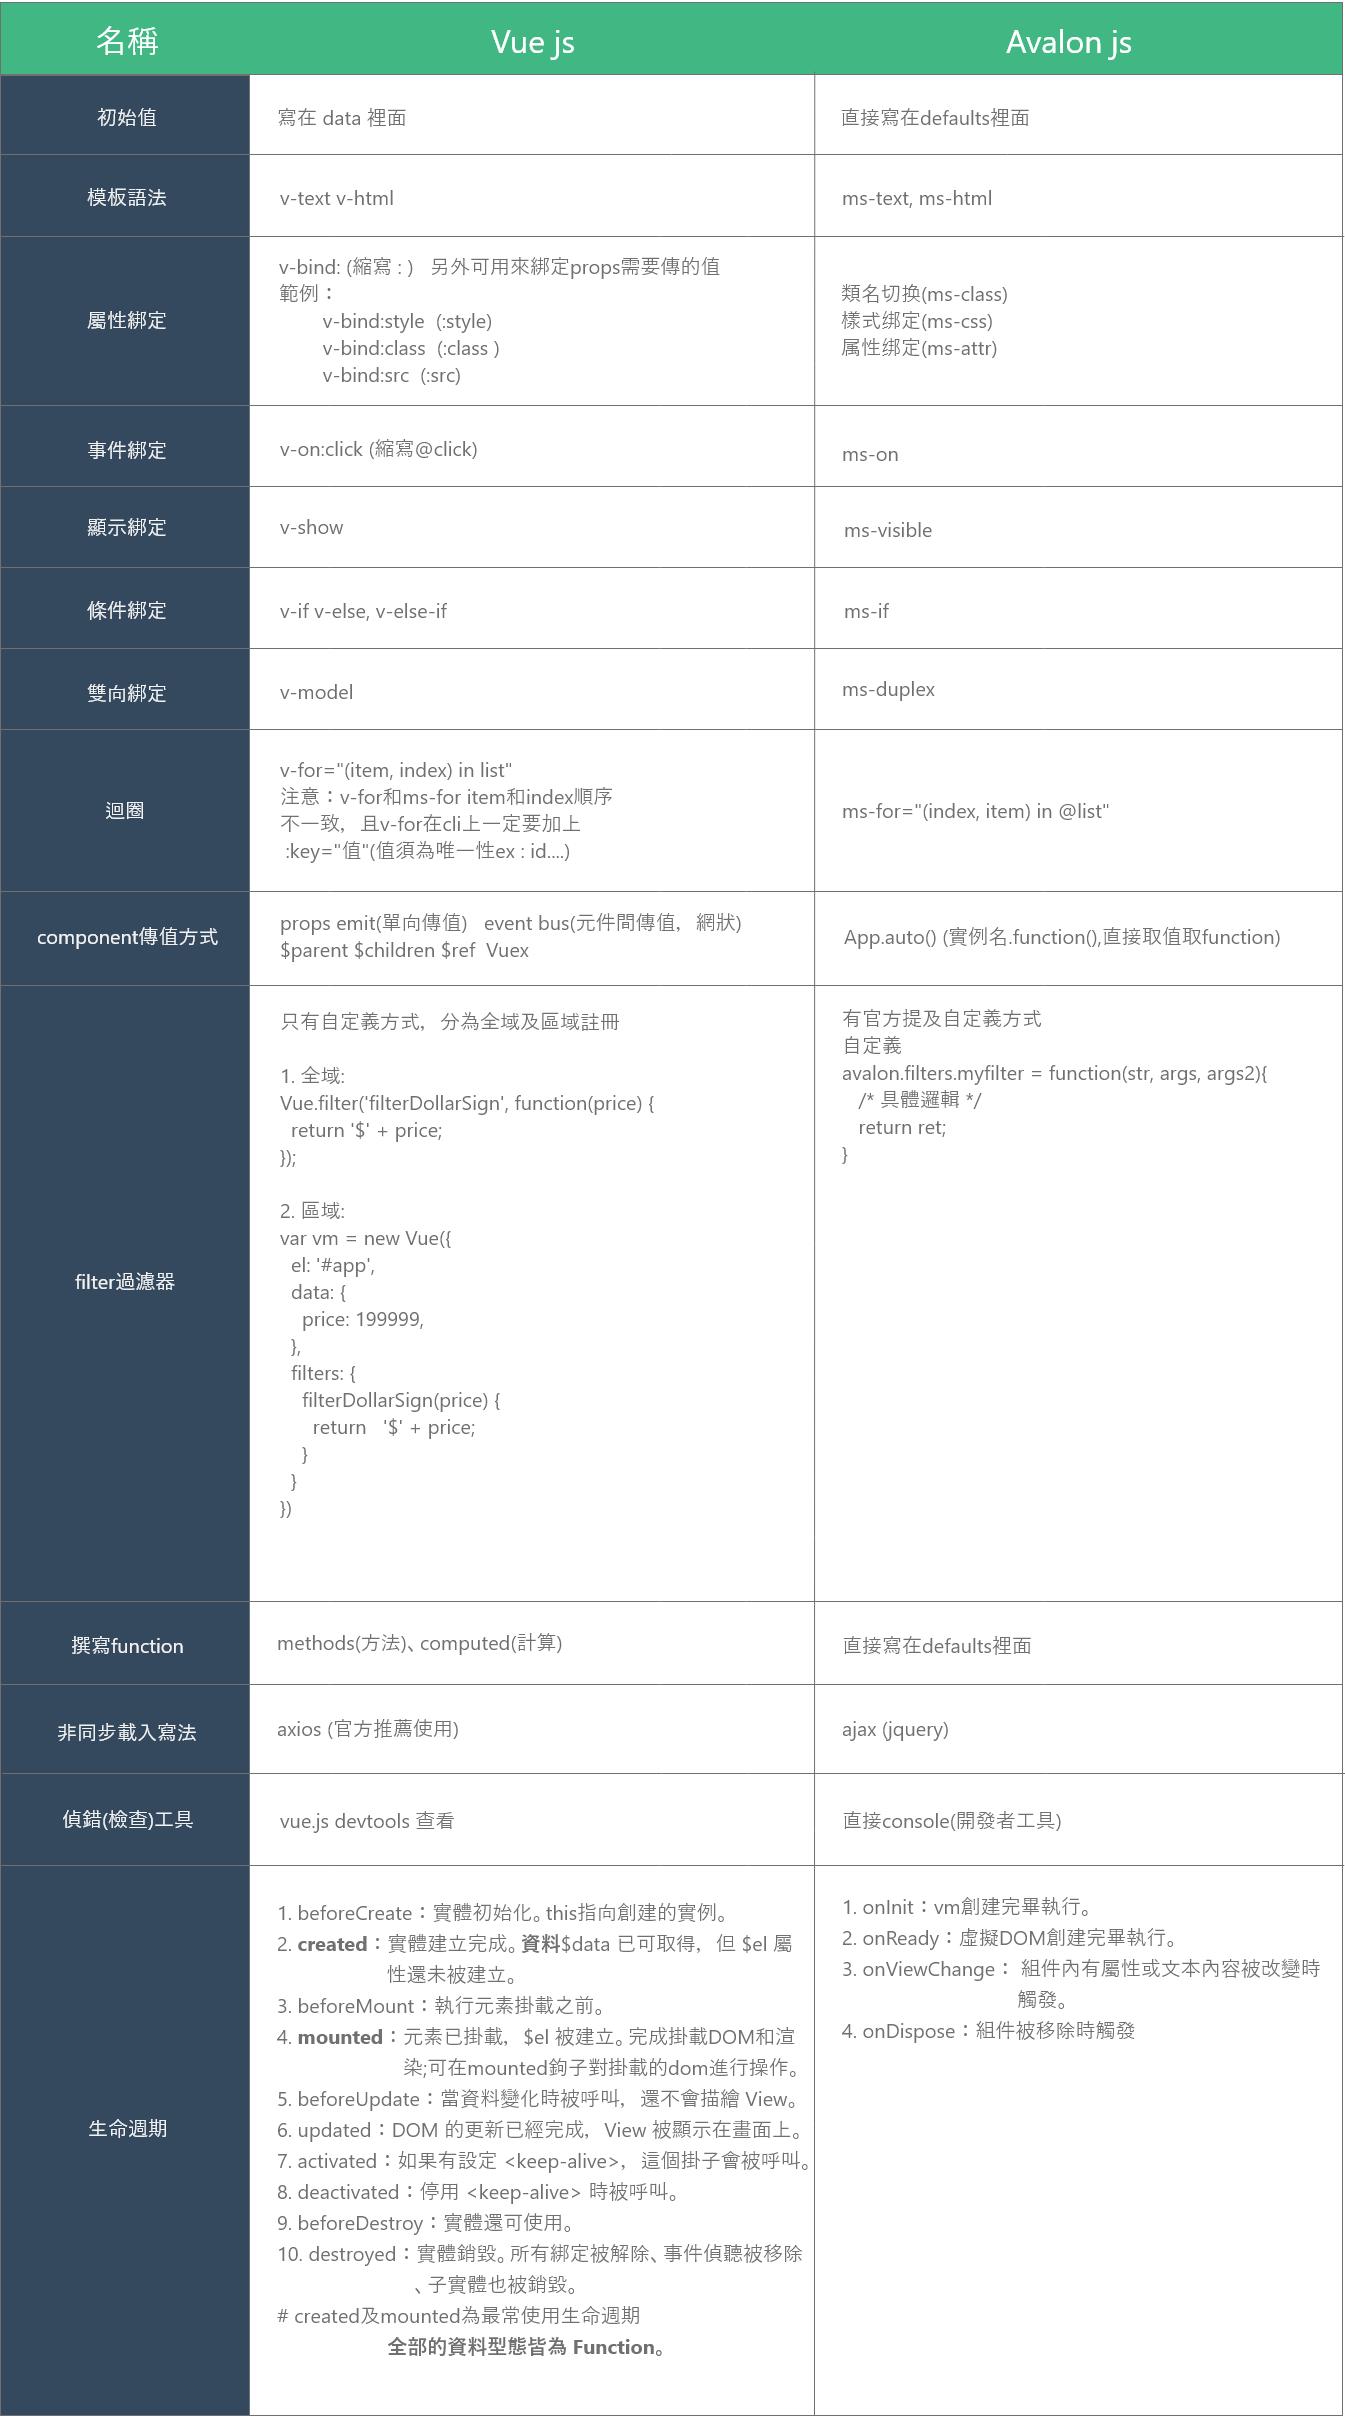
最後附上兩者框架用法比較圖
補充部分:
生命週期就是元件從建立到移除的過程。
因為其他文章已做過簡介,此就焦距在最常使用,一定要會的兩個:
1.created
資料建立之後
適合處理資料
2.mounted
元件渲染出html之後
適合處理 DOM
提醒:如果想維持住生命週期,不希望元件重新循環生命週期,可使用<keep-alive>標籤包住。
若有錯誤,請告知,我會非常感謝~~~大家一起Vue起來吧!!!!