動手做個PIP APP吧
大部分的人都用過YT或視訊通話的APP,那聽過PIP嗎?
PIP全名Picture-in-picture(子母畫面,也有人說是畫中畫),是android8.0後提供的多視窗功能,可以將APP的畫面縮小到螢幕的一小角,而且支援手指拖曳的動作,可以將APP移動到螢幕的任意地方(但不能超過螢幕邊界).進入PIP模式後,就可以實現同時觀看影片又聊天,或者是在視訊通話時一邊查看行事曆了.
看到這裡你應該知道PIP是什麼了,或許你很常使用 但是不知道他就是PIP.
那麼接下來做一個自己的PIP APP吧.首先要在manifest中告訴系統我們要使用這個功能android:supportsPictureInPicture="true",因為預設的情況下是關閉的,另外還要給幾個設定,讓APP進入PIP模式後能後夠正常顯示畫面.
<application
        android:allowBackup="true"
        android:icon="@mipmap/ic_launcher"
        android:label="@string/app_name"
        android:roundIcon="@mipmap/ic_launcher_round"
        android:supportsRtl="true"
        android:theme="@style/AppTheme">
        <activity
            android:name=".MainActivity"
            android:resizeableActivity="true"
            android:supportsPictureInPicture="true"
            android:configChanges="screenSize|screenLayout|smallestScreenSize|orientation">
            <intent-filter>
                <action android:name="android.intent.action.MAIN" />

                <category android:name="android.intent.category.LAUNCHER" />
            </intent-filter>
        </activity>
    </application>
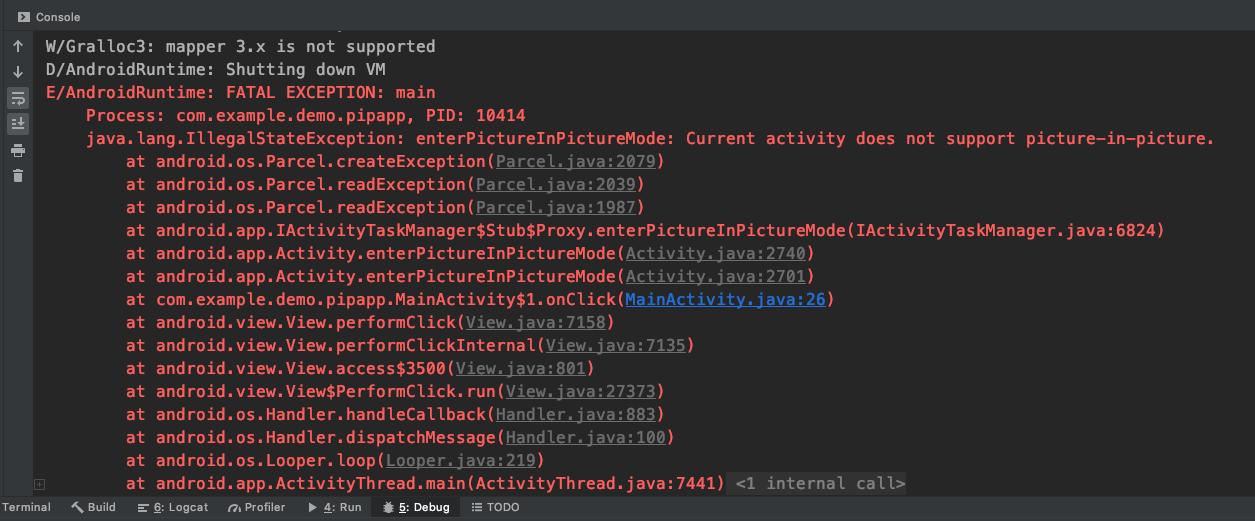
如果忘了設定支援PIP的話就會看到這個訊息:
設定完成之後接著就是要給個開關讓APP進入PIP了,可以用個按鈕或是另外做個事件去觸發.
用個簡單的例子吧,先做個layout把按鈕擺上去
public class MainActivity extends AppCompatActivity {

    private Button btnPIP;

    @Override

    protected void onCreate(Bundle savedInstanceState) {
        super.onCreate(savedInstanceState);
        setContentView(R.layout.activity_main);

        btnPIP = findViewById(R.id.btnPIP);
        btnPIP.setOnClickListener(new View.OnClickListener() {
            @Override
            public void onClick(View v) {
                enterPictureInPictureMode();
            }
        });
    }
}
你沒看錯,就這麼一行就可以進入PIP模式了,但是坑還沒開始踩呢.不是每隻手機都能用PIP的,先確認開不開得起來吧.
加上這行hasSystemFeature(PackageManager.FEATURE_PICTURE_IN_PICTURE)判斷手機是否能夠使用PIP,如果不能使用PIP也提示一下使用者.
@Override
    protected void onCreate(Bundle savedInstanceState) {
        super.onCreate(savedInstanceState);
        setContentView(R.layout.activity_main);

        btnPIP = findViewById(R.id.btnPIP);
        btnPIP.setOnClickListener(new View.OnClickListener() {
            @Override
            public void onClick(View v) {
                if(!getPackageManager().hasSystemFeature(PackageManager.FEATURE_PICTURE_IN_PICTURE)){
                    Toast.makeText(
                            MainActivity.this,
                            "Device not support PIP mode !",
                            Toast.LENGTH_SHORT).show();
                }else {
                    enterPictureInPictureMode();
                }
            }
        });
    }
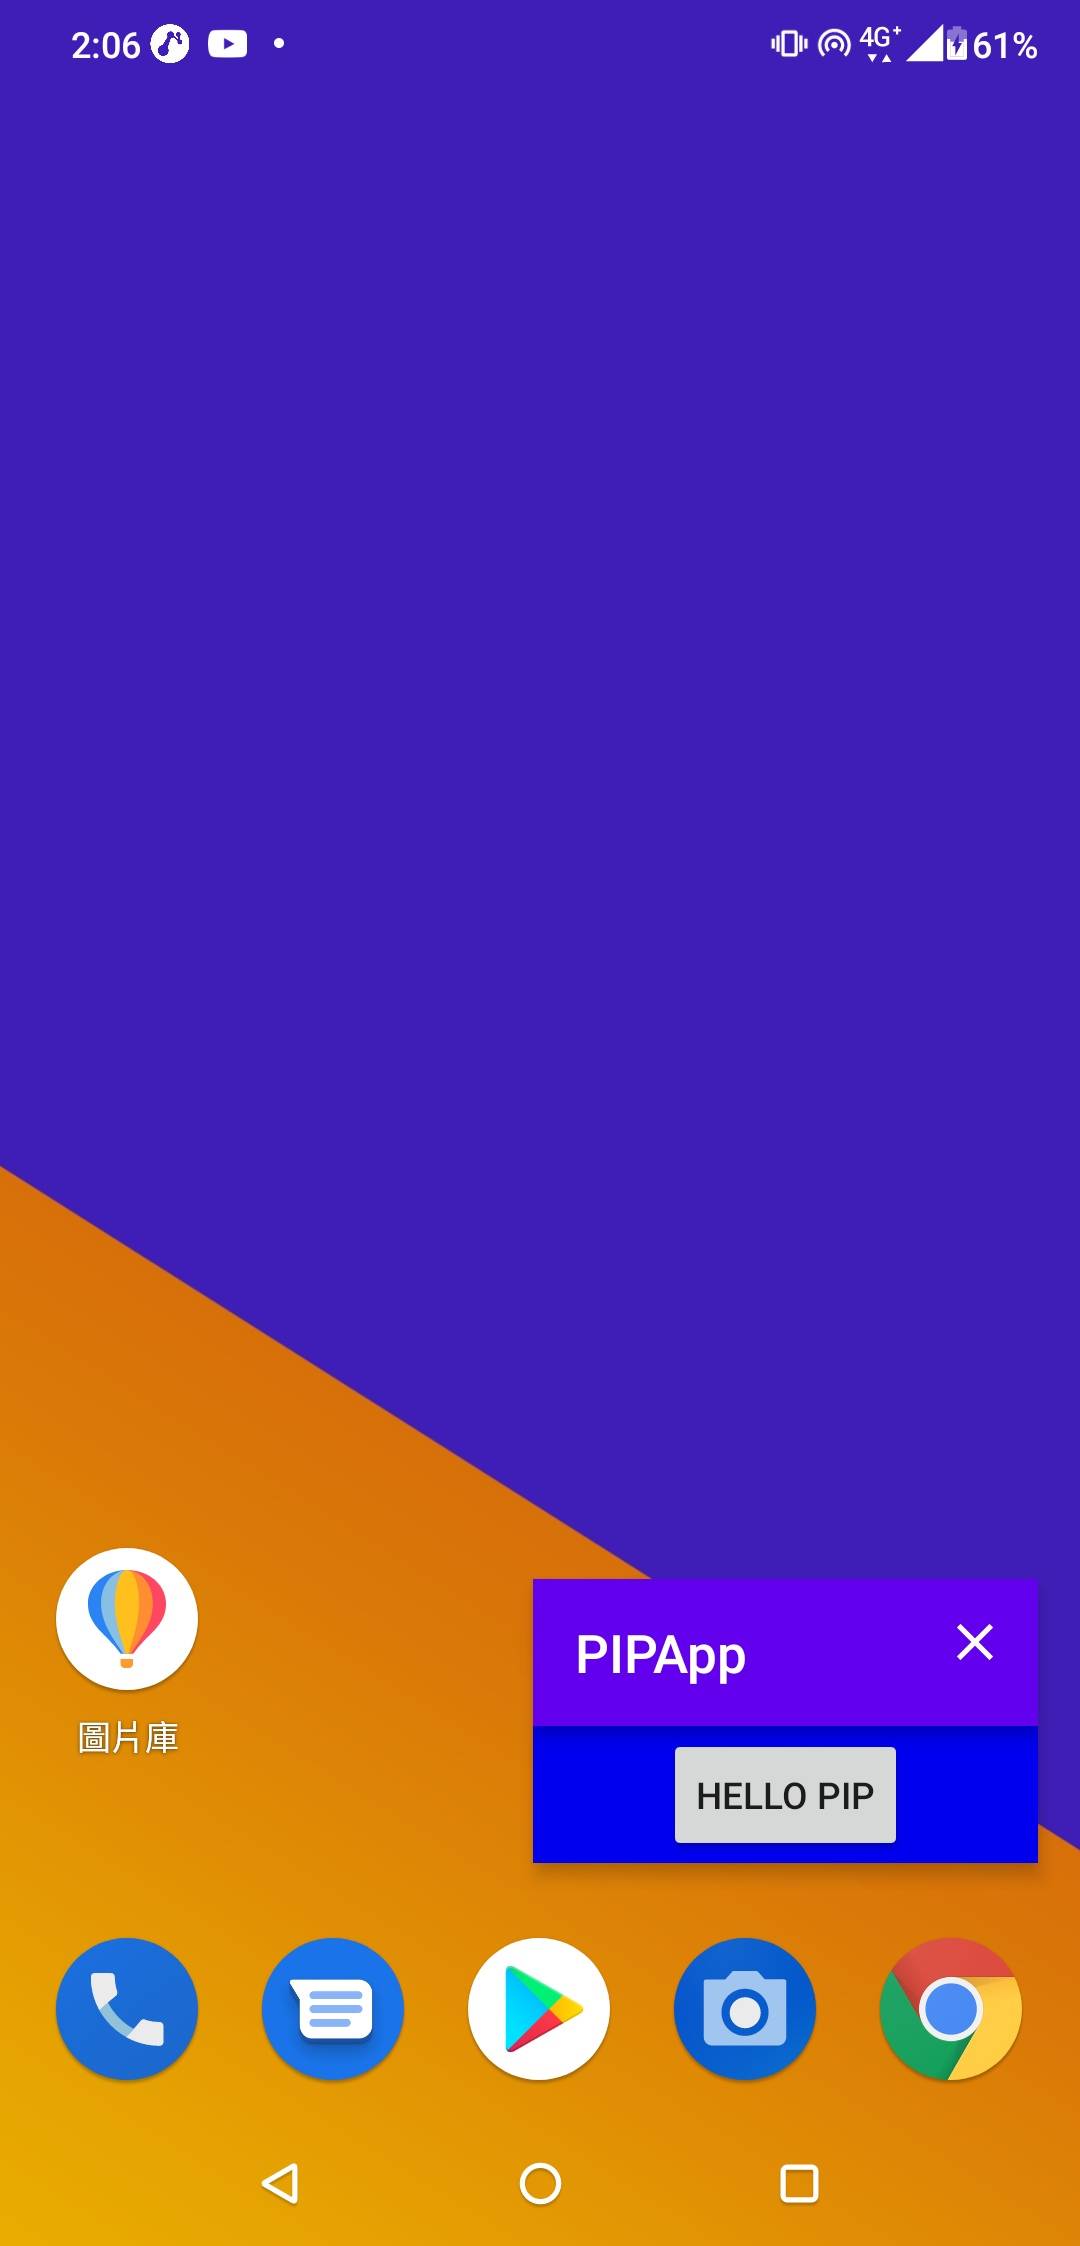
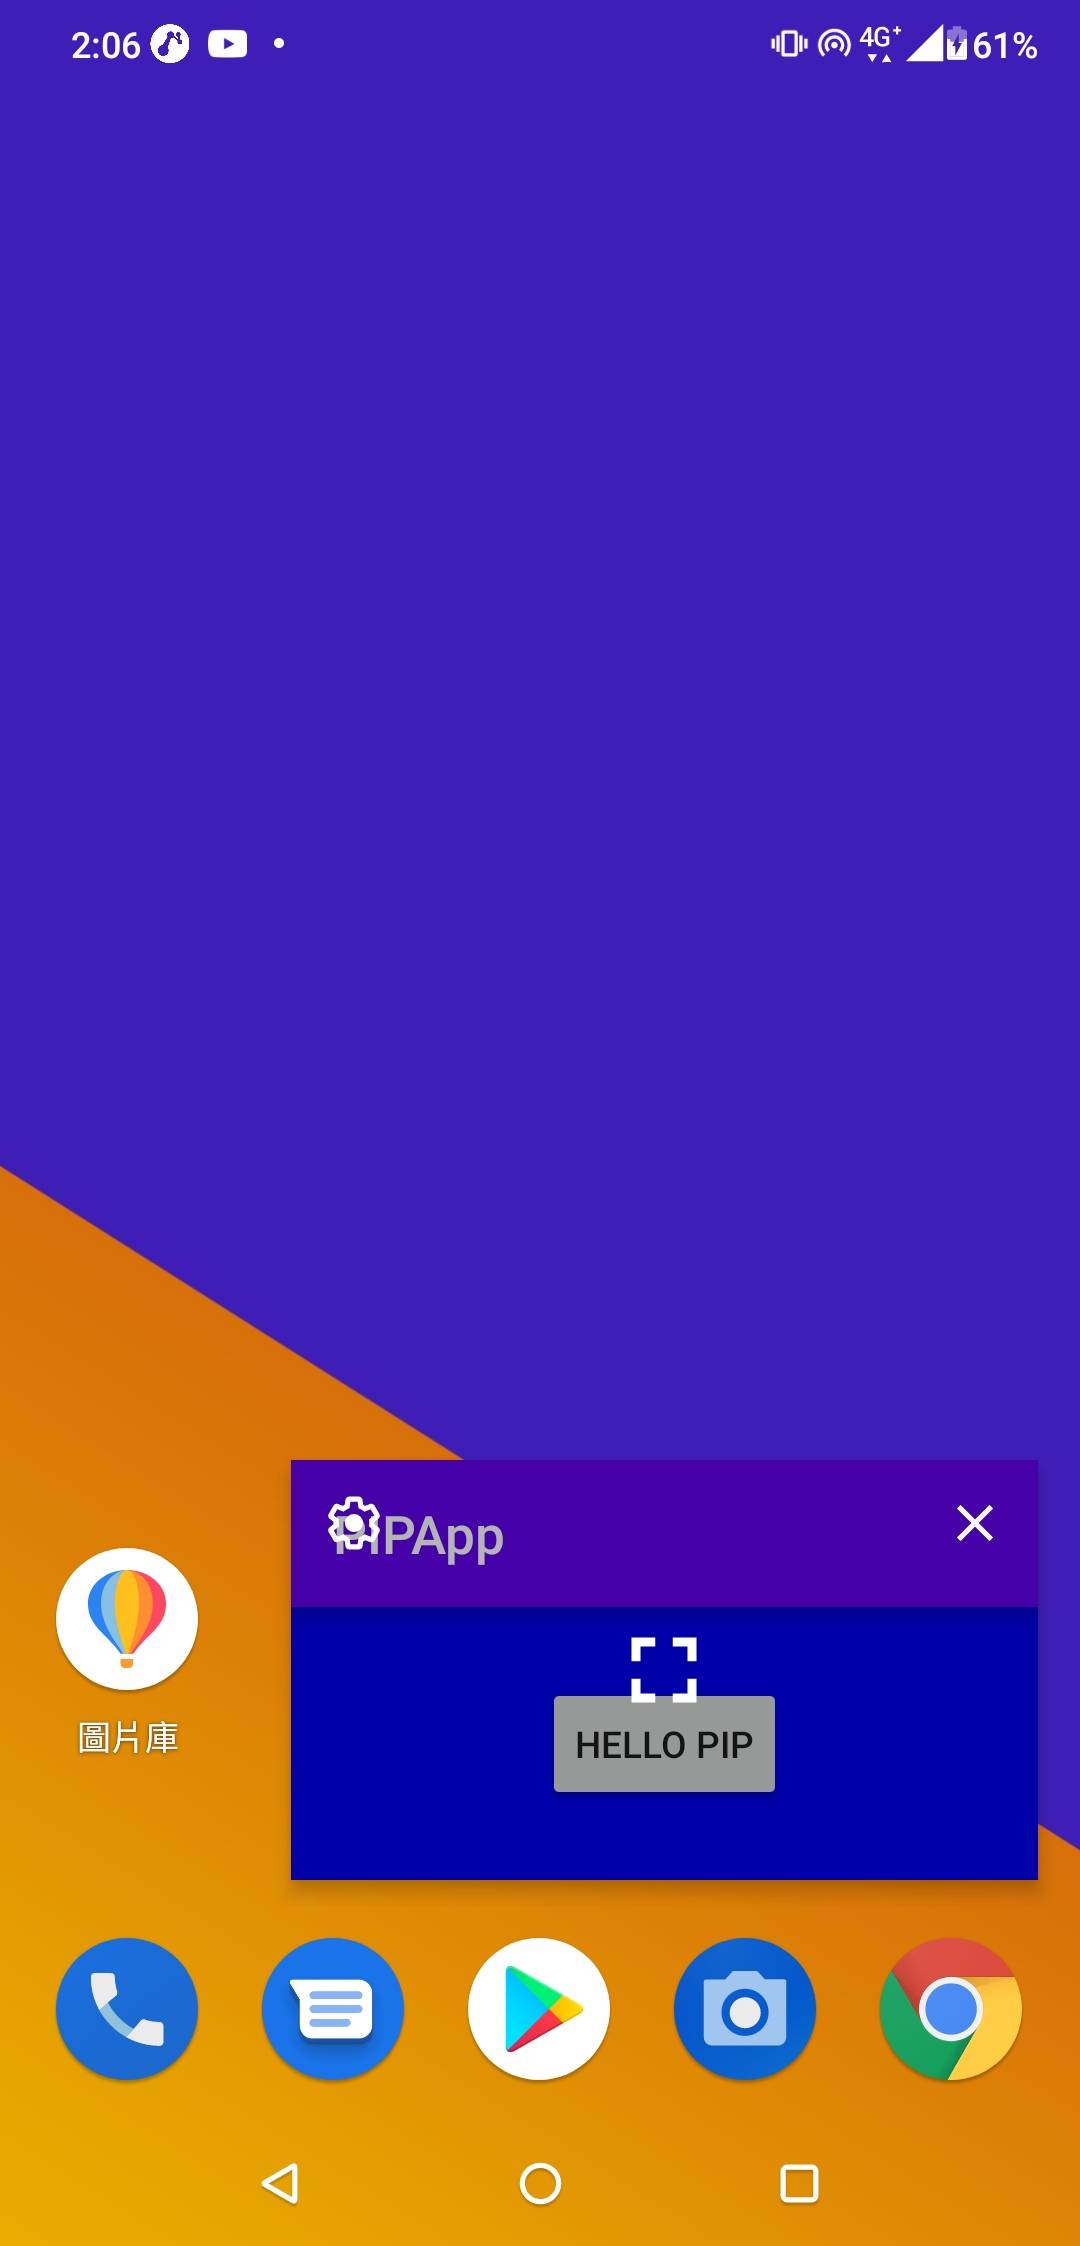
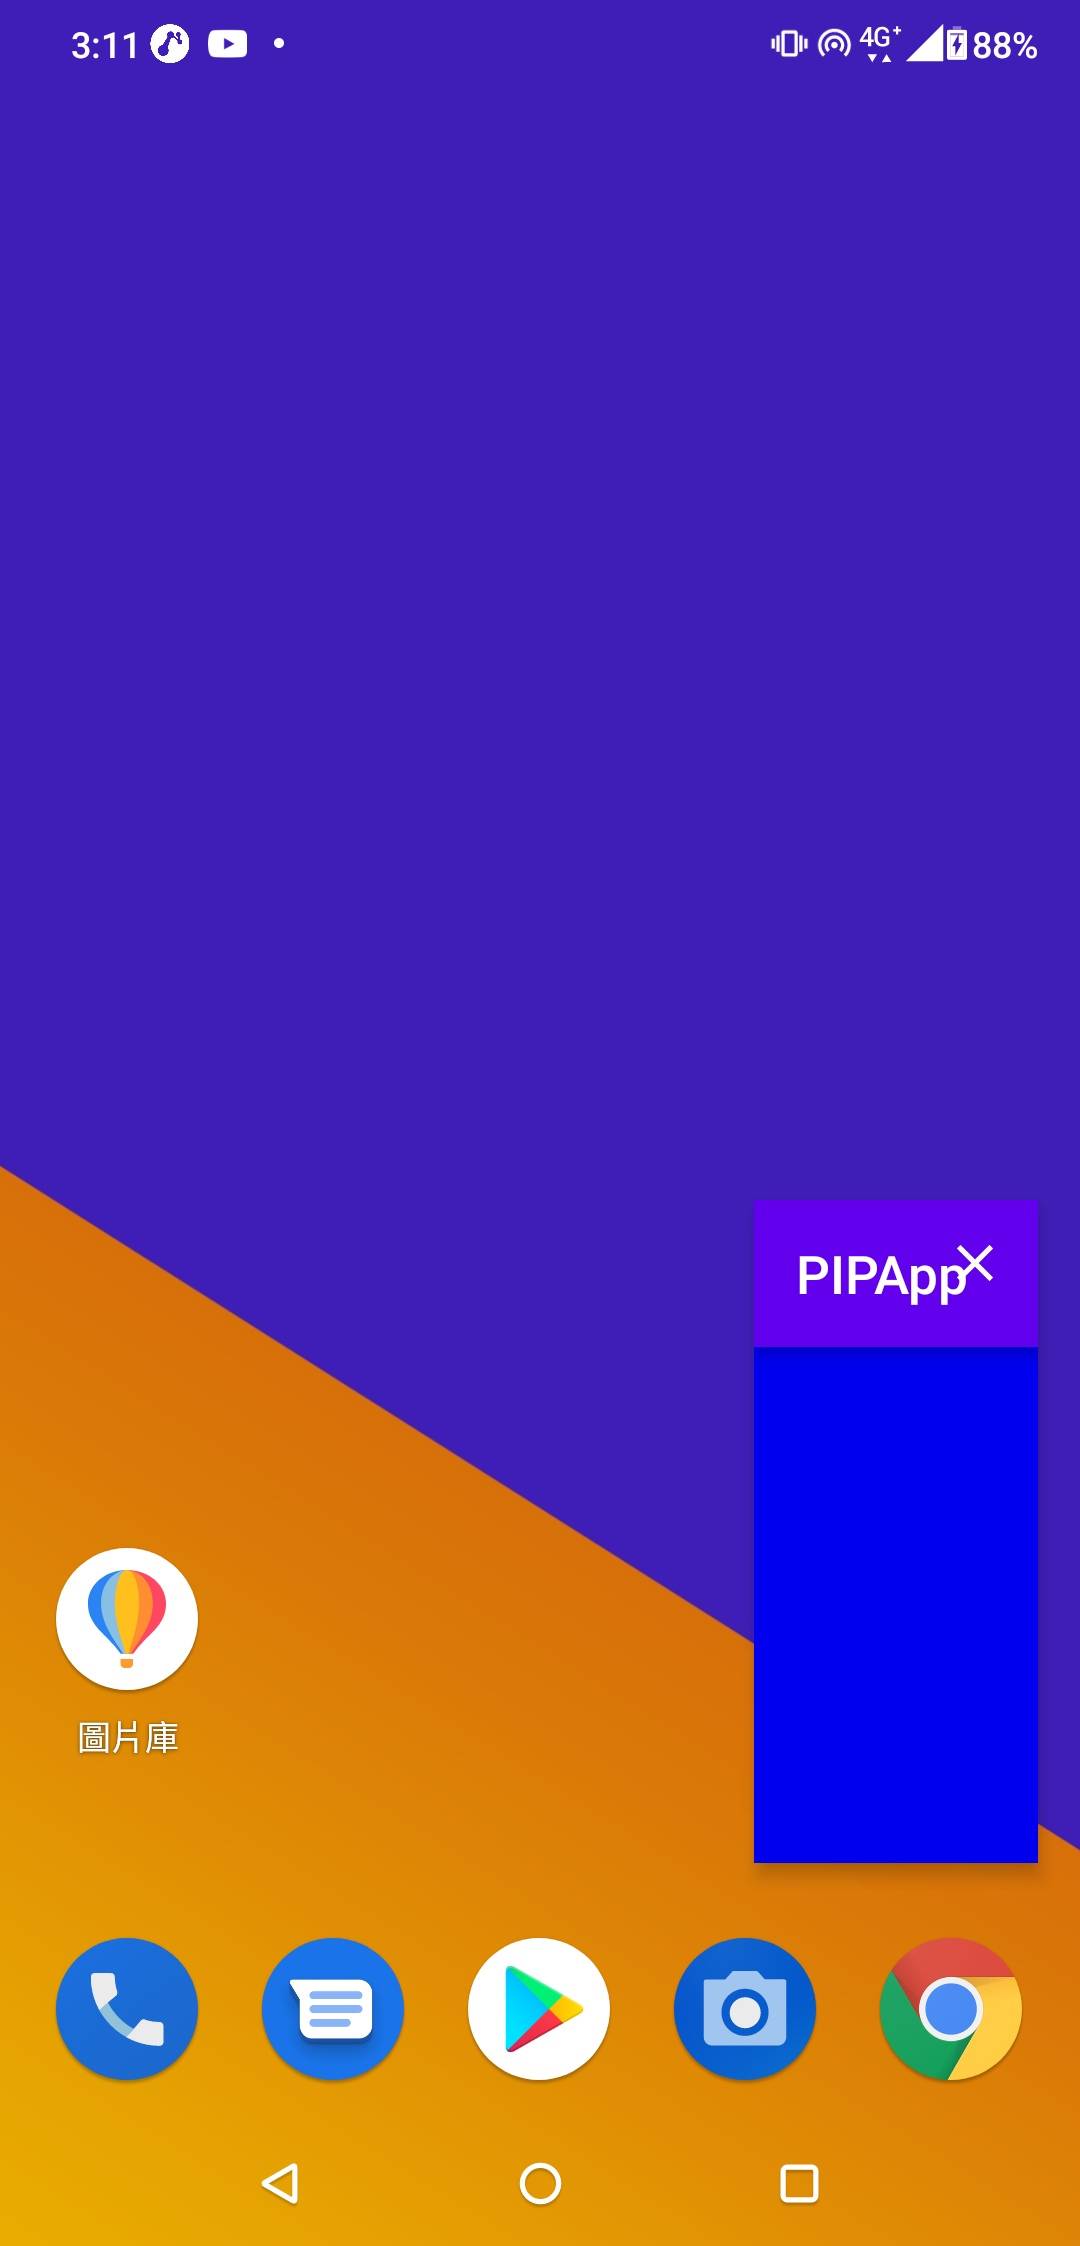
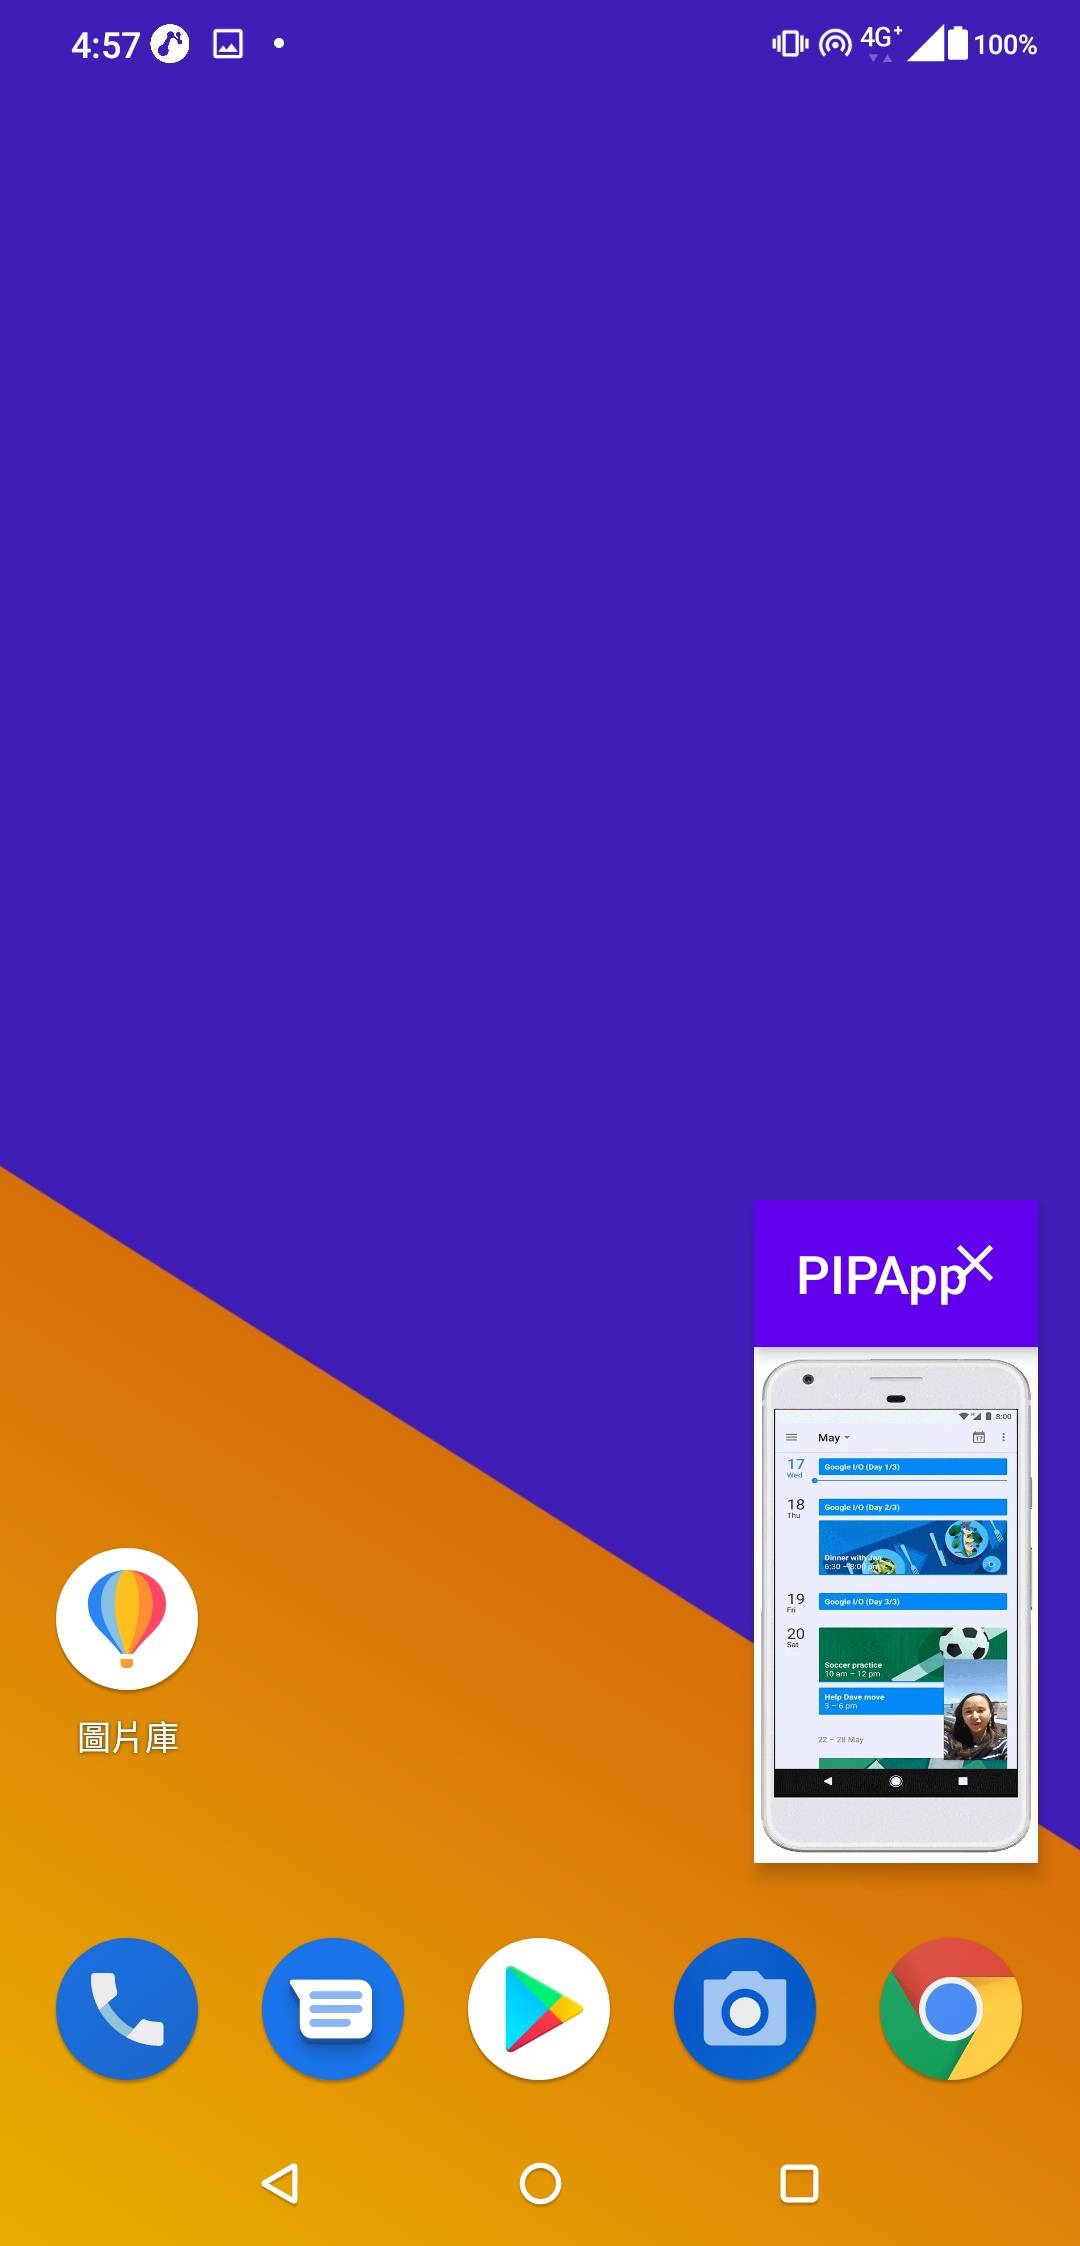
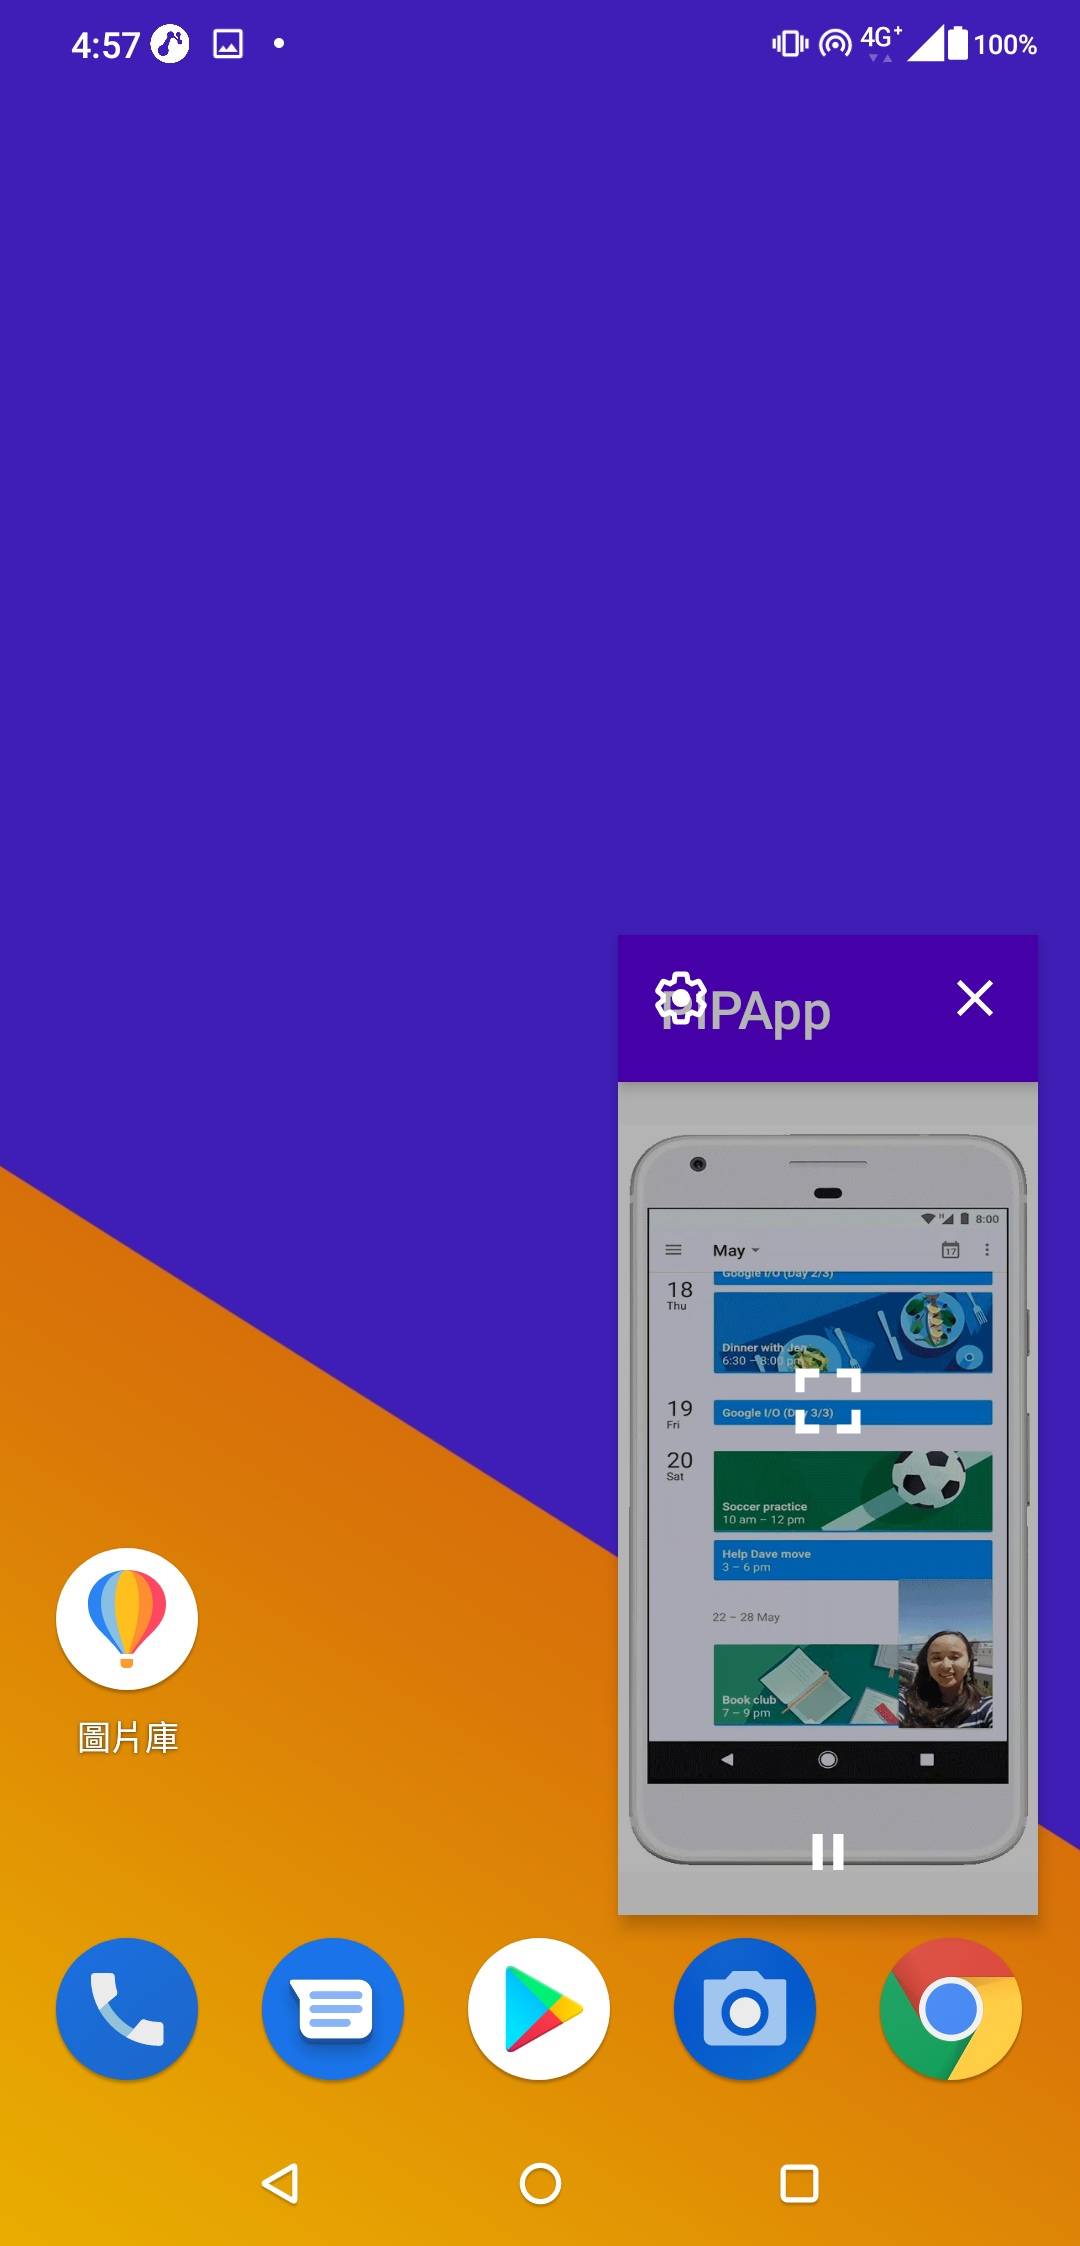
按下按鈕試試看(左邊是按下按鈕後的樣子,右邊是點擊已經縮小的畫面後聚焦的樣子,會微微的放大)
如果想要在使用者點擊Home鍵時主動幫使用者進入PIP模式,可以利用onUserLeaveHint() 方法,判斷當使用者按下Home鍵時的情境.
我們可以透過isInPictureInPictureMode()方法判斷目前是否在PIP模式下.
@Override
    protected void onUserLeaveHint() {
        super.onUserLeaveHint();

        if(!isInPictureInPictureMode()){
            enterPictureInPictureMode();
        }
    }
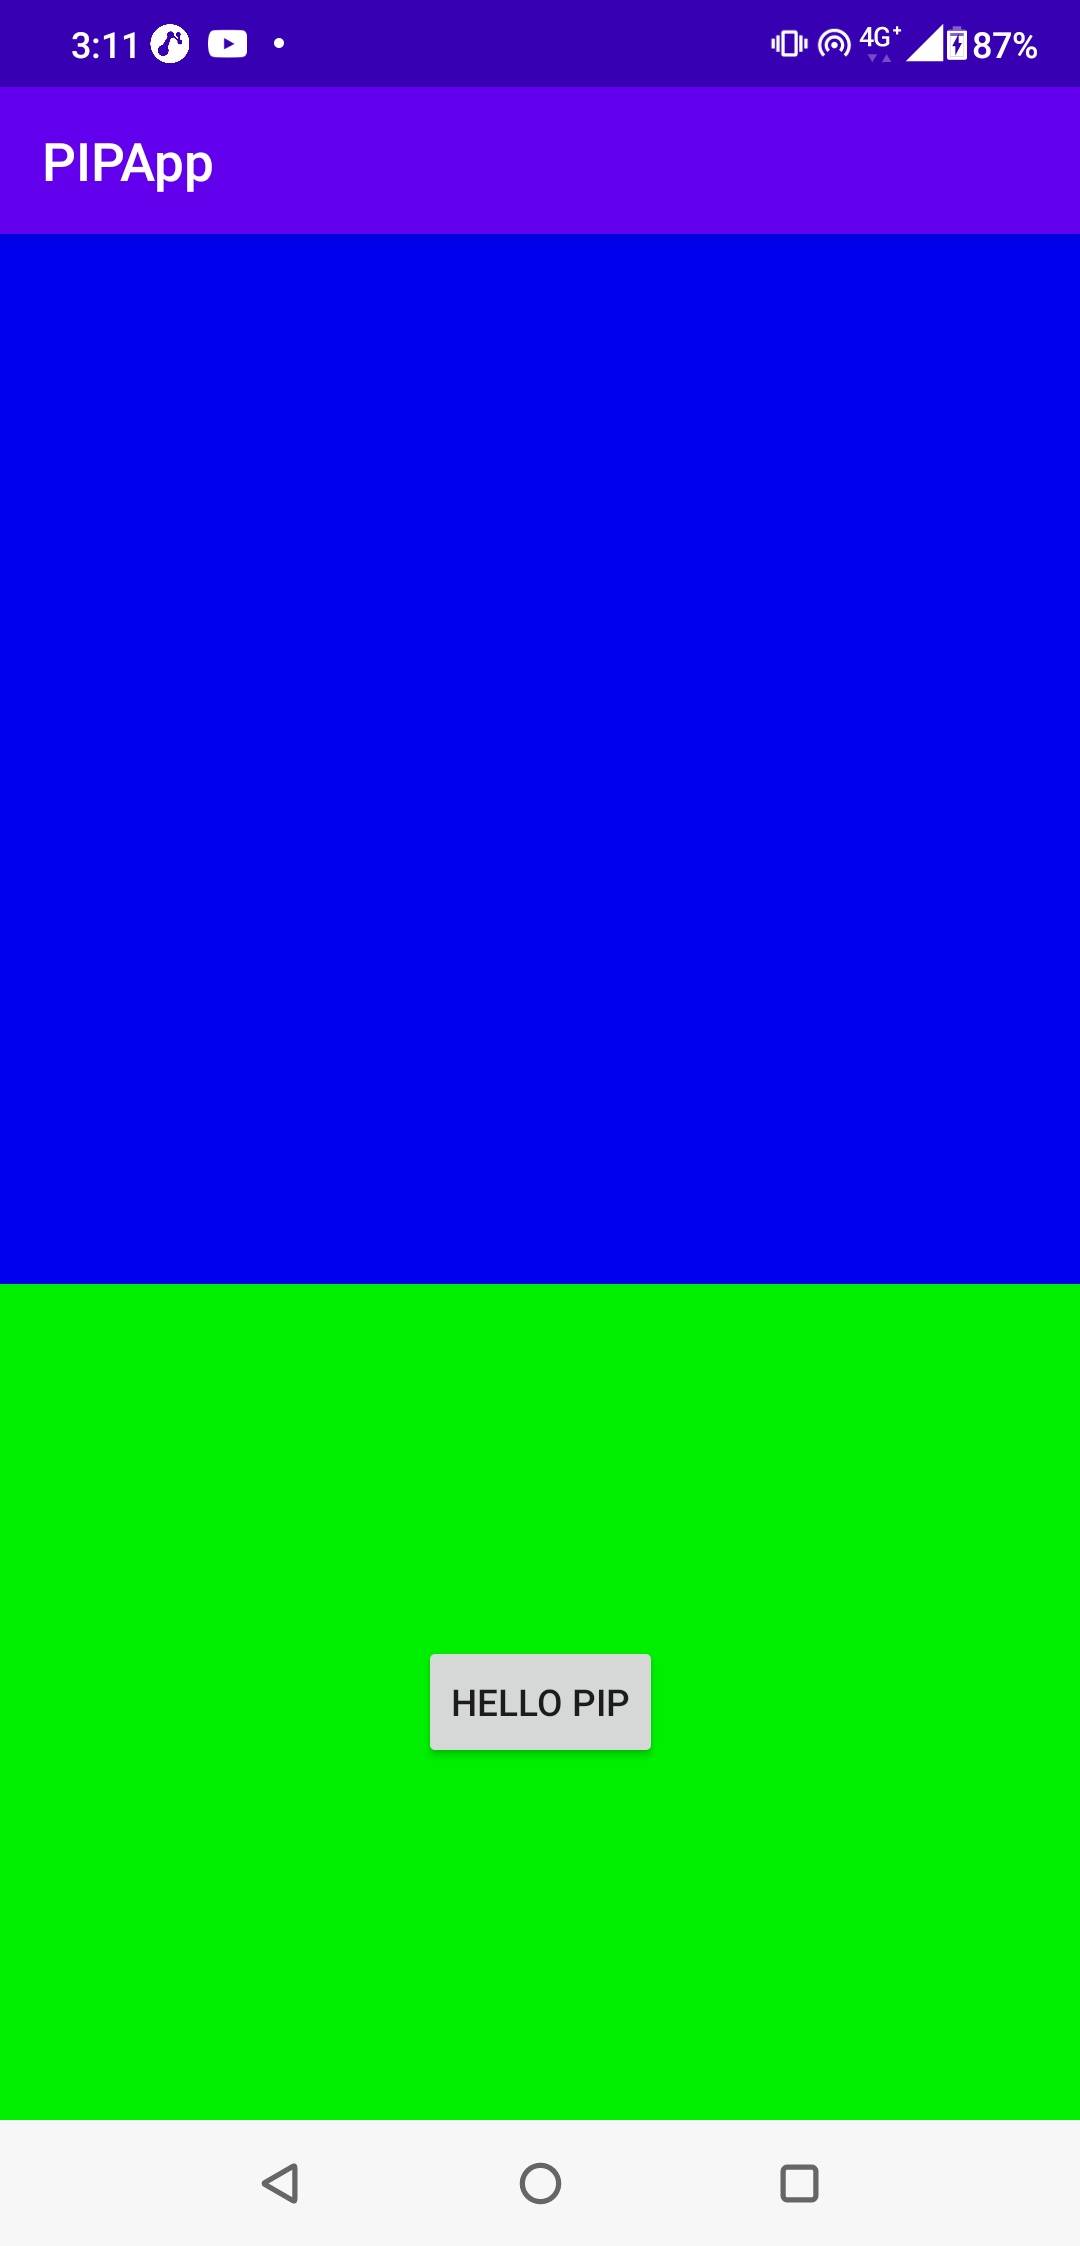
使用PIP的時候要注意一下layout的擺放,看到上面放的圖示應該就能明白,原本Layout上大部分的元件在進入PIP模式後是看不見的(如果使用ConstraintLayout把元件寬高都改成0dp,利用拘束去比例縮放的話倒是可以看到縮小後的畫面),另外中間的按鈕是因為我用拘束把它置中了,才會顯示在那裡,底下的圖例會改掉.
在進入PIP模式後,原本Activity上的元件互動是無效的,比如Edittext這個時候是點不到也無法輸入文字的,但是可以擺上幾個簡易的按鈕去處發事件.
進入PIP模式後的小視窗寬高比例是可以手動改變的,透過Rational設定寬高比,再使用PictureInPictureParams.Builder.
private PictureInPictureParams.Builder pipBuilder =
new PictureInPictureParams.Builder();
private void setPipBuilder(){
Rational rational = new Rational(9,21);
pipBuilder.setAspectRatio(rational);
}
private void intoPIPMode(){
enterPictureInPictureMode(pipBuilder.build());
}
接著放個影片到VideoView上跑跑看.
private void initVideoView(){
        //連結引用自android官方的PIP範例影片
        Uri uri = Uri.parse("https://developer.android.com/images/pip.mp4");
        videoView.setVideoURI(uri);
        videoView.start();

        videoView.setOnPreparedListener(new MediaPlayer.OnPreparedListener() {
            @Override
            public void onPrepared(MediaPlayer mp) {
                Log.d(TAG,"video onPrepared !");
                mp.start();
            }
        });

        videoView.setOnCompletionListener(new MediaPlayer.OnCompletionListener() {
            @Override
            public void onCompletion(MediaPlayer mp) {
                Log.d(TAG,"video onCompletion !");
            }
        });

        videoView.setOnErrorListener(new MediaPlayer.OnErrorListener() {
            @Override
            public boolean onError(MediaPlayer mp, int what, int extra) {
                Log.d(TAG,"video onError !");
                return false;
            }
        });
    }
我們可以觀察一下進入PIP模式時的生命週期變化:
@Override
    public void onPictureInPictureModeChanged(boolean isInPictureInPictureMode,
                                              Configuration newConfig) {
        super.onPictureInPictureModeChanged(isInPictureInPictureMode, newConfig);
        Log.d(TAG,"onPIPMode");
    }

    @Override
    protected void onStart() {
        super.onStart();
        Log.d(TAG,"onStart");
    }

    @Override
    protected void onResume() {
        super.onResume();
        Log.d(TAG,"onResume");
    }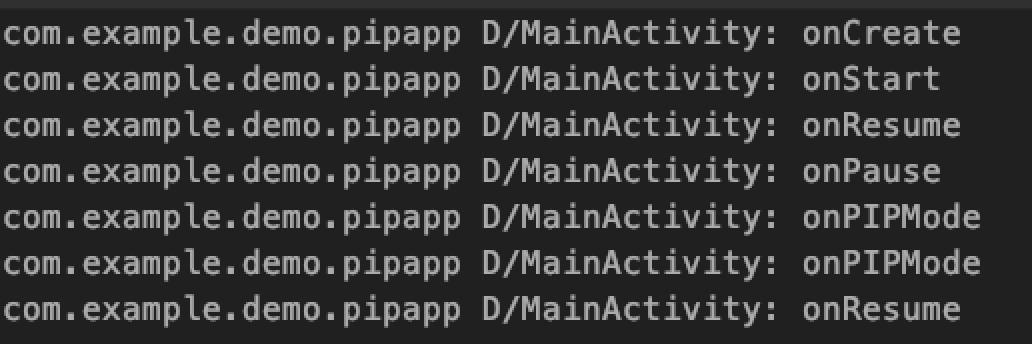
發現是在onPasue之後進入PIP模式,而且不會進到omStop.
解除PIP模式恢復一般大小時也不會觸發onStart,那麼影片應概會在變更模式後繼續播放.
接下來開始製作影片播放以及停止的按鈕吧,先定義等等會用到的參數.
private static final String VIDEO_ACTION_CONTROL = "ACTION_VIDEO_CONTROL";

    private static final String VIDEO_STATUS = "VIDEO_STATUS";

    private static final int VIDEO_STATUS_PLAY = 1;
    private static final int VIDEO_STATUS_PAUSE = 2;

    private static final int REQUEST_CODE_PLAY = 1;
    private static final int REQUEST_CODE_PAUSE = 2;

    private static final String PLAY = "PLAY";
    private static final String PAUSE = "PAUSE";
透過PendingIntent跟RemoteAction來進行操作.
private void updatePIPActions(@DrawableRes int iconResId, String title,
                                  int controlType, int requestCode){
        final ArrayList<RemoteAction> actions = new ArrayList<>();

        final PendingIntent intent =
                PendingIntent.getBroadcast(
                        MainActivity.this,
                        requestCode,
                        new Intent(VIDEO_ACTION_CONTROL).putExtra(VIDEO_STATUS, controlType),
                        0);
        final Icon icon = Icon.createWithResource(MainActivity.this, iconResId);
        actions.add(new RemoteAction(icon, title, title, intent));

        pipBuilder.setActions(actions);
        setPictureInPictureParams(pipBuilder.build());
}這裡可以看到我是用ArrayList來加上按鈕的action的,但是能夠放上去的按鈕數量是有限制的,透過getMaxNumPictureInPictureActions()這個方法可以得到3得回傳值,做多就放三個按鈕.
前面提到在PIP模式下,原本layout上的元件不會獲得互動事件,我們透過發送接收廣播來告訴系統要做什麼動作.
因為是進入PIP模式後才發生的,我就直接寫在onPictureInPictureModeChanged方法裡.
除了廣播之外也同時處理了一下View的顯示,畢竟layout上大部分的元件都看不到了乾脆隱藏掉!讓影片多一點空間.
@Override
    public void onPictureInPictureModeChanged(boolean isInPictureInPictureMode,
                                              Configuration newConfig) {
        super.onPictureInPictureModeChanged(isInPictureInPictureMode, newConfig);
        Log.d(TAG,"onPIPMode");

        if (isInPictureInPictureMode) {
            //隱藏其他的View
            topArea.setVisibility(View.GONE);
            bottomArea.setVisibility(View.GONE);
            btnPIP.setVisibility(View.GONE);

            //動態改變videoView的拘束條件讓他可以滿屏
            ConstraintSet set = new ConstraintSet();
            set.clone(mainLayout);
            set.connect(videoView.getId(),ConstraintSet.BOTTOM,mainLayout.getId(),ConstraintSet.BOTTOM);
            set.applyTo(mainLayout);

            //設定接收廣播
            actionReceiver = new BroadcastReceiver() {
                @Override
                public void onReceive(Context context, Intent intent) {
                    if(intent == null || !intent.getAction().equals(VIDEO_ACTION_CONTROL))
                        return;

                    int currentStatus = intent.getIntExtra(VIDEO_STATUS,0);
                    if(currentStatus == VIDEO_STATUS_PLAY){
                        //影片播放的時候可以按下的按鈕是暫停
                        videoView.start();

                        updatePIPActions(
                                R.drawable.ic_baseline_pause_24,
                                PAUSE,
                                VIDEO_STATUS_PAUSE,
                                REQUEST_CODE_PAUSE);

                    }else if(currentStatus == VIDEO_STATUS_PAUSE){
                        //影片暫停的時候可以按下的按鈕是播放
                        videoView.pause();

                        updatePIPActions(
                                R.drawable.ic_baseline_play_arrow_24,
                                PLAY,
                                VIDEO_STATUS_PLAY,
                                REQUEST_CODE_PLAY);
                    }
                }
            };

            registerReceiver(actionReceiver, new IntentFilter(VIDEO_ACTION_CONTROL));

        } else {
            //顯示其他的View
            topArea.setVisibility(View.VISIBLE);
            bottomArea.setVisibility(View.VISIBLE);
            btnPIP.setVisibility(View.VISIBLE);

            //動態恢復videoView的拘束條件
            ConstraintSet set = new ConstraintSet();
            set.clone(mainLayout);
            set.connect(videoView.getId(),ConstraintSet.BOTTOM,topArea.getId(),ConstraintSet.BOTTOM);
            set.applyTo(mainLayout);

            //移除廣播
            unregisterReceiver(actionReceiver);
            actionReceiver = null;
        }
    }
記得一開始影片播放的時候也要把action加上去
//連結引用自android官方的PIP範例影片
        Uri uri = Uri.parse("https://developer.android.com/images/pip.mp4");
        videoView.setVideoURI(uri);
        videoView.start();

        videoView.setOnPreparedListener(new MediaPlayer.OnPreparedListener() {
            @Override
            public void onPrepared(MediaPlayer mp) {
                Log.d(TAG,"video onPrepared !");
                mp.setLooping(true);
                mp.start();

                updatePIPActions(
                        R.drawable.ic_baseline_pause_24,
                        PAUSE,
                        VIDEO_STATUS_PAUSE,
                        REQUEST_CODE_PAUSE);
            }
        });
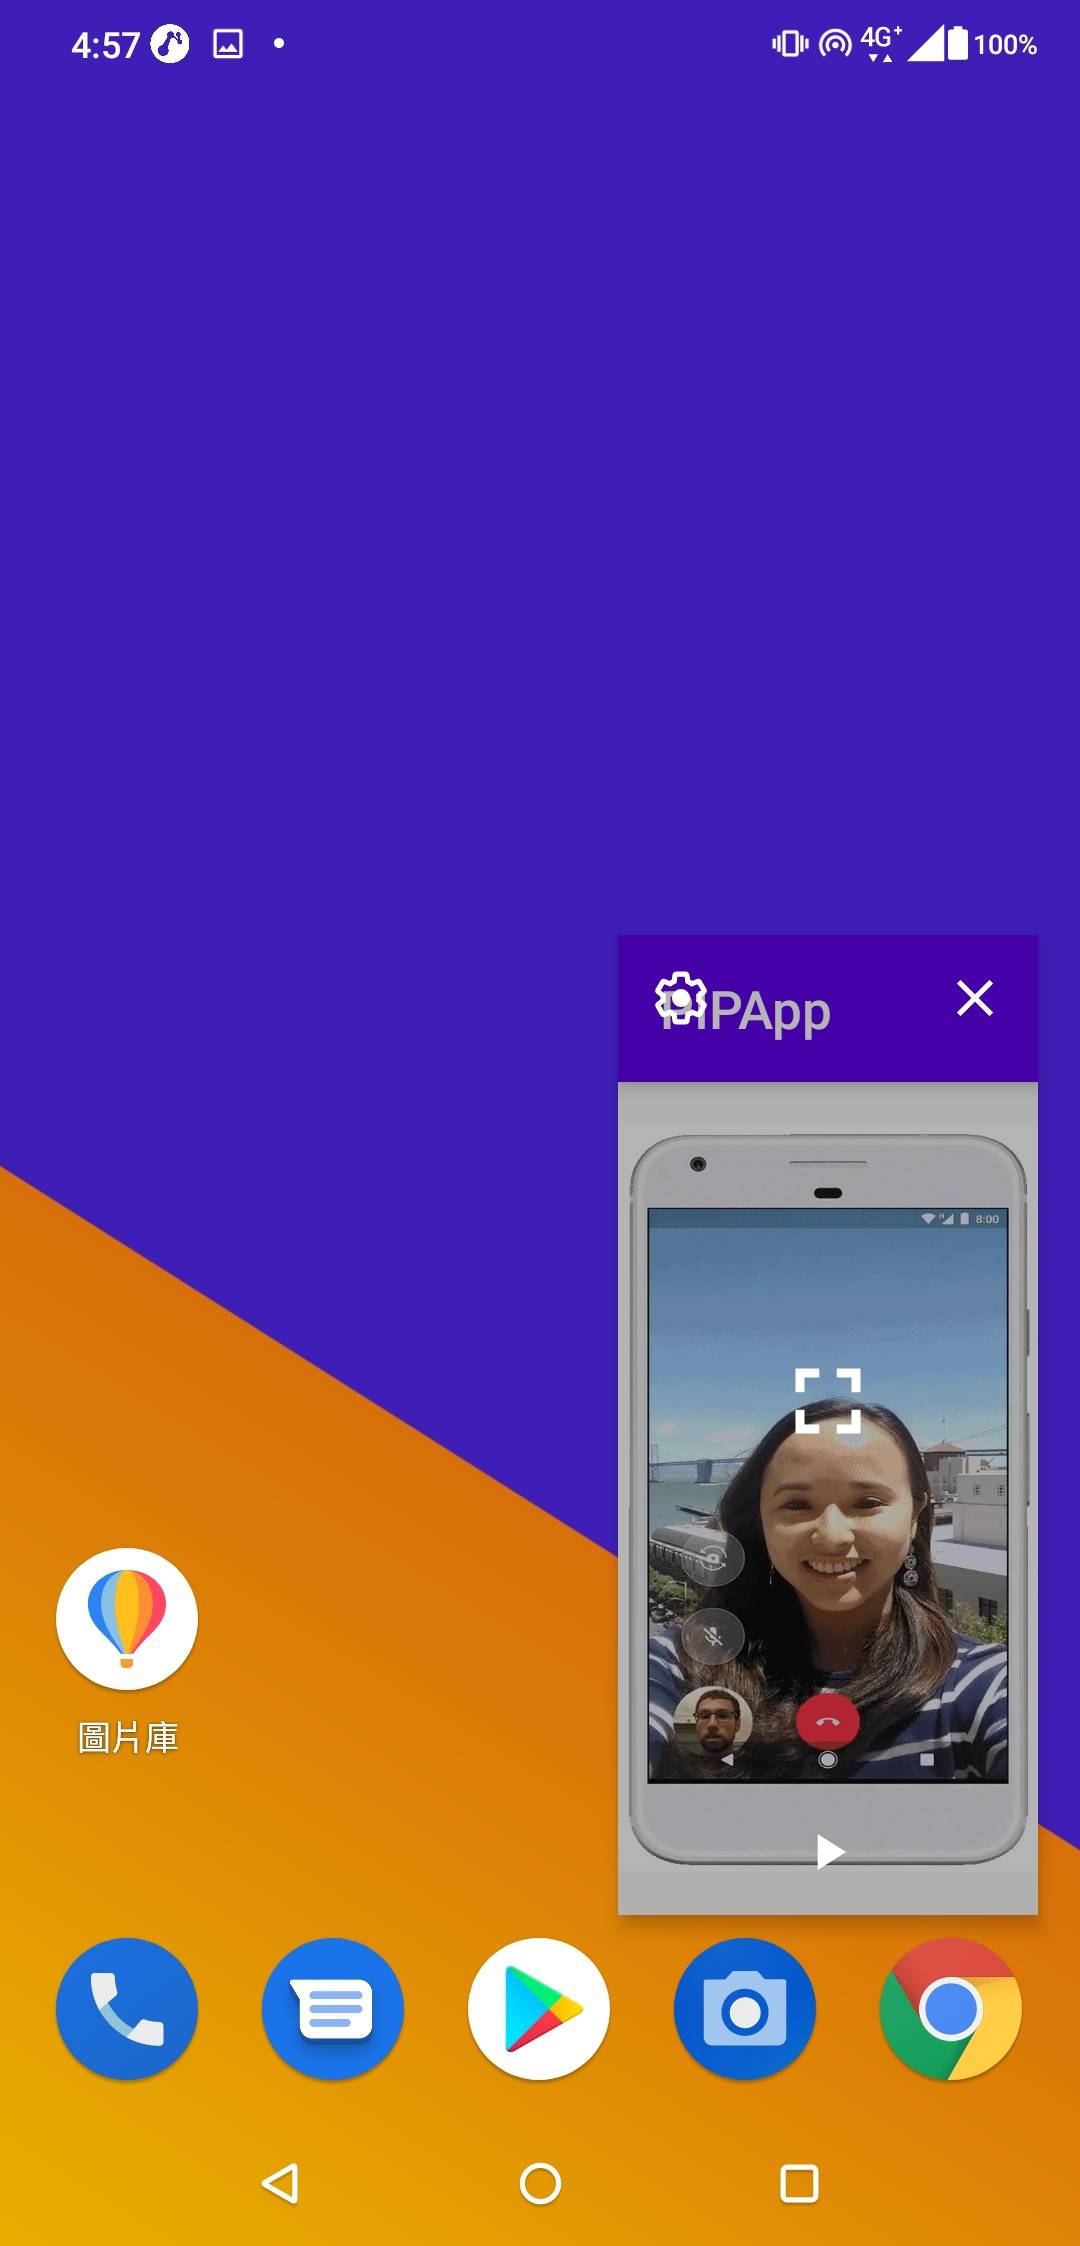
到這邊就完成摟,要做成播放清單的話還需要再加上下一首跟上一首的按鈕吧,最多只能擺放三個按鈕的限制看來就是為這個做的.
那麼後面補個layout吧,這是為了研究縮小後的擺放效果做的,就別計較好不好了看啦.
<?xml version="1.0" encoding="utf-8"?>
<androidx.constraintlayout.widget.ConstraintLayout
    xmlns:android="http://schemas.android.com/apk/res/android"
    xmlns:app="http://schemas.android.com/apk/res-auto"
    xmlns:tools="http://schemas.android.com/tools"
    android:layout_width="match_parent"
    android:layout_height="match_parent"
    tools:context=".MainActivity"
    android:id="@+id/mainLayout">

    <View
        android:id="@+id/topArea"
        android:background="#0000ee"
        android:layout_width="0dp"
        android:layout_height="400dp"
        app:layout_constraintTop_toTopOf="parent"
        app:layout_constraintLeft_toLeftOf="parent"
        app:layout_constraintRight_toRightOf="parent"/>

    <VideoView
        android:id="@+id/videoView"
        android:layout_width="0dp"
        android:layout_height="0dp"
        app:layout_constraintDimensionRatio="9:16"
        app:layout_constraintTop_toTopOf="parent"
        app:layout_constraintLeft_toLeftOf="parent"
        app:layout_constraintRight_toRightOf="parent"
        app:layout_constraintBottom_toTopOf="@+id/bottomArea"/>

    <View
        android:id="@+id/bottomArea"
        android:background="#00ee00"
        android:layout_width="0dp"
        android:layout_height="0dp"
        app:layout_constraintTop_toBottomOf="@id/topArea"
        app:layout_constraintLeft_toLeftOf="parent"
        app:layout_constraintRight_toRightOf="parent"
        app:layout_constraintBottom_toBottomOf="parent"/>

    <Button
        android:id="@+id/btnPIP"
        android:layout_width="wrap_content"
        android:layout_height="wrap_content"
        android:text="Hello PIP"
        app:layout_constraintBottom_toBottomOf="parent"
        app:layout_constraintLeft_toLeftOf="parent"
        app:layout_constraintRight_toRightOf="parent"
        app:layout_constraintTop_toTopOf="@+id/bottomArea" />
</androidx.constraintlayout.widget.ConstraintLayout>
補充:
如果開啟第二個APP並且進入PIP模式會發生什麼事呢?
答案:"前一個進入PIP模式的APP會被退出PIP模式"
參考
https://developer.android.com/guide/topics/ui/picture-in-picture#java
註:截圖中出現的影片引用自官方介紹,連結同上