[Vuex] 認識 Vue 的好朋友
在閱讀這篇文章之前,希望你已經具備 Vue 的相關知識以及基本的使用。
Vuex 的作用
在使用 Vue 的時候,可能會元件間的共用資料,比如說:Token、使用者資訊….等,因此我們需要一個公用空間去存放、管理、操作這些資料,在操作時會去改變到資料的「狀態」,例如:
- 訊息狀態:社群軟體提供已讀、未讀的訊息狀態,使用者可以在不同的頁面中顯示統一的未讀狀態。
- 購物車狀態:使用者可以在不同的產品頁面去新增、修改購物車裡的產品數量,甚至可能今天加入明天結帳、在不同的裝置上顯示正確的購物車內的產品。
因此需要一個「狀態管理機制」的套件去處理,這就是 Vuex 的用處。
有關前端的狀態管理
- 瀏覽器端的狀態管理:Cookie, local storage… 等等。
- 前端框架狀態管理工具
Vue:VuexReact:ReduxAngualr:ngrx/store、(但內建的 service + rxjs 其實就可以做到狀態管理)
Vuex 由來 Facebook Flux
「Flux」是 Facebook 提出的一個架構,在傳統 MVC 的架構裡面 Model 跟 View 會存在著複雜的關係,可能一個動作,會更動到好幾個 Model 或好幾個 View,當應用程式越來越大後,就很難追蹤因此狀態管理就變得極為重要。
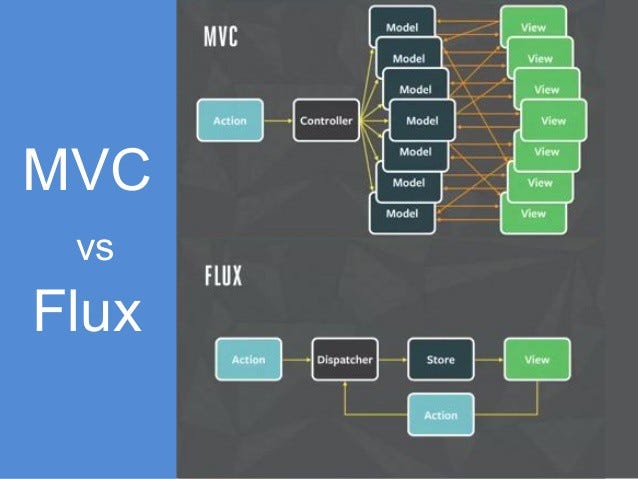
另外一個Vuex 與 Redux 一樣是從 Facebook Flux 衍生出來的一個套件,同時 Vuex 對 Redux 的部分思想也有些借鑑,因此兩者間有許多相似之處。
有關 Redux 的介紹可參考以下文章:- [Redux #1] 認識 React 的好朋友- [Redux #2] React + Redux- [Redux #3] Redux-Toolkit(RTK) & Redux thunk
Vuex 基本架構(Store、State、Dispatch、Actions、Commit、Mutations)
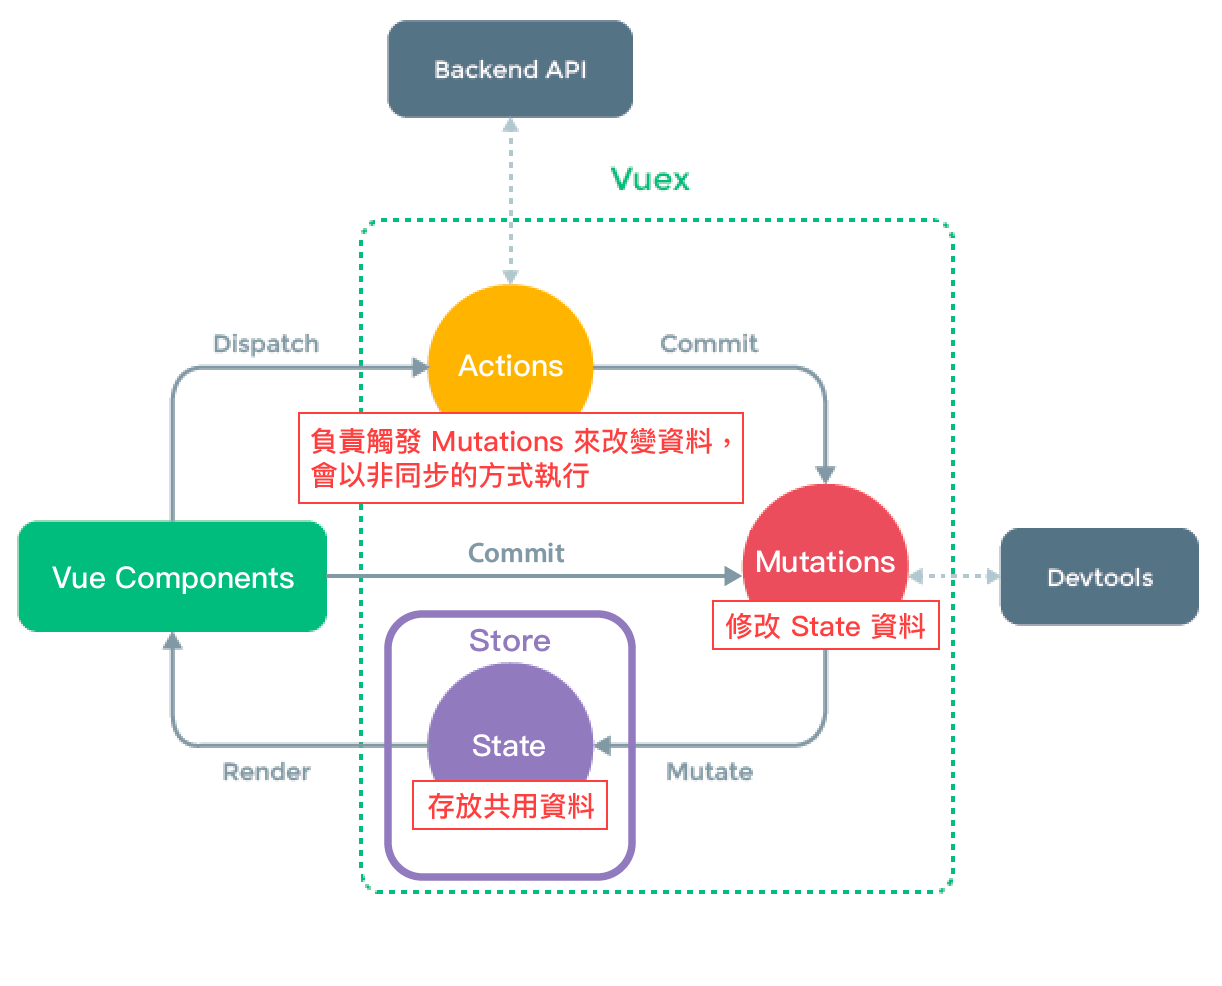
[ 流程說明 ]
- 當使用者在「Vue Component」點擊按鈕觸發事件呼叫 Event Handler
- 在 Event Handler 中 Dispatch 給「Actions」呼叫對應的 action handler
- 接著 Commit 給「Mutations」呼叫相對應的 mutation handler
- 最後改變 Store 中的 State ,渲染至元件中
流程簡單來說:定義全局的 State -> 觸發 -> 改變 State -> 渲染到畫面中
[ 名詞解釋]
- Store:保存 APP 中資料狀態的地方,一個 APP 只會有一個 Store
- State:被 Store 所管理的單一狀態值
- Dispatch:觸發 Action 的操作
- Commit:觸發 Mutation 的操作
- Actions:定義整個 APP 中所有行為,負責觸發 Mutation 來改變 State 的資料,通常會在這個階段進行非同步的處理
- Mutations:負責真正改變 State 的資料,屬於同步更新
了解 Vuex 的概念後,我們接著看如何在 Vue 中使用 Vuex
實際操作 Vuex
前置作業
- 建立 Vue 專案,指令
vue create ex-vuex - 在專案內安裝 Vuex,指令
npm install vuex@next — save
操作開始
第一種(同步操作): view → commit → mutations → state 變化 → view 變化
Step1. 建立保存 APP 中資料狀態的地方「 Store」
- 建立 Store
新增檔案,路徑:src/store/index.js
import { createStore } from 'vuex'// 保存 APP 中資料狀態的地方,一個 APP 只會有一個 Storeconst store = createStore({})export default store
- 使用 use() ,使 Vue 可以取得 Store 裡面的 State
修改檔案,路徑:src/main.js
import { createApp } from 'vue'import App from './App.vue'import store from './store'createApp(App) .use(store) .mount('#app')
Step2. 建立 State、Mutations
修改檔案,路徑:src/store/index.js
import { createStore } from 'vuex'// 被 Store 所管理的單一狀態值const state = { counter: 0}// 負責真正改變 State 的資料,屬於同步更新const mutations = { increment(state) { state.counter++ }}// 保存 APP 中資料狀態的地方,一個 APP 只會有一個 Storeconst store = createStore({ state, mutations})export default store
Step3. 在 UI Component 使用 store.commit 方法觸發 mutation,變更 State
修改檔案,路徑:src/App.vue (script 的部分)
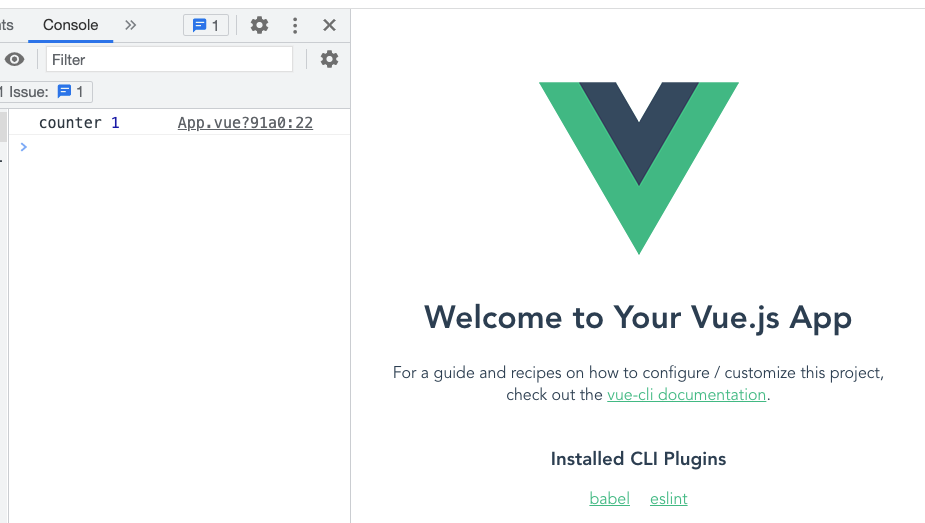
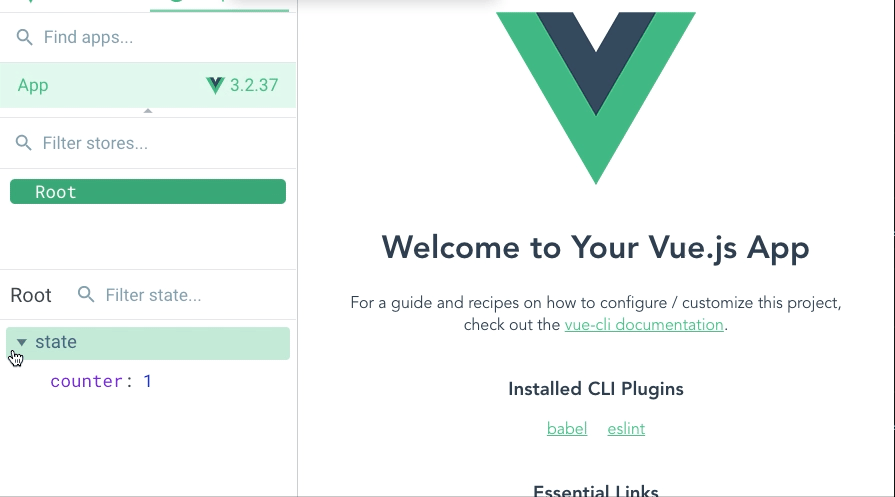
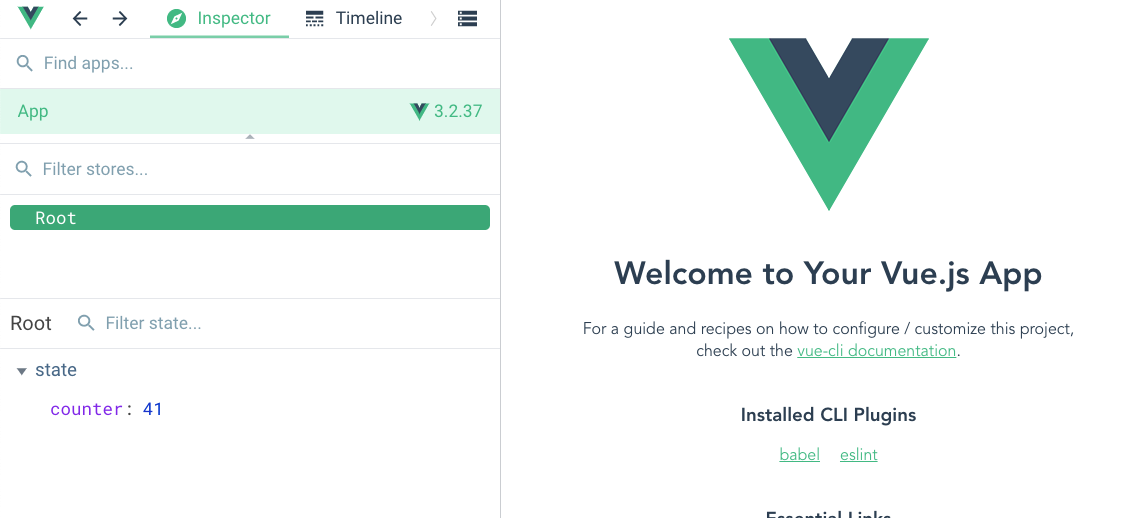
<script>import HelloWorld from './components/HelloWorld.vue'import store from './store';export default { name: 'App', components: { HelloWorld }, mounted() { // 發動 commit,觸發狀態變更 store.commit('increment') // 使用 store.state 取得 state console.log('counter', store.state.counter) // -> 1 }}</script>
結果
第二種(異步操作): view → dispatch → actions → commit → mutations → state 變化 → view 變化
Step1. 建立 Actions
修改檔案,路徑:src/store/index.js
const actions = { // 定義整個 APP 中所有行為,負責觸發 Mutation 來改變 State 的資料,通常會在這個階段進行非同步的處理 increment(context) { setTimeout(() => { context.commit('increment') }, 5000) }}// 保存 APP 中資料狀態的地方,一個 APP 只會有一個 Storeconst store = createStore({ state, mutations, actions})
Step2. 在 UI Component 使用 store.despacth 方法觸發 action,變更 State
修改檔案,路徑:src/App.js (script 的部分)
<script>import HelloWorld from './components/HelloWorld.vue'import store from './store';export default { name: 'App', components: { HelloWorld }, mounted() { // 發動 commit,觸發狀態變更 store.commit('increment') // 使用 store.state 取得 state console.log('counter', store.state.counter) // -> 1 // 發動 dispatch,觸發異步狀態變更 store.dispatch('increment') // -> 2 }}</script>
結果
在實際操作中建議操作 State 的方法要統一才能使資料流統一,因此建議統一使用第二種方式操作 State。
傳遞參數至 State 中(異步操作+payload): view → dispatch+payload → actions → commit → mutations → state 變化 → view 變化
Payload
是一個物件,可以透過 dispatch() 、 commit() 傳遞至 mutations 中取用。
Step1. dispatch() 添加 Payload
修改檔案,路徑:src/App.vue (script 的部分)
// 發動 dispatch,觸發異步狀態變更// 第二個參數為 Payloadstore.dispatch('incrementByAmount', { customCounter: 40 })
Step2. 新增相對應的 actions , mutation:incrementByAmount
修改檔案,路徑:src/store/index.js
const mutations = { incrementByAmount(state, n) { if (n) { state.counter += n } }}const actions = { // 第二個參數為 payload 使用解構的方式取出值 incrementByAmount(context, { customCounter }) { context.commit('incrementByAmount', customCounter) }}
結果
計算 Store 中 State:getters
有時候需要對 state 進行運算處理(例如:資料中取出特定資料、計算…等),有點類似 computed 的作用。
路徑:src/store/index.js
// 被 Store 所管理的單一狀態值
const state = {
    todos: [
        { id: 1, text: '...', done: true },
        { id: 2, text: '...', done: false }
    ]
}

// 取得資料。也可以像 computed 一樣,自定義運算處理資料
const getters = {
    doneTodos: (state) => state.todos.filter(todo => todo.done)
}

// 保存 APP 中資料狀態的地方,一個 APP 只會有一個 Store
const store = createStore({
    getters
})

export default store
路徑:src/App.js
<script>
import HelloWorld from './components/HelloWorld.vue'
import store from './store';
export default {
  name: 'App',
  components: {
    HelloWorld
  },
  mounted() {
    //取出 getter 值
    store.getters.doneTodos.forEach(element => {
      console.log(element.id, element.text)
    });
  }
}
</script>
Vuex 中的輔助 Function
某些開發情境僅使用上述的功能,因此 Vuex 提供了四個好用的 Function,以下一一說明:
mapState
- 使用情境:當有多個 state 需要使用於 Component 中、需要與 Component 中的 Data 進行運算處理時、需要為 state 設定別名時。
- 使用方法
1.
<script>
// 在 component 中引入
import { mapState } from 'vuex'
export default {
  // 使用於 computed 中
  computed: {
    //使用展開運算符,輕鬆取用 state
    ...mapState(['counter', 'todos'])
  },
}
</script>
2.
<script>
// 在 component 中引入
import { mapState } from 'vuex'
export default {
  // 使用於 computed 中
  computed: mapState({
    count: state => state.count,
    //  傳 string 參數,等同 `state => state.count`
    countAlias: 'count',
    // 需要與 Component 中的 Data 進行運算處理時
    countPlusLocalState (state) {
      return state.count + this.localCount
    }
  })
}
</script>
mapGetters
- 使用情境:當有多個 getter 需要使用於 Component 中。
- 使用方法
<script>
import { mapGetters } from 'vuex'
export default {
  computed: {
  // 使用展開運算符將 getter 混入 computed 中
    ...mapGetters([
      'doneTodosCount',
      'anotherGetter',
      // ...
    ])
  }
}
</script>
mapMutations(不推薦此寫法)
- 使用情境:當有多個 Mutations 需要使用於 Component 中。
- 剛剛有提到我們希望「資料流統一」,此寫法等同於發出 commit 直接更動到 State,有興趣的可以參考官網的說明。
mapActions
- 使用情境:當有多個 Actions 需要使用於 Component 中。
- 使用方法
<script>
import { mapActions } from 'vuex'
export default {
  // ...
  methods: {
    ...mapActions([
      'increment',
      // `mapActions` 也支持 payload:
      'incrementBy' // `this.incrementBy(amount)` 等於 `this.$store.dispatch('incrementBy', amount)`
    ]),
    ...mapActions({
      add: 'increment' // `this.add()` 等於 `this.$store.dispatch('increment')`
    })
  }
}
</script>
大型 APP Vuex 運用調整
當 APP 變複雜時,Store 裡的 State 通常也會變得非常多,因此如何管理就變得相當重要,以下提供兩種方式,讓我們在開發時提高開發效率以及降低錯誤率:
使用 Module 拆分 State
白話就是將 State 進行分類,例如可以分成
- 與 APP 設定相關的 State
- 權限相關的 State
- ….
拆分範例說明
- 分成 app、auth 兩個 modules
- 在 store 底下建立 modules,並一個 modules 拆分成一個檔案,所有的 module 會透過 index export 出去。
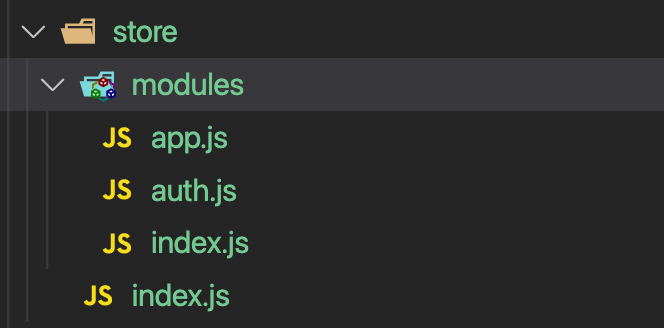
- app.js、auth.js 檔案內容:內容跟原本檔案是差不多的,比較要注意的是多了
namespaced這個屬性
[補充說明] namespaced 解決了命名重複的問題
由於 modules 中 action 和 mutation 仍是屬於「全域命名」,因此一個不小心很容易重複命名導致程式出錯,namespaced 若為 ture 時 module 所有的 getter、action 以及 mutation 都會根據 modules 調整命名
const state = {
    token: 'test token'
}
const mutations = {
    login () { ... } // -> commit('account/login')
}
const actions = {
    login () { ... } // -> dispatch('account/login')
}
const getters = {
    isAdmin () { ... } // -> getters['account/isAdmin']
}


const auth = {
    namespaced: true,
    state,
    mutations,
    actions,
    getters
}

export default auth
- store/modules/index.js:這邊使用 webpack 的語法取出檔名進行 import 跟 export,想了解寫法的可參考:使用require.context实现前端工程自动化
/* Dynamic Exporter:
 * Dynamically export all js files (except index) in current folder
 */
const req = require.context('.', false, /\.js$/)

req.keys().forEach((key) => {
    const name = key.replace(/^\.\/(.*)\.js/, '$1')

    if (name !== 'index') {
        module.exports[name] = req(key).default
    }
})
- src/store/index.js
import { createStore } from 'vuex'
import modules from './modules'

// 保存 APP 中資料狀態的地方,一個 APP 只會有一個 Store
const store = createStore({
    modules,
})

export default store- 結果

使用常量替代 Mutation 事件的 type
由於 type 是使用 String,因此如果需要置換就需要東改西改,加上可能一個不小心拼錯,程式就出事了
因此我們可以常量來替代。
- 新增 mutationTypes.js,檔案路徑:src/store/mutationTypes.js
export const LOGIN = 'login';
- 修改 auth.js,檔案路徑:src/store/modules/auth.js
import { LOGIN } from '../mutationTypes'

const state = {
    token: 'test token'
}
const mutations = {
    [LOGIN]: () => { } // -> commit('account/login')
}
const actions = {
    login(context) {
        setTimeout(() => {
            context.commit(LOGIN)
        }, 5000)
    } // -> dispatch('account/login')
}
const getters = {
    isAdmin() { } // -> getters['account/isAdmin']
}


const auth = {
    namespaced: true,
    state,
    mutations,
    actions,
    getters
}

export default auth
重點整理
- Store:保存 APP 中資料狀態的地方,一個 APP 只會有一個 Store。
- State:被 Store 所管理的單一狀態值。
- Dispatch:觸發 Action 的操作。
- Commit:觸發 Mutation 的操作。
- Actions:定義整個 APP 中所有行為,負責觸發 Mutation 來改變 State 的。資料,通常會在這個階段進行非同步的處理。
- Mutations:負責真正改變 State 的資料,屬於同步更新。
- 在實作中為了使資料流統一,我們僅使用
dispath()去改變 State。 - Vuex 中的輔助 Function 有mapState、mapGetters、mapMutations、mapActions 四種,可以在 Component 中使用。
- 在大型 APP 中我們可以使用 Module 拆分 State,以好管理。
- 在大型 APP 中我們可以使用常量替代 Mutation 事件的 type。