Spring OAuth2一看就懂
Spring OAuth2一看就懂
| 簡介 |
OAuth2是目前流行的認證機制,四種Token的許可類型(Grant Type)卻常讓人常摸不著頭緒。此處簡單的說明什麼是OAuth2,並且用Spring OAuth2來實作API的認證機制。 |
| 作者 |
夏宏彰 |
1. 前言
l OAuth2是一個開放標準,內容定義在RFC6749文件上,各家可以有自己的實作方式。
l Spring OAuth2是架構在Spring Security上的安全機制,若對於Spring Security不太了解,可以參考” Spring Security一看就會”一文幫助你快速掌握Spring Security的設計與精神。
2. 目的
l 了解什麼是OAuth2。
l 了解Spring OAuth2如何配置。
3. 開始前準備
本說明與範例基於以下版本的環境:
l JDK 1.8以上
l Spring Security 4.2.3 (Current 5.0.4)
l Spring OAuth2 2.2.1 (Current 2.3.3)
l Spring Boot 1.5.4 Release. (Current 2.0.1)
4. OAuth2是什麼?
OAuth2是一個授權的標準協定,主要是”讓用戶可以授權第三方網站存取他們儲存在另外服務提供者的某些特定資訊”。換句話說也可以是一種SSO的運作方式,但角色分得非常明確,明確到與我們一般使用的認知不同,所以容易混淆而難以在第一時間理解。例如在昕力大學登入的的運作中,我就是”用戶”沒錯,但誰是”第三方網站”? 誰又是”另外服務提供者”?
在說明之前,我們先來看OAuth2有那些角色:
Resource owner
使用者(end-user)。擁有id/pwd以取得受保護的資源。
Resource server
存放使用者資源的伺服器。一般是指提供API可取得資料的網站,它只認Token來回覆使用者資源。(這個所謂的”另外服務提供者”與Authorization server在某種程度上是相依的,或是同一套系統的不同模組。)
Client
在桌面或裝置上的應用程式,例如App,或是伺服器上的程式。它會拿Token到Resource server取得資料。(即所謂的第三方網站)
Authorization server
認證resource owner,成功後回覆Token的伺服器。此Token可用來授權Client取得受保護的資源。
回到我們的問題,我是resource owner,而Google Accounts是authorization server沒錯,剩下resource server與client分別是誰由上面的說明就很清楚了,“昕力大學”會取得Token,然後用Token呼叫Google APIs取得我的名字與email,所以“昕力大學”是client,也就是”第三方網站”; Google APIs是resource server也就是”另外服務提供者”,而我們直接操作的瀏覽器叫做User-Agent。換句話說,OAuth2是
”讓我可以授權昕力大學存取我儲存在Google的姓名與Email資訊”
這樣是不是就容易多了呢! 其中有趣的是,我們之所以可以登入昕力大學,並不是直接由OAuth2認證通過來登入,而是讓昕力大學拿Token取得我們google上的姓名與Email資料,確認是”昕力員工”才可以登入; 否則世界上所有有gmail的人不就都可以登入昕力大學了! 這些有gmail的人登入昕力大學時會看到以下訊息:
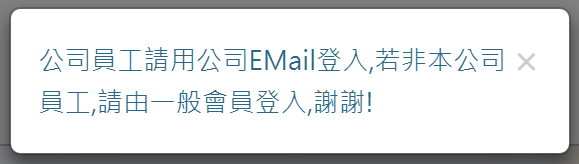
(雖然其他人不能登入昕力大學,但當他們看到以上訊息時,他們的姓名與Email已經傳給昕力大學了哦! 所以對於不明網站,我們在使用上得謹慎,否則你允許的資料就被拿去了!)
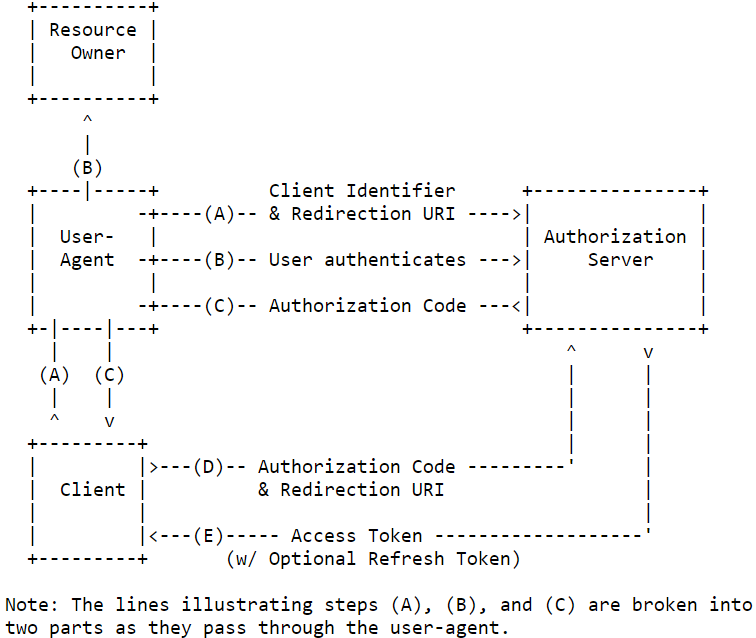
再來看下面這張RFC6749上的圖,這關係清楚地說明了Resource Owner透過User-Agent只會與Authorization Server、Client有溝通,我們在使用時是不會看到Resource Server的存在的。我們在Google上授權後,我們只知道我們登入了client,但client可因此可以從Google上進一步取得資料,從這裡我們就懂了。
4.1 四種Grant Type
為了滿足多種不用的授權機制,OAuth2定義了四種Grant Type流程。前兩個主要是Web應用,會有Browser與redirect的溝通過程; 後兩個主要是內部Servers間或信任的App與Server的相互溝通。
1. Authorization code: 這就是上述昕力大學登入時的機制,最複雜的就是它了。由上述說明,這是一個用http redirect的流程,還有browser作用其中。
2. Implicit: 這主要是給WebApp用的一種流程,因為Client就是Browser上的Javasript (ex. ReactJ),所以Token會顯示在redirect URI上,Client也不用認證,做法較不安全,與Authorization Code也因此有些不同。
3. Resource owner password credentials: Client拿Resource owner的id/pwd換取Token的機制。實作上Client需要先認證,再用Resource owner的id/pwd換取Token。
4. Client credentials: 直接用Client在Authorization Server上註冊的id/pwd換取Token的機制。
以下將以Spring OAuth2來配置Grant Type Resource owner password credentials與Client credentials兩種授權流程。此處不說明用Web進行OAuth2的配置方式,一來Servers間的授權流程較簡單,而且也是我們開發API相關的專案較常用到的機制。
5. Spring OAuth2的配置
5.1、
Spring Security + OAuth2有四個jar檔:
l Core - spring-security-core.jar,只要是用Spring Security就需要此jar。
l Web - spring-security-web.jar,包括filters與web-security的基礎程式。
l Config - spring-security-config.jar,包括namespace configuration與Java configuration程式。
l OAuth2 – spring-security-oauth2,Spring Security只要再加這個jar就可配置OAuth2的功能。
5.2、
Authorization Server配置
前面說到,第三種與第四種Grant Type分別可以用Resource owner與Client的id/pwd來取得Token,所以Authorization Server首要是配置Resource owner與Client的id/pwd。因為Resource owner也就是user的id/pwd在原Spring Security中已用UserDetailsService配置,所以這裡只需要配置Client的資料即可。用ClientDetailsServiceConfigurer範例中配置了兩個Clients:
l client_1: 用第四種Grant Type – “client credentials”來取得Token
l client_2: 用第三種Grant Type – resource owner “password” credentials來取得Token,所以需要再搭配userDetailsService中user資料才行。
還有,Token需要儲存下來,以便管理並確認該Token是否有過期。此處我們只要指定Token儲存在Redis,可以用http GET/POST取得token即可。
@Configuration
public class OAuth2ServerConfig {
private static final String DEMO_RESOURCE_ID = "order";
@Configuration
@EnableAuthorizationServer
protected static class AuthorizationServerConfiguration extends AuthorizationServerConfigurerAdapter {
@Autowired
AuthenticationManager authenticationManager;
@Autowired
RedisConnectionFactory redisConnectionFactory;
@Override
public void configure(ClientDetailsServiceConfigurer clients) throws Exception {
//配置兩個用戶端,一個用於password認證一個用於client認證
clients.inMemory().
withClient("client_1")
.resourceIds(DEMO_RESOURCE_ID)
.authorizedGrantTypes("client_credentials", "refresh_token")
.scopes("select")
.authorities("client")
.secret("123456")
.and().
withClient("client_2")
.resourceIds(DEMO_RESOURCE_ID)
.authorizedGrantTypes("password", "refresh_token")
.scopes("select")
.authorities("client")
.secret("123456");
}
@Override
public void configure(AuthorizationServerEndpointsConfigurer endpoints) throws Exception {
endpoints
.tokenStore(new RedisTokenStore(redisConnectionFactory))
.authenticationManager(authenticationManager)
//允許 GET、POST 請求獲取 token,即訪問端點:oauth/token
.allowedTokenEndpointRequestMethods(HttpMethod.GET, HttpMethod.POST);
}
}
}
5.3、
Resource Server配置
此處我們配置API存取的安全管理。首先指定好Resource ID,此ID可視為Resource Server的ID。當Client向Resource Server請求時,除了需要帶Token,也要確認該Client所註冊可使用的ResourceID是否一致。我們只要配置即可,確認的工作Spring已幫我們完成。
對於API的url,此處設定除了”/order/**”路徑下的需要認證以外,其他不做任何控管。除了可指定要認證,也可以指定其他所需要的條件,例如Role(hasRole()),或是IP Address(hasIpAddress())要與設定一致才可放行。
@Configuration
public class OAuth2ServerConfig {
private static final String DEMO_RESOURCE_ID = "order";
@Configuration
@EnableResourceServer
protected static class ResourceServerConfiguration extends ResourceServerConfigurerAdapter {
@Override
public void configure(ResourceServerSecurityConfigurer resources) {
resources.resourceId(DEMO_RESOURCE_ID).stateless(true);
}
@Override
public void configure(HttpSecurity http) throws Exception {
// @formatter:off
http
// Since we want the protected resources to be accessible in the UI as well we need
// session creation to be allowed (it's disabled by default in 2.0.6)
.sessionManagement().sessionCreationPolicy(SessionCreationPolicy.IF_REQUIRED)
.and()
.requestMatchers().anyRequest()
.and()
.anonymous()
.and()
.authorizeRequests()
.antMatchers("/order/**").authenticated();//order存取,必須認證過後才可以訪問
// @formatter:on
}
}
}
5.4、 原Spring Security配置
前面有說明過,Spring OAuth2是架構在Spring Security上的功能,所以User的Id/Pwd與URL的安全配置還是需要從基本Spring Security來設定。如下範例,就是設定UserDetailsService與HttpSecurity即可:
@Configuration
@EnableWebSecurity
public class SecurityConfiguration extends WebSecurityConfigurerAdapter {
@Bean
@Override
protected UserDetailsService userDetailsService(){
InMemoryUserDetailsManager manager = new InMemoryUserDetailsManager();
manager.createUser(User.withUsername("user_1").password("123456").authorities("USER").build());
manager.createUser(User.withUsername("user_2").password("123456").authorities("USER").build());
return manager;
}
@Override
protected void configure(HttpSecurity http) throws Exception {
// @formatter:off
http
.requestMatchers().anyRequest()
.and()
.authorizeRequests()
.antMatchers("/oauth/*").permitAll();
// @formatter:on
}
}
5.5、 Spring Boot設定
此處用Spring Boot開發,相關設定如下。有監聽埠8080、redis host與Auth2 filter在Spring security的位置:
server:
port: 8080
spring:
redis:
host: 127.0.0.1
database: 0
security:
oauth2:
resource:
filter-order: 3
5.6、
JWT Token說明
JWT(JSON Web Toke)是一個開放標準(RFC 7519),定義了一個精簡且自我滿足的方法讓JSON資料可安全地在網路上傳輸。所謂精簡是此Token可以放在Url或是Http Header上傳輸; 所謂安全,是資料有被簽署,可保證資料沒有被篡改。但請注意,資料是沒加密的,僅是Base64 encode,所以千萬不要有個資或是敏感性資料。
JWT長相如下:
eyJhbGciOiJIUzI1NiIsInR5cCI6IkpXVCJ9.eyJzZXJ2ZXIiOiJIb3N0MSIsImF1ZCI6WyJvcmRlciJdLCJ1c2VyX25hbWUiOiJ1c2VyXzMiLCJzY29wZSI6WyJzZWxlY3QiXSwiZXhwIjoxNTMwMTU4NjAxLCJhdXRob3JpdGllcyI6WyJVU0VSIl0sImp0aSI6ImQ5ZjM1ZTEwLTZjY2MtNGJlNi05NjkyLWE0YThiYzkxZTE4ZCIsImNsaWVudF9pZCI6ImNoYW5uZWxfNCJ9.Tr-k2ySYxl21OIdCDZdA66tXS5WEPIYIOmMCmsmziAE
仔細看會發現JWT是由三個部分組成,用點”.”來分隔,格式如下:
Header(頭).Payload(負載).Signature(簽名)
每個部分由Base64 encoded,所以當我們將上面的JWT Token每部分依次解開後,結果如下:
Header:
{"alg":"HS256","typ":"JWT"}
Payload:
{"server":"Host1","aud":["order"],"user_name":"user_3","scope":["select"],"exp":1530158601,"authorities":["USER"],"jti":"d9f35e10-6ccc-4be6-9692-a4a8bc91e18d","client_id":"channel_4"}
Signature:
N6&1mN!Ѓe:a!
我們看到Header有兩個屬性: alg(湊雜演算法)、typ(Token Type),其中HS256表示HMAC SHA256,表示Signature是用secret key加密,當然也可以用非對稱式RSA方式加密。
Payload有:
l aud (audience),此值通常為URI清單,表示此JWT可存取該清單中的資源(位址)。
l exp (expiration time),有效期限,表示此JWT在此時間前是可用的。
l jti (JWT ID),此JWT的唯一ID,用來避免JWT被重複使用。
其他還有iss (Issuer簽發者), sub (subject用戶), nbf (Not Before之前不可用), iat (Issued At簽發時間)等,以上這些對於JWT來說都是Optional屬性。
另外,server是我們客製的屬性,表示我們也可以將資料置於JWT中,不過要注意的是不要有敏感內容與個資,例如密碼或是身分證字號; 而user_name或是client_id只是名稱,並不是絕對可識別的資料,一般情況下被知道也是安全的。
Signature則是將Header.Payload用alg屬性所說的方式加密產生的訊息摘要,只要Header、Payload有任何異動,或是secret key不對,則簽名結果就會不同。一但簽名不同,則該JWT將被Server拒絕接受。
6. OAuth2實際應用
6.1、 Authorization Server
暨然是Security, 當然1. 不可能用明碼,2. 實際應用也要將安全相關資料存放在DB,並且要加密才行。若Token不能用Redis存放,我們就要改用JWT(Jason Web Token),讓Token本身即有足夠的資訊可以做證明,不用存放在Server端。以上這些仍是只要設定即可,Spring OAuthe2是不是很好用呢!
Authentication Server更新如下,其中DB中client的資料建立我們用程式建好跑一次即可,所以註解掉了。然後設定Endpoint,因為JWT是不用store的,所以我們會看到這JwtTokenStore主要是設定一個Token Converter,此Token Convertor的設定要與Resource Server中的一致,這樣才能正確的解析JWT Token內容。
@Configuration
@EnableAuthorizationServer
protected static class AuthorizationServerConfiguration extends AuthorizationServerConfigurerAdapter {
@Autowired
AuthenticationManager authenticationManager;
@Autowired
private UserDetailsService userDetailsService;
@Autowired
DataSource myds;
@Override
public void configure(ClientDetailsServiceConfigurer clients) throws Exception {
clients.jdbc(myds).passwordEncoder(passwordEncoder());
/*可用來初始化client測試資料
clients.jdbc(myds).passwordEncoder(passwordEncoder())
.withClient("channel_5")
.resourceIds(DEMO_RESOURCE_ID)
.authorizedGrantTypes("client_credentials", "refresh_token")
.scopes("select")
.authorities("client")
.secret("123456")
.and().withClient("channel_6")
.resourceIds(DEMO_RESOURCE_ID)
.authorizedGrantTypes("password", "refresh_token")
.scopes("select")
.authorities("client")
.secret("123456");
*/
}
@Override
public void configure(AuthorizationServerEndpointsConfigurer endpoints) throws Exception {
TokenEnhancerChain tokenEnhancerChain = new TokenEnhancerChain();
tokenEnhancerChain.setTokenEnhancers(Arrays.asList(tokenEnhancer(), accessTokenConverter()));
endpoints
.tokenStore(jwtTokenStore())
.tokenEnhancer(tokenEnhancerChain)
.authenticationManager(authenticationManager).userDetailsService(userDetailsService)
.allowedTokenEndpointRequestMethods(HttpMethod.GET, HttpMethod.POST);
}
@Override
public void configure(AuthorizationServerSecurityConfigurer oauthServer) throws Exception {
oauthServer.passwordEncoder(passwordEncoder()); //設定密碼加密
}
@Bean
public PasswordEncoder passwordEncoder() {
return new BCryptPasswordEncoder(); ////密碼加密方式
}
@Bean
public JwtAccessTokenConverter accessTokenConverter() {
JwtAccessTokenConverter converter = new JwtAccessTokenConverter();
converter.setSigningKey("123"); //Token暫用symmetric key "123"來加密
return converter;
}
@Bean
public TokenStore jwtTokenStore() {
return new JwtTokenStore(accessTokenConverter());
}
@Bean
public TokenEnhancer tokenEnhancer() {
return new TsmpTokenEnhancer();
}
@Bean
@Primary
public DefaultTokenServices tokenServices() {
DefaultTokenServices defaultTokenServices = new DefaultTokenServices();
defaultTokenServices.setTokenStore(jwtTokenStore());
defaultTokenServices.setSupportRefreshToken(true);
//defaultTokenServices.setAccessTokenValiditySeconds(300); //5mins 沒作用
//defaultTokenServices.setRefreshTokenValiditySeconds(3000); //50mins 沒作用
return defaultTokenServices;
}
}
//此類別客制JWT的屬性值與效期
public class TsmpTokenEnhancer implements TokenEnhancer {
private static String SERVER_NAME = "Host1"; //需此成由系統環境變數取得
@Override
public OAuth2AccessToken enhance(OAuth2AccessToken accessToken, OAuth2Authentication authentication) {
Map<String, Object> additionalInfo = new HashMap<String, Object>();
additionalInfo.put("server", SERVER_NAME);
((DefaultOAuth2AccessToken) accessToken).setAdditionalInformation(additionalInfo);
((DefaultOAuth2AccessToken) accessToken).setExpiration(new Date(System.currentTimeMillis() + 300000));
return accessToken;
}
}
6.2、 Resource Server
此處我們可以看到TokenConverter的設定與Authorization Server要一致; 而Authorization中的TokenEnhancer在此要有相對應的TokenConverter將客制化的屬性取出來,則Controller中即可方便地用Spring參數注入的方式從Authentication物件取得Token的屬性。
@Configuration
@EnableResourceServer
protected static class ResourceServerConfiguration extends ResourceServerConfigurerAdapter {
@Override
public void configure(ResourceServerSecurityConfigurer resources) {
resources
.resourceId(DEMO_RESOURCE_ID)
.tokenServices(tokenServices())
.stateless(true);
}
@Override
public void configure(HttpSecurity http) throws Exception {
// @formatter:off
http
// Since we want the protected resources to be accessible in the UI as well we need
// session creation to be allowed (it's disabled by default in 2.0.6)
.sessionManagement().sessionCreationPolicy(SessionCreationPolicy.IF_REQUIRED)
.and()
//在此將頁面相關的URL排除 (只有API才用Token)
.requestMatchers().requestMatchers(
new NegatedRequestMatcher(
new OrRequestMatcher(
new AntPathRequestMatcher("/product/**")
) ) )
.and()
.anonymous()
.and()
.authorizeRequests()
.antMatchers("/order/**").authenticated();//設定API URLs
// @formatter:on
}
@Bean
public TokenStore jwtTokenStore() {
return new JwtTokenStore(accessTokenConverter());
}
@Bean
public JwtAccessTokenConverter accessTokenConverter() {
JwtAccessTokenConverter converter = new JwtAccessTokenConverter();
converter.setSigningKey("123");
converter.setAccessTokenConverter(tokenConverter());
return converter;
}
@Bean
@Primary
public DefaultTokenServices tokenServices() {
DefaultTokenServices defaultTokenServices = new DefaultTokenServices();
defaultTokenServices.setTokenStore(jwtTokenStore());
return defaultTokenServices;
}
@Bean
public TsmpTokenConverter tokenConverter() {
return new TsmpTokenConverter();
}
}
//將Token的屬性截取出來設定到OAuth2Authentication物件,
//如此我們才能在Authentication物件直接取得Token的屬性。
public class TsmpTokenConverter extends DefaultAccessTokenConverter {
/**
* Note: DefaultAccessTokenConverter used to set Authentication details to Null.
*/
@Override
public OAuth2Authentication extractAuthentication(Map<String, ?> claims) {
OAuth2Authentication authentication = super.extractAuthentication(claims);
authentication.setDetails(claims);
return authentication;
}
}
6.3、 application.yml
此處主要說明Spring Boot datasource的設定(以MariaDB為例)
server:
port: 8080
spring:
datasource:
url: jdbc:mariadb://localhost:3306/test
username: root
password: 1qaz2wsx
driver-class-name: org.mariadb.jdbc.Driver
driverClassName: org.mariadb.jdbc.Driver
logging:
level:
ROOT: INFO
security:
oauth2:
resource:
filter-order: 3
6.4、 測試
users Table
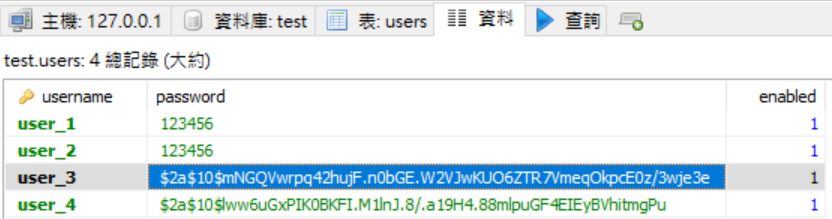
*user_3與user_4的密碼是有加密的。
oauth_client_details Table

*channel_3與channel_4的密碼有加密,channel_3的grant_type為client_credentials; channel_4的grant_type為password。
Sample Controller: /order
//取得authentication物件,並將認證明細列出。
@RequestMapping("/order/{id}")
public String getOrder(@PathVariable String id, Authentication authentication, Principal principal) {
//Authentication authentication = SecurityContextHolder.getContext().getAuthentication();
OAuth2AuthenticationDetails details = (OAuth2AuthenticationDetails)authentication.getDetails();
Map<String, Object> mapDetails = (Map<String, Object>)details.getDecodedDetails();
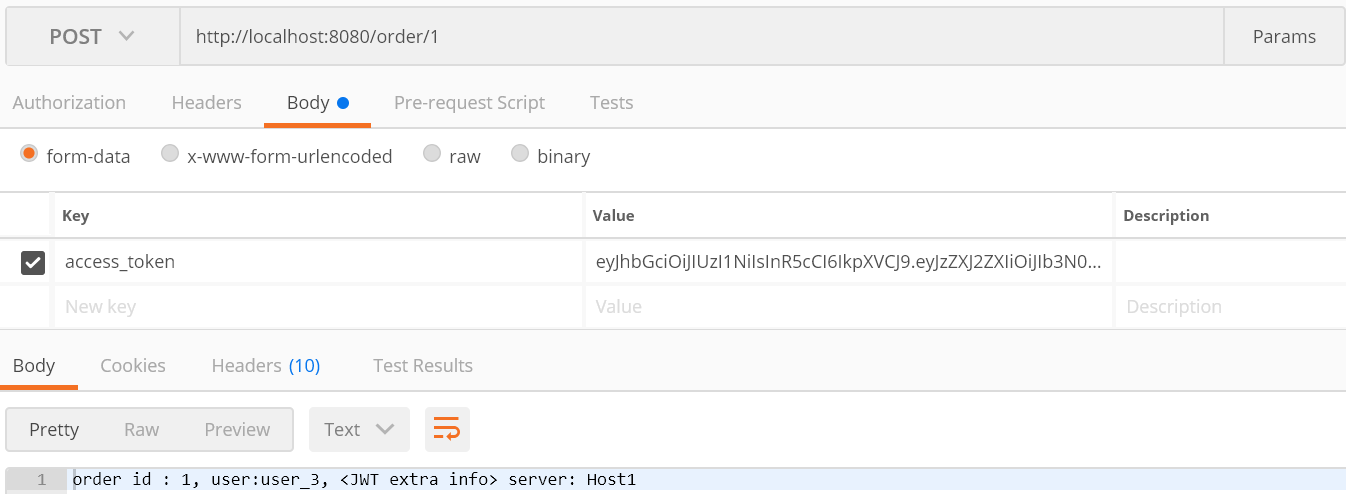
return "order id : " + id + ", user:" + principal.getName() + ", <JWT extra info> server: " + mapDetails.get("server") ;
}
1. 用Grant Type 3取得Token
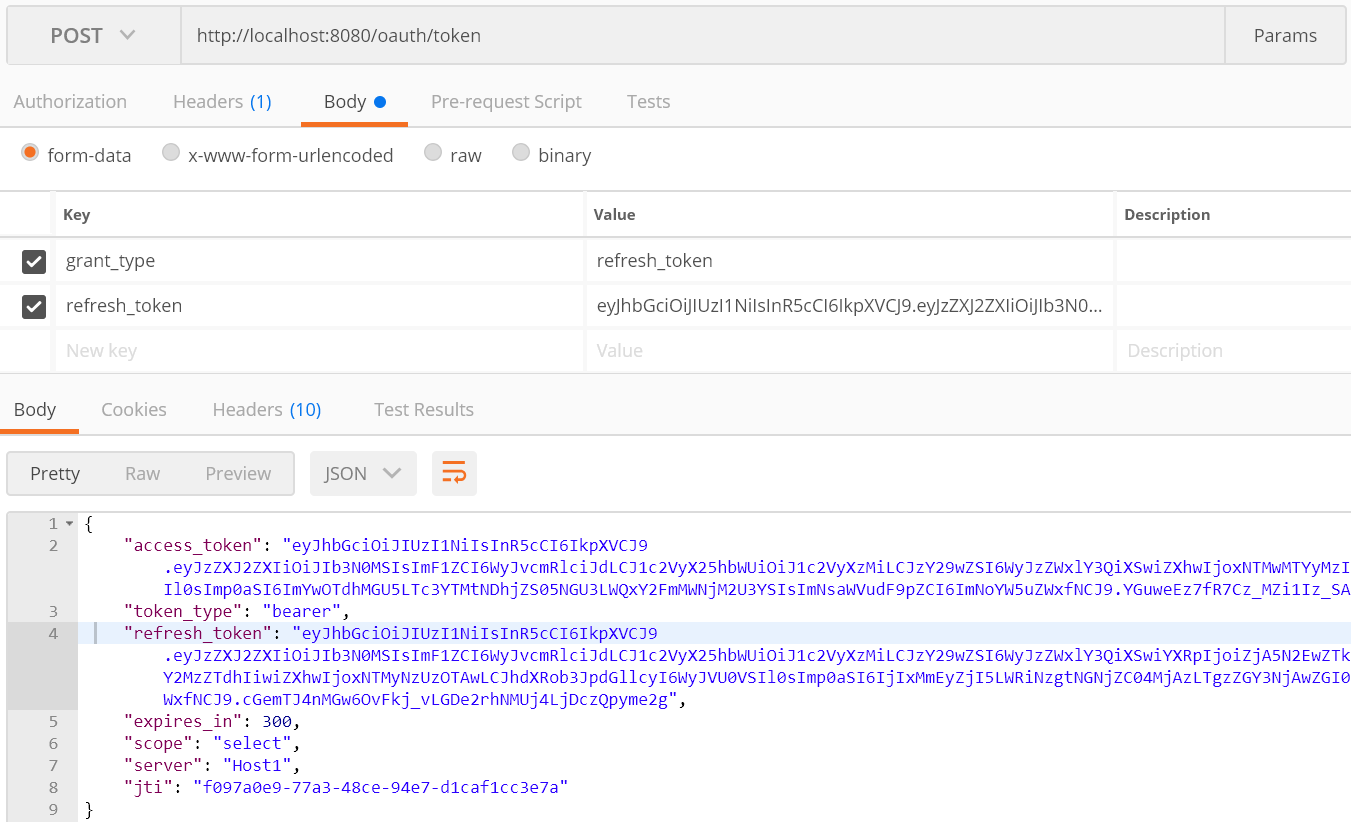
此範例為Grant Type: Resource owner password credentials,取得Token所需的輸入資料如下:
l URL: http://localhost:8080/oauth/token
l Authorization: Basic Y2hhbm5lbF80OjEyMzQ1Ng== //Basic channel_4:123456
l grant_type: password
l username: user_3
l password: 123456
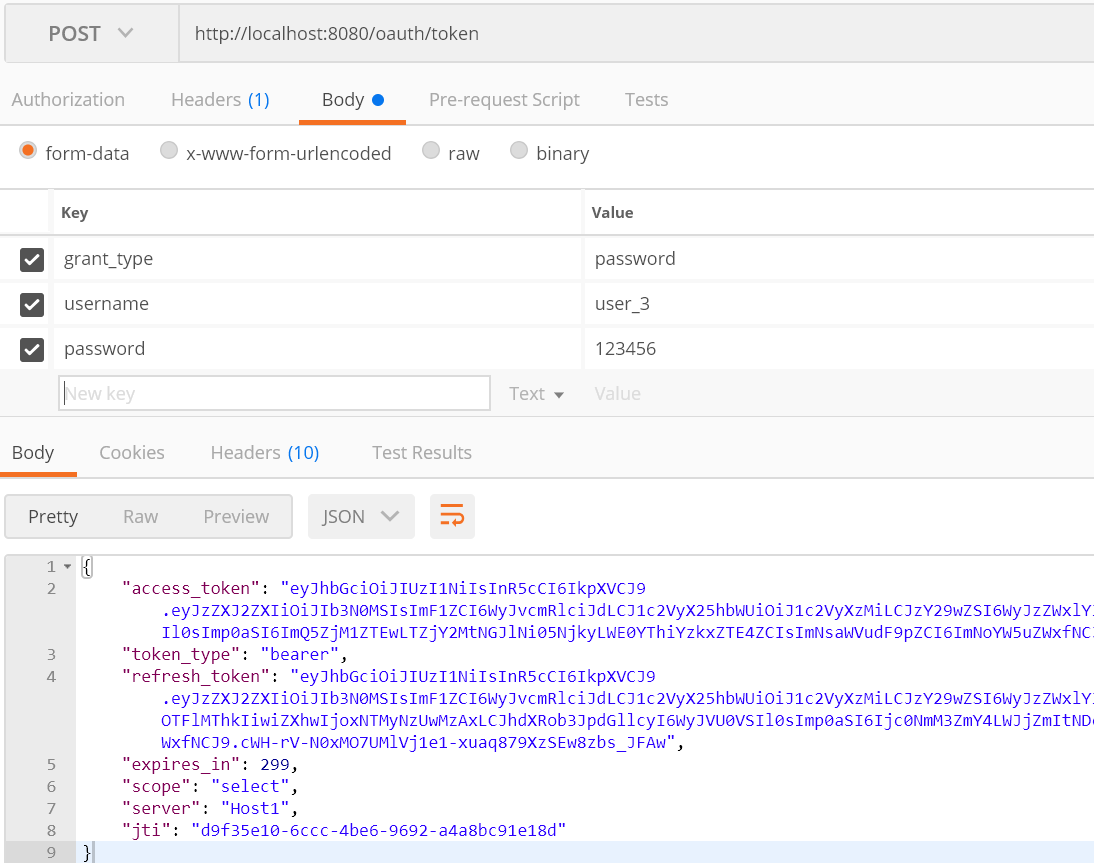
取得的Token
"access_token": "eyJhbGciOiJIUzI1NiIsInR5cCI6IkpXVCJ9.eyJzZXJ2ZXIiOiJIb3N0MSIsImF1ZCI6WyJvcmRlciJdLCJ1c2VyX25hbWUiOiJ1c2VyXzMiLCJzY29wZSI6WyJzZWxlY3QiXSwiZXhwIjoxNTMwMTU4NjAxLCJhdXRob3JpdGllcyI6WyJVU0VSIl0sImp0aSI6ImQ5ZjM1ZTEwLTZjY2MtNGJlNi05NjkyLWE0YThiYzkxZTE4ZCIsImNsaWVudF9pZCI6ImNoYW5uZWxfNCJ9.Tr-k2ySYxl21OIdCDZdA66tXS5WEPIYIOmMCmsmziAE",
access_token BASE64 Decode後的結果:
{"alg":"HS256","typ":"JWT"}{"server":"Host1","aud":["order"],"user_name":"user_3","scope":["select"],"exp":1530158601,"authorities":["USER"],"jti":"d9f35e10-6ccc-4be6-9692-a4a8bc91e18d","client_id":"channel_4"}N6&1mN!Ѓe:a!
Token取得之後,接下來我們看如何用此Token打API:
一、用GET,將此access_token放在query string中打API (不建議)
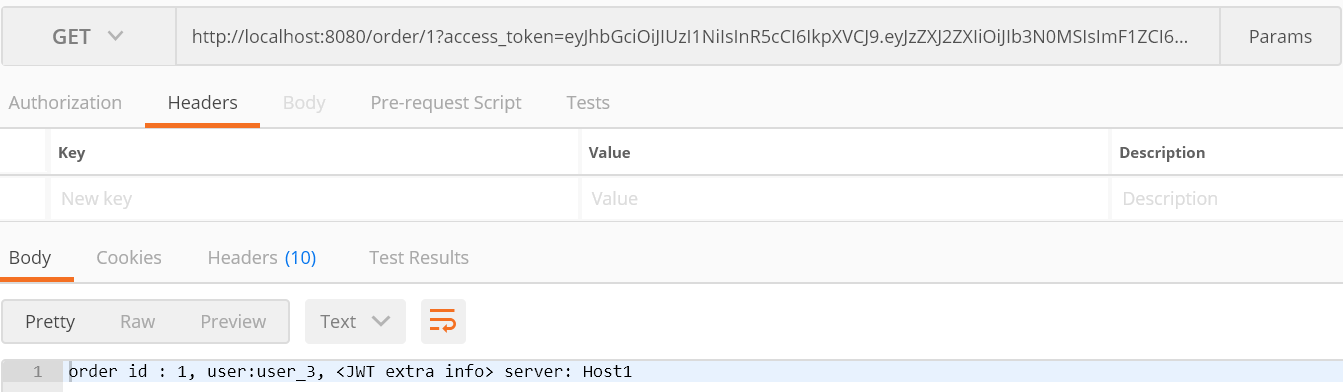
二、用GET,將此access_token放在header用Bearer Token方式打API
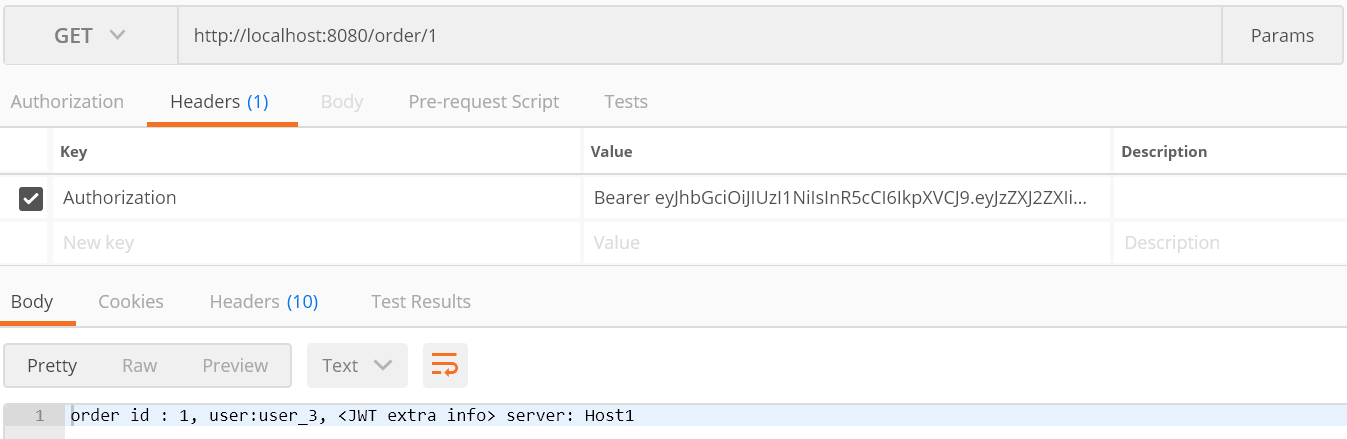
三、用POST,送出access_token打API
若access token過期則出現如下錯誤訊息:

四、用Refresh Toke取得Access Token
此範例為Grant Type: Refresh Token,取得Token所需的輸入資料如下:
l URL: http://localhost:8080/oauth/token(取Token的URL不變)
l Authorization: Basic Y2hhbm5lbF80OjEyMzQ1Ng== //Basic channel_4:123456
l grant_type: access_token
l refresh_token: <如下範例所示>
若refresh token過期,則出現如下錯誤訊息:

2. 用Grant Type 4取得Token
此範例為Grant Type: Client credentials,取得Token所需的輸入資料如下:
l URL: http://localhost:8080/oauth/token
l Authorization: Basic Y2hhbm5lbF8zOjEyMzQ1Ng== //Basic channel_3:123456
l grant_type: client
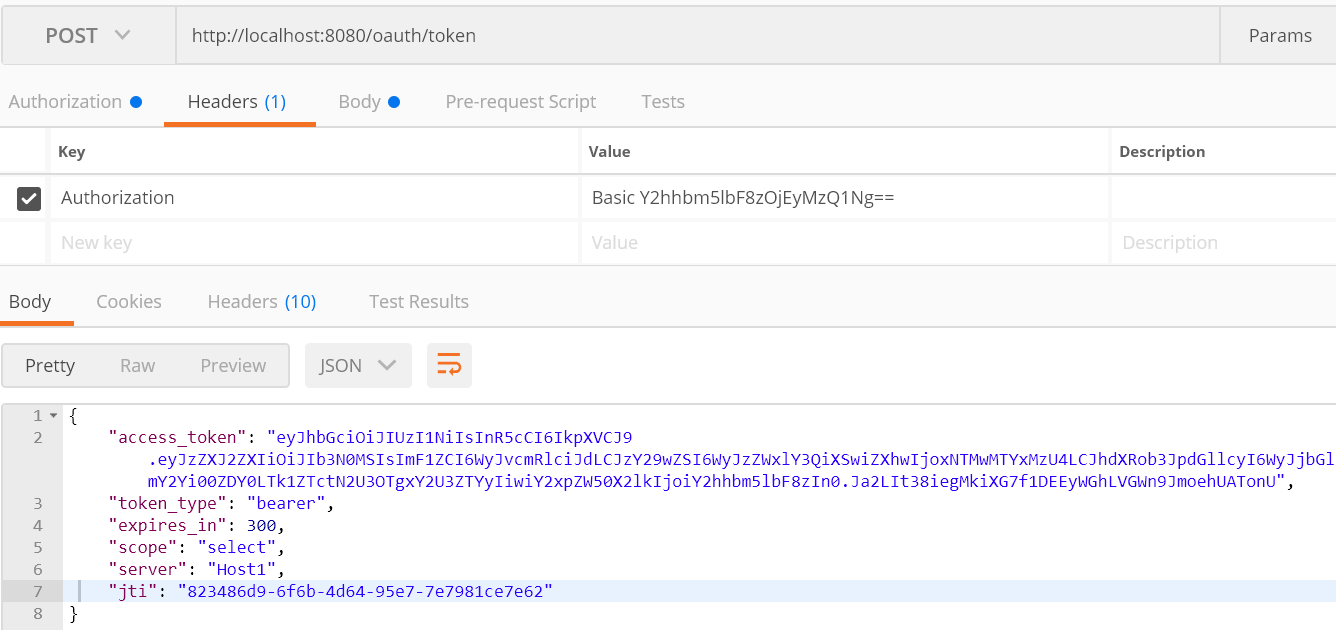
*我們發現grant_type: client時沒有refresh-token
取得的Token
"access_token": "eyJhbGciOiJIUzI1NiIsInR5cCI6IkpXVCJ9.eyJzZXJ2ZXIiOiJIb3N0MSIsImF1ZCI6WyJvcmRlciJdLCJzY29wZSI6WyJzZWxlY3QiXSwiZXhwIjoxNTMwMTYxMzU4LCJhdXRob3JpdGllcyI6WyJjbGllbnQiXSwianRpIjoiODIzNDg2ZDktNmY2Yi00ZDY0LTk1ZTctN2U3OTgxY2U3ZTYyIiwiY2xpZW50X2lkIjoiY2hhbm5lbF8zIn0.Ja2LIt38iegMkiXG7f1DEEyWGhLVGWn9JmoehUATonU",
access_token BASE64 Decode後的結果:
{"alg":"HS256","typ":"JWT"}{"server":"Host1","aud":["order"],"scope":["select"],"exp":1530161358,"authorities":["client"],"jti":"823486d9-6f6b-4d64-95e7-7e7981ce7e62","client_id":"channel_3"}
Token的使用方法相同,此處我們僅用Bearer Token方式為例打API
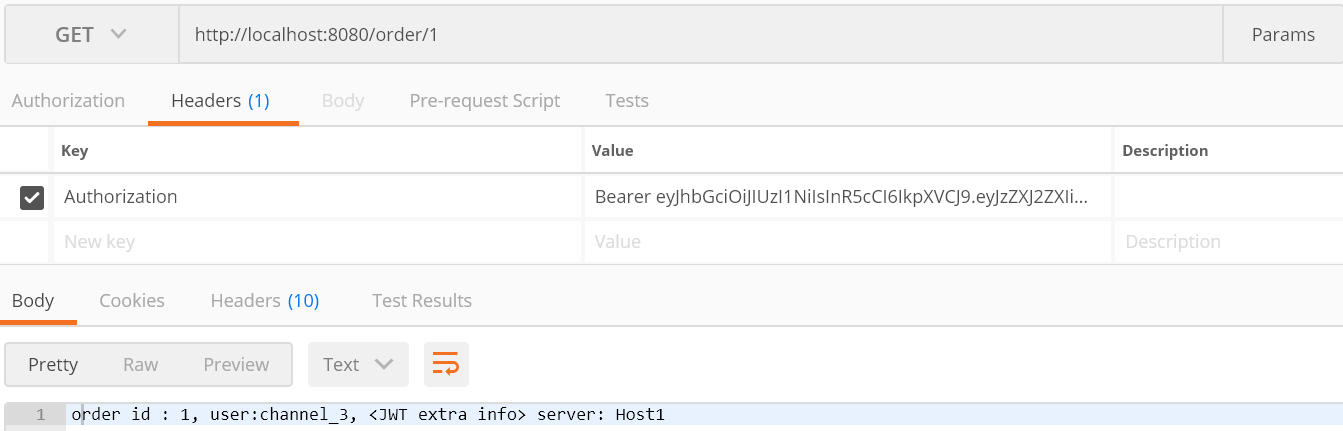
*注意: 此時user為channel_3(client)
6.5、
POM
最後我們看一下使用Spring OAuth2的pom.xml,其基本相依配置如下:
<parent>
<groupId>org.springframework.boot</groupId>
<artifactId>spring-boot-starter-parent</artifactId>
<version>1.5.4.RELEASE</version>
</parent>
<dependencies>
<!-- 注意是starter,自动配置 -->
<dependency>
<groupId>org.springframework.boot</groupId>
<artifactId>spring-boot-starter-security</artifactId>
</dependency>
<!-- 不是starter,手动配置 -->
<dependency>
<groupId>org.springframework.security.oauth</groupId>
<artifactId>spring-security-oauth2</artifactId>
</dependency>
<!-- 使用JWT -->
<dependency>
<groupId>org.springframework.security</groupId>
<artifactId>spring-security-jwt</artifactId>
</dependency>
<dependency>
<groupId>org.springframework.boot</groupId>
<artifactId>spring-boot-starter-web</artifactId>
</dependency>
<dependency>
<groupId>org.springframework.boot</groupId>
<artifactId>spring-boot-starter-data-jpa</artifactId>
</dependency>
<!-- 使用MariaDB -->
<dependency>
<groupId>org.mariadb.jdbc</groupId>
<artifactId>mariadb-java-client</artifactId>
</dependency>
<dependency>
<groupId>org.springframework.boot</groupId>
<artifactId>spring-boot-configuration-processor</artifactId>
<optional>true</optional>
</dependency>
</dependencies>
*基本上與spring security設定是一樣的,但OAuth2多了oauth2與jwt。
7. 參考來源
l RFC6749
https://tools.ietf.org/html/rfc6749
l OAuth 2.0 筆記 (1) 世界觀
https://blog.yorkxin.org/2013/09/30/oauth2-1-introduction
l 開放授權
https://zh.wikipedia.org/wiki/%E5%BC%80%E6%94%BE%E6%8E%88%E6%9D%83
l 昕力大學 - Google OAuth2.0 For Your WebApp
https://www.tpisoftware.com/tpu/article/articleDetails
l Using JWT with Spring Security OAuth
http://www.baeldung.com/spring-security-oauth-jwt
l JSON Web Token