Querydsl 入門
QueryDsl是一種增強JPA的開源框架,使JPA使用起來更加靈活方便,而且只要會一點SQL的寫法,基本上就可以無痛入門
而且也不需要複雜的設定就可以使用,接下來就讓我們進入QueryDsl的世界!
pom.xml
		<dependency>
			<groupId>org.springframework.boot</groupId>
			<artifactId>spring-boot-starter-data-jpa</artifactId>
		</dependency>
		<dependency>
			<groupId>org.springframework.boot</groupId>
			<artifactId>spring-boot-starter-web</artifactId>
		</dependency>
		<dependency>
			<groupId>org.springframework.boot</groupId>
			<artifactId>spring-boot-starter-web-services</artifactId>
		</dependency>
		<!-- H2資料庫依賴 -->
		<dependency>
			<groupId>com.h2database</groupId>
			<artifactId>h2</artifactId>
		</dependency>
		<!-- 自動生成GET/SET等...套件 -->
		<dependency>
			<groupId>org.projectlombok</groupId>
			<artifactId>lombok</artifactId>
			<optional>true</optional>
		</dependency>
		<dependency>
			<groupId>org.springframework.boot</groupId>
			<artifactId>spring-boot-starter-test</artifactId>
			<scope>test</scope>
			<exclusions>
				<exclusion>
					<groupId>org.junit.vintage</groupId>
					<artifactId>junit-vintage-engine</artifactId>
				</exclusion>
			</exclusions>
		</dependency>

		<!-- Apache 工具類別-->
		<dependency>
			<groupId>org.apache.commons</groupId>
			<artifactId>commons-lang3</artifactId>
		</dependency>
<!-- query dsl 核心套件 -->
		<dependency>
			<groupId>com.querydsl</groupId>
			<artifactId>querydsl-apt</artifactId>
			<scope>provided</scope>
		</dependency>

		<dependency>
			<groupId>com.querydsl</groupId>
			<artifactId>querydsl-jpa</artifactId>
		</dependency>
<build>
		<plugins>
			<plugin>
				<groupId>org.springframework.boot</groupId>
				<artifactId>spring-boot-maven-plugin</artifactId>
			</plugin>

			<!-- dsl Maven Apt 自動生成Q類實體-->
			<plugin>
				<groupId>com.mysema.maven</groupId>
				<artifactId>apt-maven-plugin</artifactId>
				<version>1.1.3</version>
				<executions>
					<execution>
						<goals>
							<goal>process</goal>
						</goals>
						<configuration>
							<outputDirectory>target/generated-sources/java</outputDirectory>
							<processor>com.querydsl.apt.jpa.JPAAnnotationProcessor</processor>
						</configuration>
					</execution>
				</executions>
			</plugin>
		</plugins>
	</build>
本次使用H2之資料庫,H2是一種以純java語言所構成的資料庫,本次使用嵌入式的方式建置H2資料庫
採用啟動時便自動載入SQL建立Table方式
附件--SQL.txt (因篇幅關係 此為本文範例所使用之資料)
application.properties設定
#此為設定H2連線資訊
spring.datasource.url =jdbc:h2:mem:test
spring.datasource.username = root
spring.datasource.password =
spring.datasource.driverClassName = org.h2.Driver

#此為設定開啟H2控制台
spring.h2.console.enabled=true

#此為設定自動更新Table 必要!  沒設定只會創立Table不會插入data
spring.jpa.hibernate.ddl-auto = update
#啟動程式後,自動到resources底下匯入Table  此處設定到/resource/db撈取
spring.datasource.schema=classpath:/db/schema.sql
#啟動程式後,自動到resources底下插入data  此處設定到/resource/db撈取
spring.datasource.data=classpath:/db/data.sql
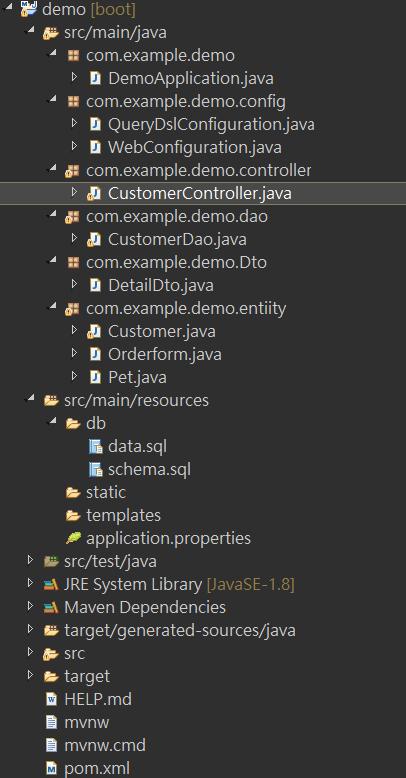
在Application.java所在Package底下新增config,此處放置配置文件
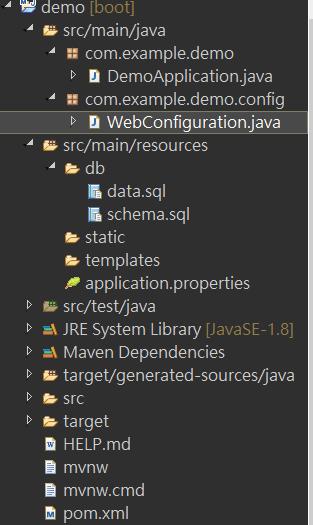
此java為H2資料庫進行註冊配置,spring boot 啟動時才能辨識到H2連線
@Configuration
public class WebConfiguration {
	@SuppressWarnings({ "rawtypes", "unchecked" })
	@Bean
	ServletRegistrationBean h2servletRegistration() {
		ServletRegistrationBean servletRegistrationBean =
				new ServletRegistrationBean(new WebServlet());
		servletRegistrationBean.addUrlMappings("/console/*");
		return servletRegistrationBean;
	}
}
目前到這邊已可以嘗試啟動傳案 並在瀏覽器輸入http://localhost:8080/console
便會出現H2控制台
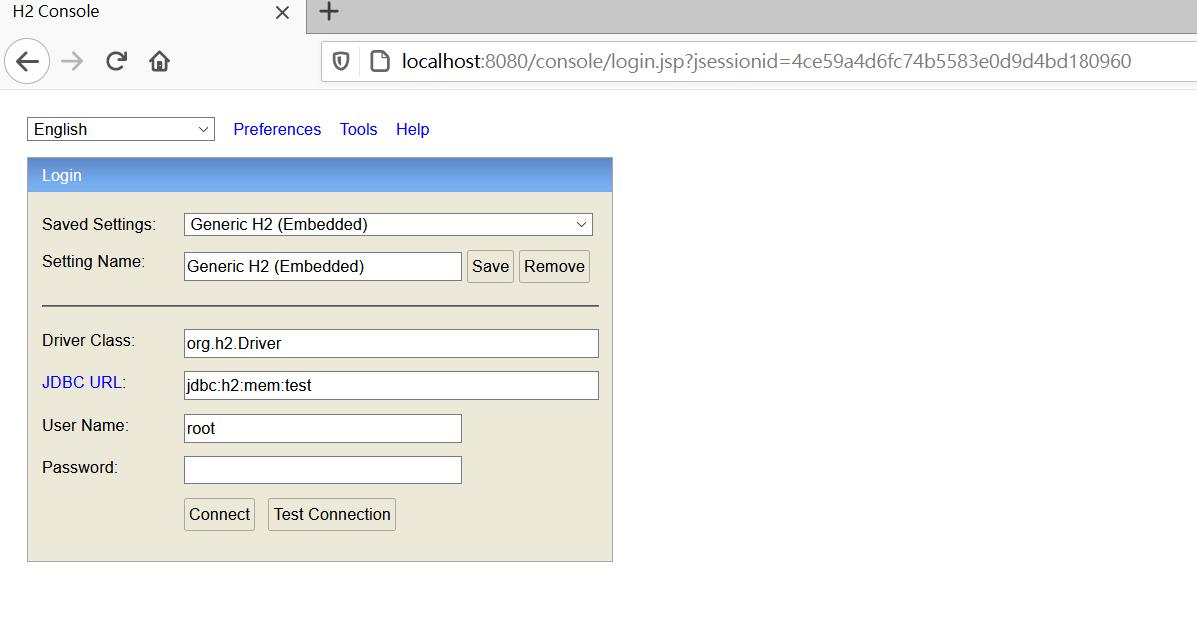
按下Connect 即可進入Table(application.properties設定帳號為 root 無密碼)
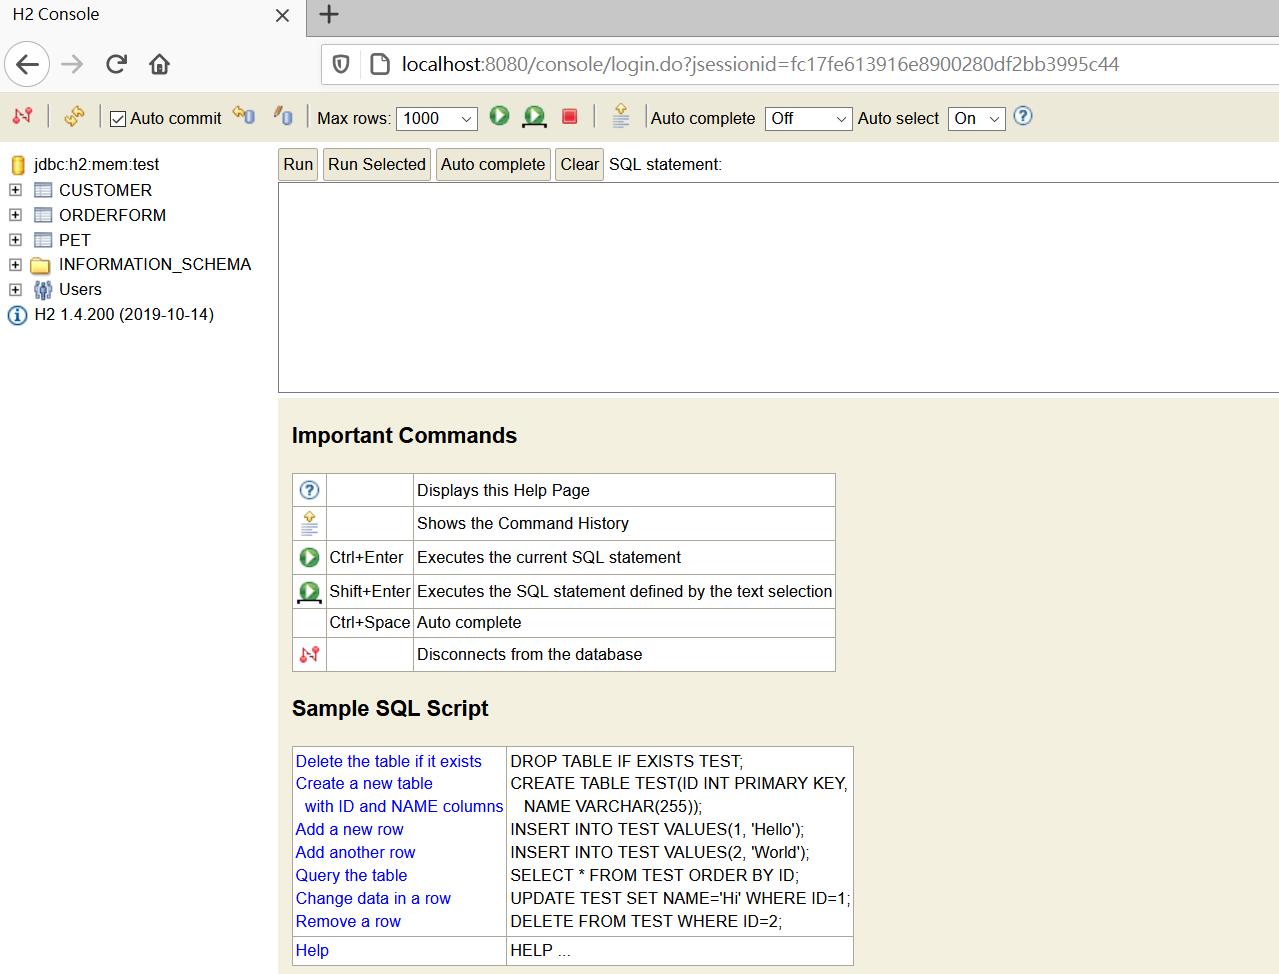
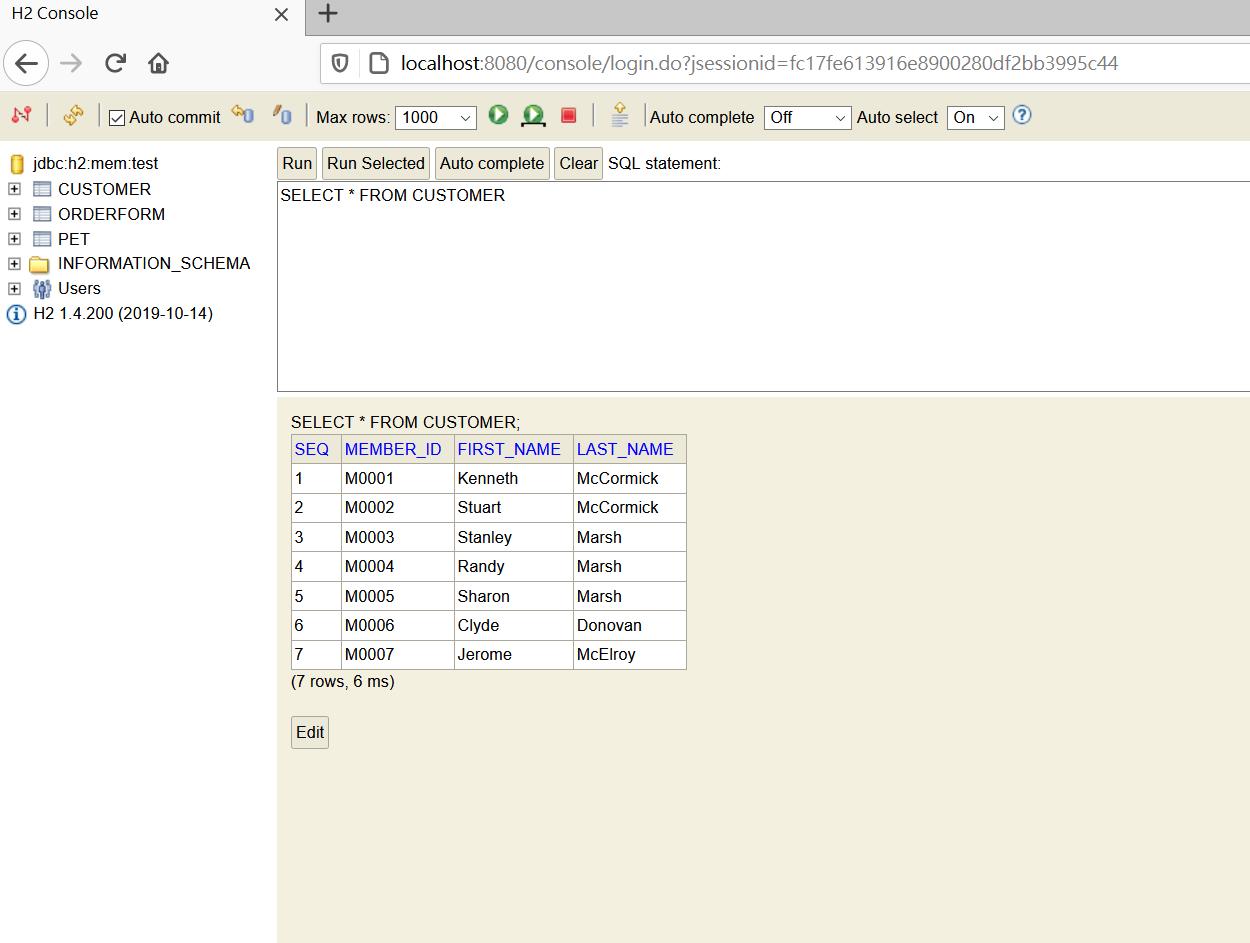
從左側便可看到預先載入的Table已成功創立,點下Table名稱且按下RUN鍵就可以看到Data也一起新增成功了!
(如果發現Table有誤可先試試將專案Clean完再重啟專案)
接下來就是針對QueryDsl作配置了!
在config下新增配置文件如下
因為後續會使用@Autowired做自動注入所以需要先做好配置
@Component
public class QueryDslConfiguration implements WebMvcConfigurer{
	@Bean
    public JPAQueryFactory jpaQuery(EntityManager entityManager) {
        return new JPAQueryFactory(entityManager);
    }
}
以下為範例架構
Customer.java內容
@Data
@NoArgsConstructor
@AllArgsConstructor
@Entity
public class Customer {
@Id
private String seq;
private String memberId;
private String firstName;
private String lastName;
}
Orderform.java內容
@Data
@NoArgsConstructor
@AllArgsConstructor
@Entity
public class Orderform {
@Id
private String seq;
private String orderId;
private String memberId;
private String petId;
}
Pet.java內容
@Data
@NoArgsConstructor
@AllArgsConstructor
@Entity
public class Pet {
@Id
private String seq;
private String petId;
private String petName;
private String species;
private Integer age;
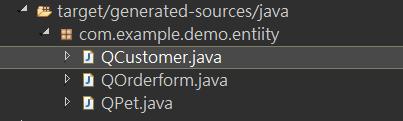
}新增完Entity物件後,會發現target/generated-sources/java同時出現了Entity類別
還記得之前在pom.xml裡有一段便是生成Q類別
/**
 * QCustomer is a Querydsl query type for Customer
 */
@Generated("com.querydsl.codegen.EntitySerializer")
public class QCustomer extends EntityPathBase<Customer> {

    private static final long serialVersionUID = 1209675926L;

    public static final QCustomer customer = new QCustomer("customer");

    public final StringPath firstName = createString("firstName");

    public final StringPath lastName = createString("lastName");

    public final StringPath memberId = createString("memberId");

    public final StringPath seq = createString("seq");

    public QCustomer(String variable) {
        super(Customer.class, forVariable(variable));
    }

    public QCustomer(Path<? extends Customer> path) {
        super(path.getType(), path.getMetadata());
    }

    public QCustomer(PathMetadata metadata) {
        super(Customer.class, metadata);
    }

}
Dto組成

@Data
@NoArgsConstructor
@AllArgsConstructor

public class DetailDto {

	@JsonProperty("ORDER_ID")
	private String orderId;

	@JsonProperty("MEMBER_ID")
	private String memberId;

	@JsonProperty("PET_ID")
	private String petId;

	@JsonProperty("FIRST_NAME")
	private String firstName;

	@JsonProperty("LAST_NAME")
	private String lastName;

	@JsonProperty("PET_NAME")
	private String petName;

	@JsonProperty("SPECIES")
	private String species;

	@JsonProperty("AGE")
	private Integer age;
}
本範例採取簡單的網址傳值 使用GET
@RestController
@RequestMapping(value="/customer")
public class CustomerController {
@Autowired
private CustomerDao customerDao;
@GetMapping(value="/getCustomer")
public List<Customer> getCustomer(@RequestParam String firstName, @RequestParam String lastName) {
List<Customer> list = customerDao.findCustomer(firstName, lastName);
return list;
}
@GetMapping(value="/getOrder")
public List<DetailDto> getOrder(@RequestParam String firstName, @RequestParam String lastName) {
List<DetailDto> dtos = customerDao.findOrder(firstName, lastName);
return dtos;
}
}
先來看看如果要以customer的FirstName LastName 做搜尋的Dao處理方式
看到這你可能會想 為什麼不用JpaRepository 寫完方法就結束了 還要寫這麼多Code
的確簡單的查詢用JpaRepository就足夠了 可是當出現多表查詢 或是 動態查詢 JpaRepository就顯得有點吃力了
@Service
public class CustomerDao {

	@Autowired
	private JPAQueryFactory queryFactory;

	public List<Customer> findCustomer(String firstName, String lastName) {
		QCustomer qcustomer = QCustomer.customer;

		return queryFactory.selectFrom(qcustomer)
				.where(qcustomer.firstName.eq(firstName)
						.or(qcustomer.lastName.eq(lastName)))
				.fetch();
	}
}
http://localhost:8080/customer/getCustomer?firstName=Randy&lastName=

http://localhost:8080/customer/getCustomer?firstName=&lastName=Marsh
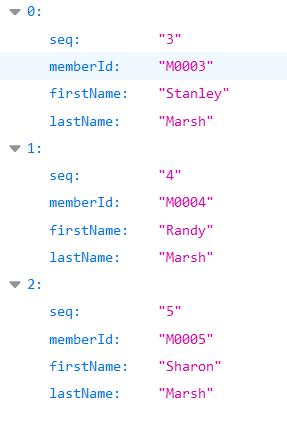
http://localhost:8080/customer/getCustomer?firstName=Randy&lastName=Marsh
看到這個結果,與預想的有出入,怎麼連不叫Randy Marsh也出現了,哦!原來是Dao是使用 "or",當你要改成and時就會發現
當你給了兩個參數的時候正確了,可是上面只給一個參數兩個情形又不對了
那怎麼辦呢? 拆成兩個方法,一個處理1個參數用"or"查詢 一個處理兩個參數 用"and"查詢
這時候Querydsl就派上用場啦!
只要將需要動態查詢的條件使用BooleanBuilder依照不同情況進行篩選,便可達到目的!
public List<Customer> findCustomer(String firstName, String lastName) {
QCustomer qcustomer = QCustomer.customer;
BooleanBuilder condition = new BooleanBuilder();
if (StringUtils.isBlank(firstName) || StringUtils.isBlank(lastName)) {
condition.and(qcustomer.firstName.eq(firstName)
.or(qcustomer.lastName.eq(lastName)));
} else {
condition.and(qcustomer.firstName.eq(firstName)
.and(qcustomer.lastName.eq(lastName)));
}
return queryFactory.selectFrom(qcustomer)
.where(condition)
.fetch();
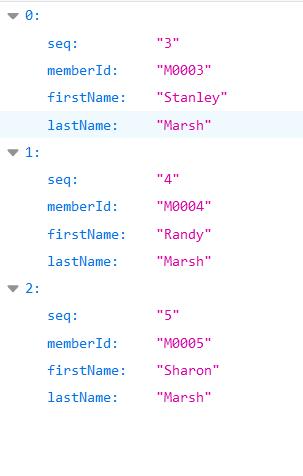
}http://localhost:8080/customer/getCustomer?firstName=Randy&lastName=Marsh
目前介紹的只是簡單的動態查詢,是否感覺到好用呢! ,實務上一定有碰過這種情形,如果使用本來的JpaRepository就會出現許多方法只差了某些條件卻要新增許多重複
的方法,造成重複的Code過多,不好維護也不易開發
接下來來看看如果多表查詢!
有一種在寫SQL的感覺吧! 一看就很明確知道資料是使用哪個Table哪個欄位資料所組成
在實務上JpaRepository的多表查詢所用的SQL相信大家應該有點心得了吧,看到眼睛都花了也看不太懂到底是哪個資料是對應哪個表
看都看老半天去了,再看看以QueryDsl的寫法高下立判!
public List<DetailDto> findOrder(String firstName, String lastName) {
QCustomer qcustomer = QCustomer.customer;
QPet qpet = QPet.pet;
QOrderform qorderform = QOrderform.orderform;
return queryFactory.select(
Projections.bean(DetailDto.class,
qorderform.orderId,
qorderform.memberId,
qorderform.petId,
qcustomer.firstName,
qcustomer.lastName,
qpet.petName,
qpet.species,
qpet.age))
.from(qorderform)
.leftJoin(qpet).on(qpet.petId.eq(qorderform.petId))
.leftJoin(qcustomer).on(qcustomer.memberId.eq(qorderform.memberId))
.where(qcustomer.firstName.eq(firstName)
.or(qcustomer.lastName.eq(lastName)))
.fetch();
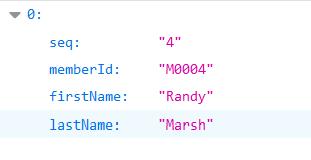
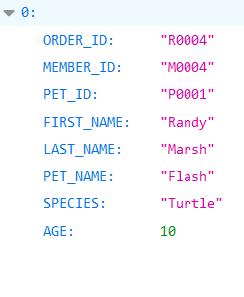
}http://localhost:8080/customer/getOrder?firstName=Randy&lastName=Marsh
回傳的資料以Dto的資料組成
本文就到這裡結束了,雖然只有粗淺的介紹,但是應該讓大家感受到這個工具的強大了!
還有許多功能沒介紹到,如果想了解更多,可至官網看使用文件
參考資料:
https://openhome.cc/Gossip/Spring/H2.html
http://www.querydsl.com/static/querydsl/4.4.0/reference/html_single/