Azure Notification Hubs實作推播通知

Kelly Wu 2023/08/07 19:48:39
660

前言

由於客戶需求為利用Azure 平台實現推播功能,考慮到GCM與Azure整合功能已淘汰和維護程式碼的考慮下,決定使用Azure Notification Hubs和Firebase做整合,後續新增功能和維護也會方便許多 。
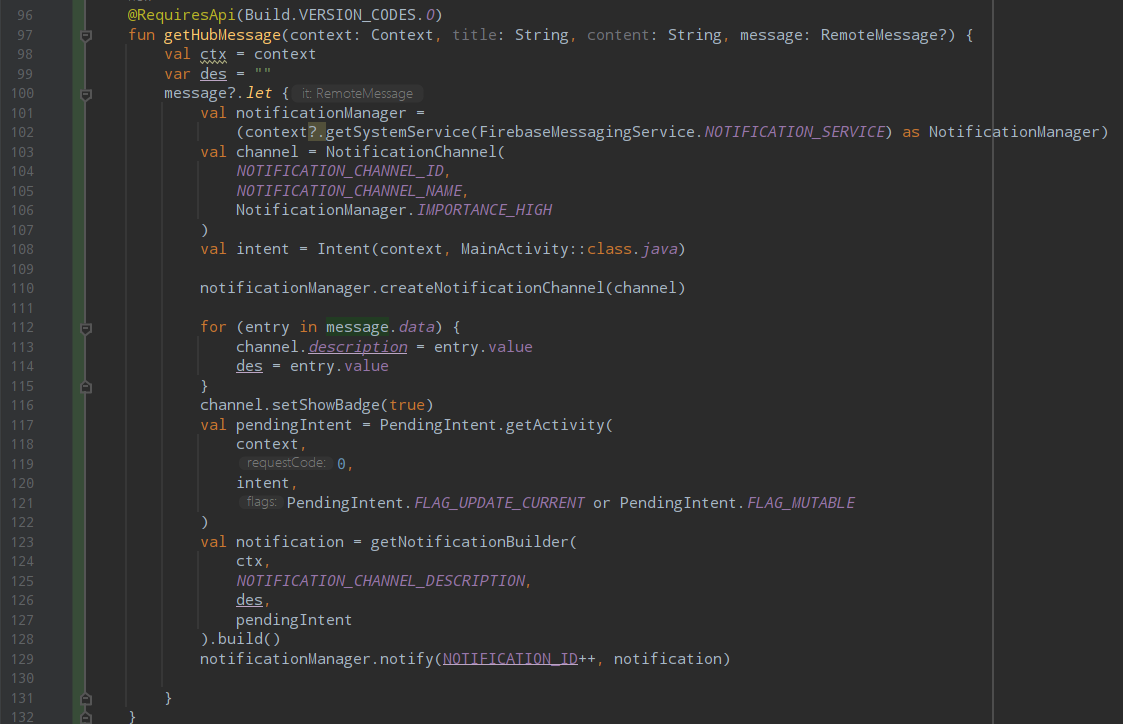
本篇主要介紹Azure Notification Hubs 設定,Android gradle相關設定和實作服務。
Azure Notification Hubs相關參考可參閱:
使用 GCM推播通知傳送至特定 Android 裝置
使用FCM將推播通知傳送至 Android 裝置


內容

Firebase 相關設定昕力大學已有多篇文章可參閱,此篇會著重Azure Notification Hubs設定
昕力大學相關文章參閱
https://www.tpisoftware.com/tpu/articleDetails/362
https://www.tpisoftware.com/tpu/articleDetails/380


Azure Notification Hubs 設定

開啟Azure入口網站


點開側邊欄的[所有服務],找到通知中樞


點開後我們要加入專案

the source of picture: https://learn.microsoft.com/en-us/azure/notification-hubs/android-sdk

專案設定請參照官方步驟

the source of picture:
https://learn.microsoft.com/en-us/azure/notification-hubs/android-sdk

以上完成後,我們在自己的界面板應當可看到剛剛加入的方案
此篇以TpiSoftwareDFMS.2 為範例


此時我們建立的HubName為TpiSoftwareDFMS.2
接下來我們需要拿到Connection String,請開啟剛剛建置的方案

依照圖示操作,此時我們的剪貼版有了connection string
接下來我們要加入Firebase金鑰,先Copy Server Key

接下來請依圖片操做


內容實作

於build.gradle(:app)加入

於build.gradle(application) add

於setting.gradle add

接下來我們創建一個繼承FirebaseMessagingService的  NotificationService來去做推播的Service

其中的onMessageReceived使用NotificationHelper getHubMessage()方法

NotificationHelper完整代碼

以上NotificationService完成,請開啟AndroidManifest加上Service宣告

接下來開啟Activity,於onCreate加上


並請記得加上NotificationListener


此Listener也可做推播處理

可以看到我們NotificationHub.start中塞入了HubName和剛剛拿到的connectionString


測試傳送,請依照圖片操作

按下發送


結果畫面


結語
以往專案中都是使用Firebase來實現推播功能居多,此次以Azure notification hubs來實現覺得非常的驚奇,在功能上我覺得兩者都能達到所需要的功能,希望能再試試看其他推播引擎。

資料來源參考
Notification Hubs:
https://learn.microsoft.com/en-us/azure/notification-hubs/android-sdk

Azure:
https://portal.azure.com/#home

Firebase:
https://firebase.google.com/


Kelly Wu