XamarinForms自訂控制項
XamarinForms自訂控制項
| 簡介 |
如何在Xamarin Forms中建立自訂控制項 |
| 作者 |
張朝銘 |
1.前言
l 本文件用來提供Xamrin Forms開發人員開發控制項應用
l 開發工具使用Visual Studio 2017
l 適合Xamarin Forms進階開發者
2.目的
3.本文
在APP開發時,常會有某部分的控制項組合會重複的出現在許多頁面上,僅只有呈現的資料或者觸發的邏輯不同,這時我們可建立使用者控制項ContentView來將這些控制項進行包裝。
3.1建立ContentView
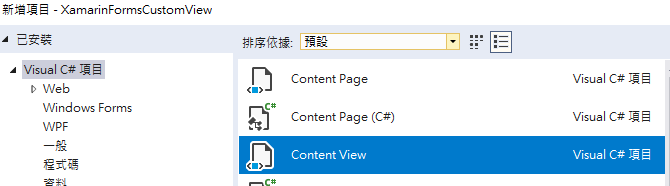
首先在XamarinForms專案上加入新增項目,選擇Content View
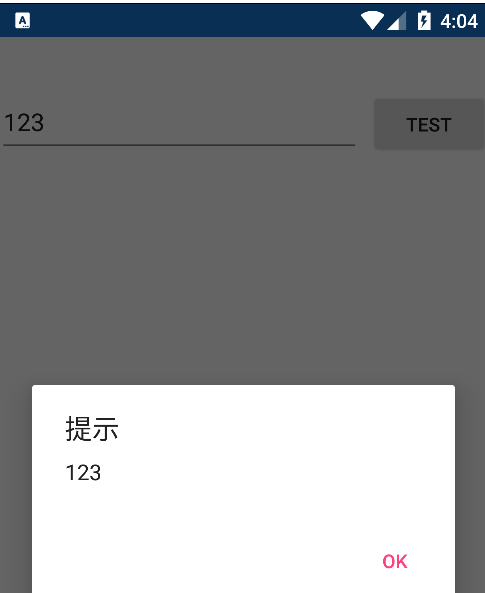
假設以下畫面中的輸入框與按鈕的組合是我們要變為自訂控制項的部分

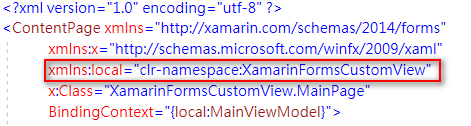
接著在剛剛建立出來的ContentView中,加入以下內XAML內容:
<?xml version="1.0" encoding="UTF-8"?>
<ContentView xmlns="http://xamarin.com/schemas/2014/forms"
xmlns:x="http://schemas.microsoft.com/winfx/2009/xaml"
x:Class="XamarinFormsCustomView.MyView">
<StackLayout Orientation="Horizontal" >
<Entry x:Name="entry" HorizontalOptions="FillAndExpand"/>
<Button x:Name="btn" Text="Test" />
</StackLayout>
</ContentView>
3.2引用控制項與建立自訂屬性、事件
建立完ContentView後,接著就是要在原本的Page頁面上引用該控制項,因控制項是建立在專案本身,所以在Page上要記得先宣告一下。
透過在Page宣告的前置詞引用該控制項。
<StackLayout Padding="0,40,0,0">
<local:MyView/>
</StackLayout>
但這裡希望可以在引用的時候變成他的提示文字,以及註冊按鈕的事件等,所以我們將ContentView所用的.cs檔開啟,加入一個提示屬性及一個事件。
public string PlaceHolder
{
get { return this.entry.Placeholder; }
set { this.entry.Placeholder = value; }
}
public event EventHandler OnButtonClick;
在建構子的地方註冊原本的Button Click事件,觸發控制項本身新建立的OnButtonClick。
public MyView ()
{
InitializeComponent ();
this.btn.Clicked += (sender, e) => this.OnButtonClick?.DynamicInvoke(sender, e);
}
在Page頁面上引用該控制項的地方,就可使用前述自訂新增的屬性與事件
<StackLayout Padding="0,40,0,0">
<local:MyView PlaceHolder="test" OnButtonClick="MyButtonClick" />
</StackLayout>
3.3自訂控制項Binding
前述步驟我們建立的自訂的屬性與事件,但無法直接拿來做Binding的動作,因為它並非BindableProperty,若要更改成可被Binding的話需要再建立一個對應的BindableProperty。
在自訂的ContentView的cs檔內,我們建立一個PlaceHolder用的BindableProperty命名為PlaceHolderProperty,如下:
public static readonly BindableProperty PlaceHolderProperty =
BindableProperty.Create(
propertyName:"PlaceHolder",
returnType: typeof(string),
declaringType: typeof(MyView),
defaultValue: null,
defaultBindingMode: BindingMode.TwoWay);
這裡我們使用BindableProperty提供的靜態方法Create來建立BindableProperty,這裡使用的參數說明如下:
propertyName:要被Binding的屬性名稱
returnType:被Binding的屬性型別
declaringType:被Binding的屬性所在的類別型別
defaultValue:被Binding的屬性的預設值
defaultBindingMode:被Binding的方向類型
接著修改原本PlaceHoleder屬性內的Get與Set,如下:
public string PlaceHolder
{
get { return (string)this.GetValue(PlaceHolderProperty); }
set { SetValue(PlaceHolderProperty, value); }
}
依照相同的方式,我們建立Text,以及Command屬性與其BindableProperty,分別對應到Entry的Text屬性與Button的Command,這樣我們就完成了Page端使用時,與自訂控制項的Binding,但我們也必須讓自訂控制項內的Button與Entry要使用的屬性Binding到相同的屬性上。如下XAML片段
<StackLayout x:Name="stkLayout" Orientation="Horizontal" >
<Entry
Placeholder="{Binding PlaceHolder}"
Text="{Binding Text}"
HorizontalOptions="FillAndExpand"/>
<Button Command="{Binding Command}" Text="Test" />
</StackLayout>
控制項本身的BindingContext已經由Page決定了,所以在控制項內我們需要將其控制項Binding到自身的ContentView上,所以我們要將StackLayout的BindingContext做修改,如下程式碼片段
public MyView ()
{
InitializeComponent ();
this.stkLayout.BindingContext = this;
}
最後建立一個ViewModel來測試Binding是否成功,XAML片段如下
<StackLayout Padding="0,40,0,0">
<local:MyView
PlaceHolder="{Binding PlaceHolder}"
OnButtonClick="{Binding OnClick}" />
</StackLayout>