IBM MobileFirst Server的安裝、設置與Mobile App的部署
IBM MobileFirst Server的安裝、設置與Mobile App的部署
| 簡介 |
1. 如何使用 IBM Installation Manager 的圖形方式和 Server Configuration Tool 來安装 MobileFirst Server。 2. 如何部署App到IBM MobileFirst Server |
| 作者 |
陳傑雄 |
- IBM DB2
- MySQL
- Oracle
- IBM DB2,使用 DB2 JDBC 驅動程式 V4.0 (db2jcc4.jar)。
- MySQL,使用 Connector/J JDBC 驅動程序。
- Oracle,使用 Oracle thin JDBC 驅動程序。
- WebSphere Application Server Liberty Core
- WebSphere Application Server Liberty Network Deployment
- WebSphere Application Server
- Apache Tomcat
IBM Installation Manager V1.8.4 或更高版本
Installation Manager 用於運行 MobileFirst Server 的安裝程式。 必須安裝 Installation Manager V1.8.4 或更高版本。 較低版本的 Installation Manager 將無法安裝 IBM Mobile Foundation V8.0,因為該產品在安裝後操作需要使用 Java 7,而較低版本的 Installation Manager 只隨附了 Java 6。
從 Installation Manager 和 Packaging Utility 下載鏈結(http://www-01.ibm.com/support/docview.wss?uid=swg27025142)下載 IBM Installation Manager V1.8.4 或更高版本的安裝程式。
MobileFirst Server 的 Installation Manager Repository
您可以從 IBM Passport Advantage 上的 Mobile Foundation eAssembly 中下載該repository。 Package的名稱為 IBM MobileFirst Platform Server 的 Installation Manager Repository,IBM MobileFirst Foundation V8.0 .zip 文件。
運行安裝
IBM Installation Manager 在電腦上安裝 IBM MobileFirst Foundation Server 文件和工具。
可以通過兩種不同的 IBM Installation Manager 方式來安裝 MobileFirst Server。方式取決於 IBM Installation Manager 自身的安裝方式。安裝方式可決定您用於 Installation Manager 和軟體包的目錄和命令。
Mobile Foundation 支持以下兩種 Installation Manager 方式:
- Administrator mode: 在此方式下,必須以 root 帳戶在 Linux 或 UNIX 下運行 Installation Manager,在 Windows 下必須使用Administrator權限來運行。系統目錄中安裝有 Installation Manager 的repository文件(即安裝的軟體及其版本的列表)。 /var/ibm(Linux 或 UNIX)或 ProgramData(Windows 上)。如果以Administrator方式運行 Installation Manager,請不要使用 Installation Manager 部署 Application Center。
- User mode: 在此方式下,不具有特定權限的任何用戶均可運行 Installation Manager。但是,Installation Manager 的repository文件存儲在用戶主目錄中。只有該用戶能夠升級產品安裝。如果未以 root 帳戶運行 Installation Manager,請確保您在升級產品安裝過程或套用臨時修訂後提供該帳戶權限。
- 啟動Installation Manager。請開啟terminal視窗,並將目錄切換到Installation Manager解壓縮後目錄下的eclipse檔案夾(例如: /opt/IBM/InstallationManager/eclipse),然後輸入以下指令:
sudo ./launcher - 出現提示時,輸入您使用的帳戶密碼。
- 在Installation Manager安裝程式視窗中,為MobileFirst Server新增repository:
a. 從左上角File > Preferences,按下Add Repositories. (如已有其他的repository列在其中,請先將它移除)
b. 瀏覽到您安裝的repository位置,例如: /opt/software/MobileFirst_Platform_Server/disk1/diskTag.inf
c. 選取檔案並按下 OK
d. 按下 OK 關閉Preferences對話視窗 - 按下 Install 開始安裝。
- 勾選check box後,按 Next 準備進行安裝IBM MobileFirst Platform Server。
- 同意license agreement,按 Next。
- 使用預設設定建立一個新的package group,按 Next。
- 選擇 Do not activate token licensing with the Rational License Key Server。(本此先不使用token licensing。在production環境中,如果您沒有定義將Token licensing用於Rational License Key Server的合同,那麼請不要activate它。如果您activate token,那麼您必須進一步地針對Token licensing在MobileFirst Server進行配置)。
- 在 "General setting" 的install IBM MobileFirst Foundation for iOS部分,請接受預設值(No)。
- 在 "Choose configuration",選擇 Yes 安裝Application Center。
- 選擇 Use pre-installed database server,並選擇 DB2,然後按下 Next。
- 以下面設定值來完成 DB2資料庫的配置:
- Host name: localhost
- Port: 50000
- Path to .jar file: /opt/ibm/db2/V10.5/java/db2jcc4.jar(請依照您實際安裝的位置) - 然後按 Next。
- 輸入user name 和 password: db2inst1 / passw0rd(請依照您實際狀況輸入)
- 在下一個畫面,安裝程式會嘗試連線到 db2inst1 資料庫實例,請按 Next。
- 接下來的畫面,安裝程式會建立 APPCNTR 資料庫,這個步驟會花較長時間,在資料庫建立完成後,繼續按 Next。
- 選取 WebSphere Application Server 並按 Next。
- 輸入下面的application server配置資訊:
- WebSphere installation directory: /opt/IBM/WebSphere/Liberty(請依照您實際安裝的位置)
- Profile: Liberty
- Server name: server1 - 按 Next。
- 選取 Single user,並輸入作業系統操作帳戶 localuser(請依照您實際的帳戶設定)。
- 在致謝的畫面上,按 Next。
- 查看摘要資訊,確認後按 Install 開始安裝。
- 在安裝完成後,按 Finish。
- 退出 Install Manager 安裝程式畫面。
最後,安裝程式會將所有MobileFirst的組件安裝在 /opt/IBM/MobileFirst_Platform_Server 目錄底下(實際目錄位置必須參考您的Installation Manager啟動位置),在這個目錄下,您可以找到:
- Analytics 資料夾(MobileFirst Analytics)
- ApplicationCenter 資料夾(Application Center)
- MobileFirstServer 資料夾(MobileFirst Server)
- PushService 資料夾(MobileFirst Server push service)
另外,您也可以在 shortcuts 資料夾中找到一些伺服器配置工具,Ant 和 mfpadm 程式的捷徑...等等。
- 啟動Server Configuration Tool. 請在terminal window中,切換到 /opt/IBM/MobileFirst_Platform_Server/shortcuts(請依照您實際安裝位置),並輸入下面指令
sudo ./configuration-tool.sh - 點擊 Create a MobileFirst Server configuration(或從 File > New Configuration)。
- 輸入configuration name,像是 MobileFirst Server,按下 OK。
- 請清除 Install with an environment ID,接受Administrator Services context root(/mfpadmin)和 Runtime context root(/mfp)預設值。按 Next。
- 接受MobileFirst Operations Console context root(/mfpconsole),按 Next。
- 在資料庫選擇(Database Selection)畫面上,選擇 DB2 ,按 Next。
- DB2 資料庫完整的設定如下(這三個欄位資料必須和前面安裝MobileFirst Server時設定的資料庫一樣):
- Host name: localhost
- Port: 50000
- Path to .jar file: /opt/ibm/db2/V10.5/java/db2jcc4.jar - 按 Next。
- 輸入user name 和 password: db2inst1 / passw0rd。configuration tool 會驗證user name和password,這過程會花費較長的時間,之後等到"Continue to create a new database"顯示,表示驗證完成。
- 按 Next,configuration tool會驗證資料庫連線,會花費一些時間。
- 按 Next。
- 選擇 WebSphere Application Server。按 Next。
- 輸入下面的應用程式伺服器的配置資訊:
- WebSphere installation directory: /opt/UBM/WebSphere/Liberty(請依照您實際安裝位置)
- Profile: Liberty
- Deployment type: Stand-alone deployment
- Server name: server1
- 接受為控制台"Create a default user" - 按 Next。
- 選取 Install the Push service,按 Next。
- 不要做任何的Analytics Settings 的設定,按 Save。
在預設情況下,configuration tool會將配置資訊存成一份Ant XML,放置於 /root/mobilefirst_platform_server/server-configuration-tool/MobileFirst_Configuration_MobileFirst_Server/MobileFirst_Server.xml - 按下 Deploy 以進行安裝動作,Server Configuration Tool 將建立和部署MobileFirst Server的實例。
- 待 "Configuration successfully deployed"顯示,表示已經部署完成,請關閉Server Configuration Tool。
- 在成功安裝後,請重新啟動Liberty應用程式伺服器。
- a. 使用terminal window,切換目錄到 /opt/IBM/WebSphere/Liberty/bin
- b. 使用root權限,輸入下面指令停止server:
su root
./server stop server1
- c. 重新啟動server:
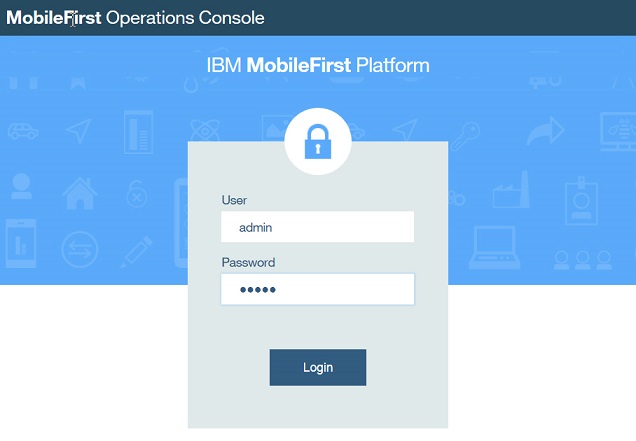
./server start server1 - 驗證安裝結果是否成功,您可以在網頁瀏覽器開啟MobileFirst Operations Console.
- a. 在網頁瀏覽器中,瀏覽到 http://localhost:9080/mfpconsole.
- b. 輸入帳號 / 密碼: admin / admin
2. 如何部署App到IBM MobileFirst Server
- 部署 adapters 和 applications 到 MobileFirst Server
- 使用 MobileFirst Operations Console 管理 Mobile Applications
- 在terminal window,切換到 /opt/IBM/WebSphere/Liberty/bin 目錄下
- 檢查伺服器狀態,輸入下面的指令(您必須使用root權限執行啟動伺服器的指令;當提示出現時,記得輸入先前安裝配置的密碼 passw0rd):
su root
[sudo] password for localuser:
./server status server1
server server1 is running with process ID 12345. - 如果伺服器是停止服務的狀態,請使用下面的指令啟動它:
./server start server1
- 開啟MobileFirst Opertaions Console:
- a. 在網頁瀏覽器中,瀏覽到 http://localhost:9080/mfpconsole
- b. 輸入帳號密碼:admin /admin - 選擇 Actions > Deploy Adapter
- 點擊"Browse"並選擇您的 .adapter 檔案
- 按下 Deploy,該adapter就會被部署,並顯示在"儀表板"的 mfp runtime 區段下面。
另外,您也可以使用指令: mfpadm deploy adapter mfp 來部署adapter - 在儀表板中,展開 mfp runtime 區段,點擊 JavaAdapter,然後點選右側畫面的 Configuration Files 的頁籤。在下方您可以看 Adapter Runtime-Configuration JSON File 和 Adapter -Descriptor XML File 的內容。
- 在terminal window中,切換到包含App原始碼的目錄下(依照您的檔案實際位置):
cd /usr/labfiles/EX02/ResourceRequestCordova-release80 - 新增一個platform到App。例如:新增Android platform,那就執行下面的指令:
cordova platform add android - 執行下面指令將註冊App到MobileFirst Server:
mfpdev app register
*您也許會看到一些錯誤訊息顯示,您現在可以先忽略它 - 執行 cordova prepare 指令廣播更動。
- 打開 MobileFirst Operation Console:
- a. 在網頁瀏覽器中,瀏覽到 http://localhost:9080/mfpconsole
- b. 輸入帳號密碼:admin / admin - 點擊 ResourceRequestCordova 展開它,接著點擊 Android(latest)。
在網頁畫面右邊的 Management 頁籤,您可以在 Application Access 看到App的狀態,這邊可以變更 Direct Update 的方式,有 Active、Active and Notifying 和 Access Disable三種。
- 在網頁畫面右邊的 Management 頁籤,變更 Application Access 的設定為 Active and Notifying,這樣,您就可以輸入一些要傳到使用者裝置的訊息內容,這個訊息將會在使用者開啟App時接收到。
- 點擊 Update Locales。
這裡,您可以上傳不同語言(多國語系)的推播訊息。 - 我們沒有真的要更新,所以按 Cancel 取消變更。
- 將畫面捲動到下方的 Direct Update 段落:
這裡,您可以上傳 web resources archive(WAR)檔案來更新App的web resources。 - 點擊 Configuration Files 頁籤。
在下方您可以看 Adapter Runtime-Configuration JSON File 和 Adapter -Descriptor XML File 的內容。
您可以複製內容到剪貼簿,或是下載這些內容來修改。 - 畫面捲動到下方,可以看見 mfpclient.properties 檔案:
如果您有需要去更新client的屬性(properties),在這邊您可以下載和編輯這個檔案,然後將它存放到Android專案的 assets 檔案夾中。 - 點擊 Log Filters 頁籤,然後點擊 Create Log Filter。
這裡可以指定此App返回的Log訊息嚴重性級別。 - 點擊 Cancel 關閉 Create Log Filter 對話。
- 點擊左邊儀表板中的 App Setting。
這邊可以更改App 的 display name、type 和 license type。
另外,您也可以使用 mfpadm app set license-config 指令來變更licensing的資訊,它採用 B2C 或 B2E 的App類型,並將憑證類型參數化。憑證類型可以是 APPLICATION、ADDITIONAL_BRAND_DEPLOYMENT 或 NON_PRODUCTION。