TableView實現畫線、自動捲軸、取得座標位置
一、 前言:
將遇到的需求之一紀錄一下,以IPad為主要平台,功能為產生一個垂直向X軸固定的座標表,可以在上面畫橫線紀錄並限制線不可超過一列的範圍,以及可以設定每分鐘向下捲動直到底,我選用TableView為主來實作。
二、 實作:
我將此功能拆成幾個部分分別實作:
1. 座標圖:
從自訂cell開始,由於X軸的數量是固定,直接在cell上設定需要的view的數量,左邊數字為每一列Y軸的量,每一格座標中間都有view來當作分隔線,cell的上下方也有。
接下來把元件都設定到cell.swift裡,並為每個view加上tag,在cell.swift裡的awakeFromNib加上
var tag = 1;
for view in coordinateViewArray {
 view.tag = tag;
 tag += 1;
}
coordinateViewArray為IBOutlet的collection,裝有每一格座標的view。
接下來tableView主體,在storyboard或xib設定好tableView拉到viewController裡,並實作tableView的delegate和dataSource,
我有另外做一個headerView來標示X軸的單位,剩下的相信大家都很熟悉,不再多說。
2. 繪畫功能:
要先得知使用者觸碰了螢幕,可以使用UIKit的touchesBegan delegate取得觸碰事件,就可以開始實作畫畫的部分,首先在cell.swift裡加上需要用到的參數
var lastPoint = CGPoint.zero;  //觸碰過程最後的point
var endPoint = CGPoint.zero;  //觸碰結束的point
var currentPath = UIBezierPath(); // 觸碰過程的路徑
var currentLayer: CAShapeLayer = CAShapeLayer(); //目前碰觸的view的圖層
var startViewTag: Int = 0; //開始碰觸的view的tag
再來就是取得碰觸事件,因為delegate回傳的UITouch是optional,所以在touchesBegan裡加入
guard let touch = touches.first else{ return; }
lastPoint = touch.location(in: self.contentView);
//取得事件後將現在的point設定給lastPoint做紀錄
let view = self.contentView.hitTest(lastPoint, with: nil);
startViewTag = view?.tag ?? 0;
//取得起始的view,並將tag設定給startViewTag
因為contentView裡不需要多個畫完的結果,所以在每一次碰觸開始都先初始化相關的參數
currentLayer.removeFromSuperlayer();
currentLayer = CAShapeLayer();
currentPath = UIBezierPath();
self.contentView.layer.addSublayer(currentLayer);
下一步是要取得碰觸移動事件,透過touchesMoved delegate來實作,並加入下面的部分
guard let touch = touches.first else{ return; }
let currentPoint = touch.location(in: self.contentView);
self.drawLine(from: lastPoint, to: currentPoint);
lastPoint = currentPoint;
我將實作畫的部分拉出來獨立一個function drawLine,讓delegate裡的東西不會太長,function需要帶入目前的point,如下
private func drawLine(from fromPoint: CGPoint, to toPoint: CGPoint){
 if toPoint.y <= 78 && toPoint.y >= 0 {
  currentPath.move(to: fromPoint);
  currentPath.addLine(to: toPoint);
  currentLayer.path = currentPath.cgPath;
  currentLayer.backgroundColor = UIColor.red.cgColor;
  currentLayer.strokeColor = UIColor.red.cgColor;
  currentLayer.lineWidth = 8;
  currentLayer.lineCap = .round;
  currentLayer.lineJoin = .round;
 }
}
畫下去先檢查碰觸的範圍是否超過cell的內容,範圍根據cell的高度自訂,剩下就是設定路徑從A點到B點,圖層的顏色粗細大小,要不要圓角,根據自己的喜好就好,畫的部分大致上這樣就完成了。
3. 取得座標位置:
接下來就是收尾並取得觸碰的座標位置,實作touchesEnded delegate來取得觸控結束的事件,再來取得座標位置,也就是tableView的indexPath以及cell裡方格的tag,首先,加入以下function取得tableView
private func getTableView() -> UITableView{
 var view = superview
 while let v = view, v.isKind(of:UITableView.self) == false {
  view = v.superview
}
 let tableView = view as! UITableView;
 return tableView;
}
透過尋找cell contentView的superView是否為tableView的做法一層一層往上找,直到找到我們的目標。
取得tableView後就可以在touchesEnded裡加上
let tableViewLocation = touch.location(in: self.getTableView());
let indexPath = self.getTableView().indexPathForRow(at: tableViewLocation);
//根據最後碰觸的location來取得tableView的indexPath
let endLocation = touch.location(in: self.contentView);
let view = self.contentView.hitTest(endLocation, with: nil);
//根據最後碰觸的location來取得view
4. 自動捲動:
自動捲動很簡單,首先設定timer以及要執行的function,並計算每一秒需要增加tableView多少contentOffSet的y軸值
@objc func scrollByTime(){
let scrollPerMin = Float(self.scrollPerMinTextField.text!);
//取得輸入匡輸入的數字
let offset = scrollPerMin! * 80 / 60;
//每秒捲動多少單位 * cell的高 / 60秒
yOffset = yOffset + CGFloat(offset);
DispatchQueue.main.asyncAfter(deadline: .now()) {
  UIView.animate(withDuration: 1, delay: 0, options: .curveLinear, animations: {
  self.tableView.contentOffset.y =
  self.yOffset;
  }, completion: nil)
 };
}
最後實作scorllView的delegate scrollViewDidScroll來檢查是否捲到底,到底了要記得停掉timer
func scrollViewDidScroll(_ scrollView: UIScrollView) {
let height = self.tableView.frame.size.height;
let yOffset = self.tableView.contentOffset.y;
let fromBottom = self.tableView.contentSize.height - yOffset;
 if fromBottom <   height {
  self.timer?.invalidate();
  self.timer = nil;
 }
}
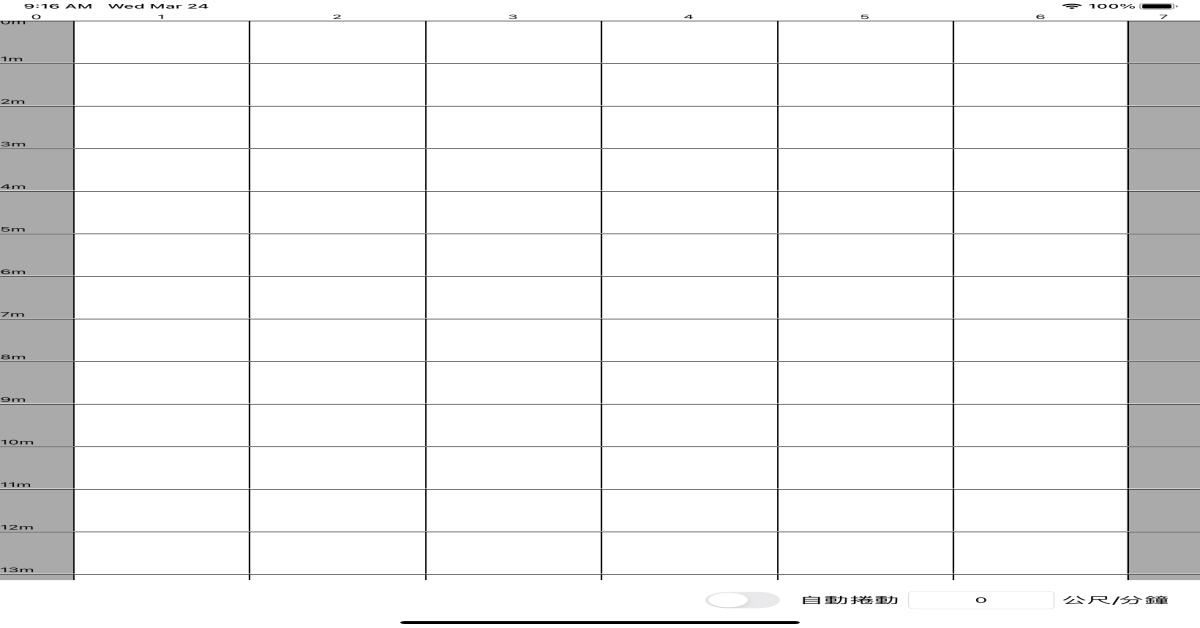
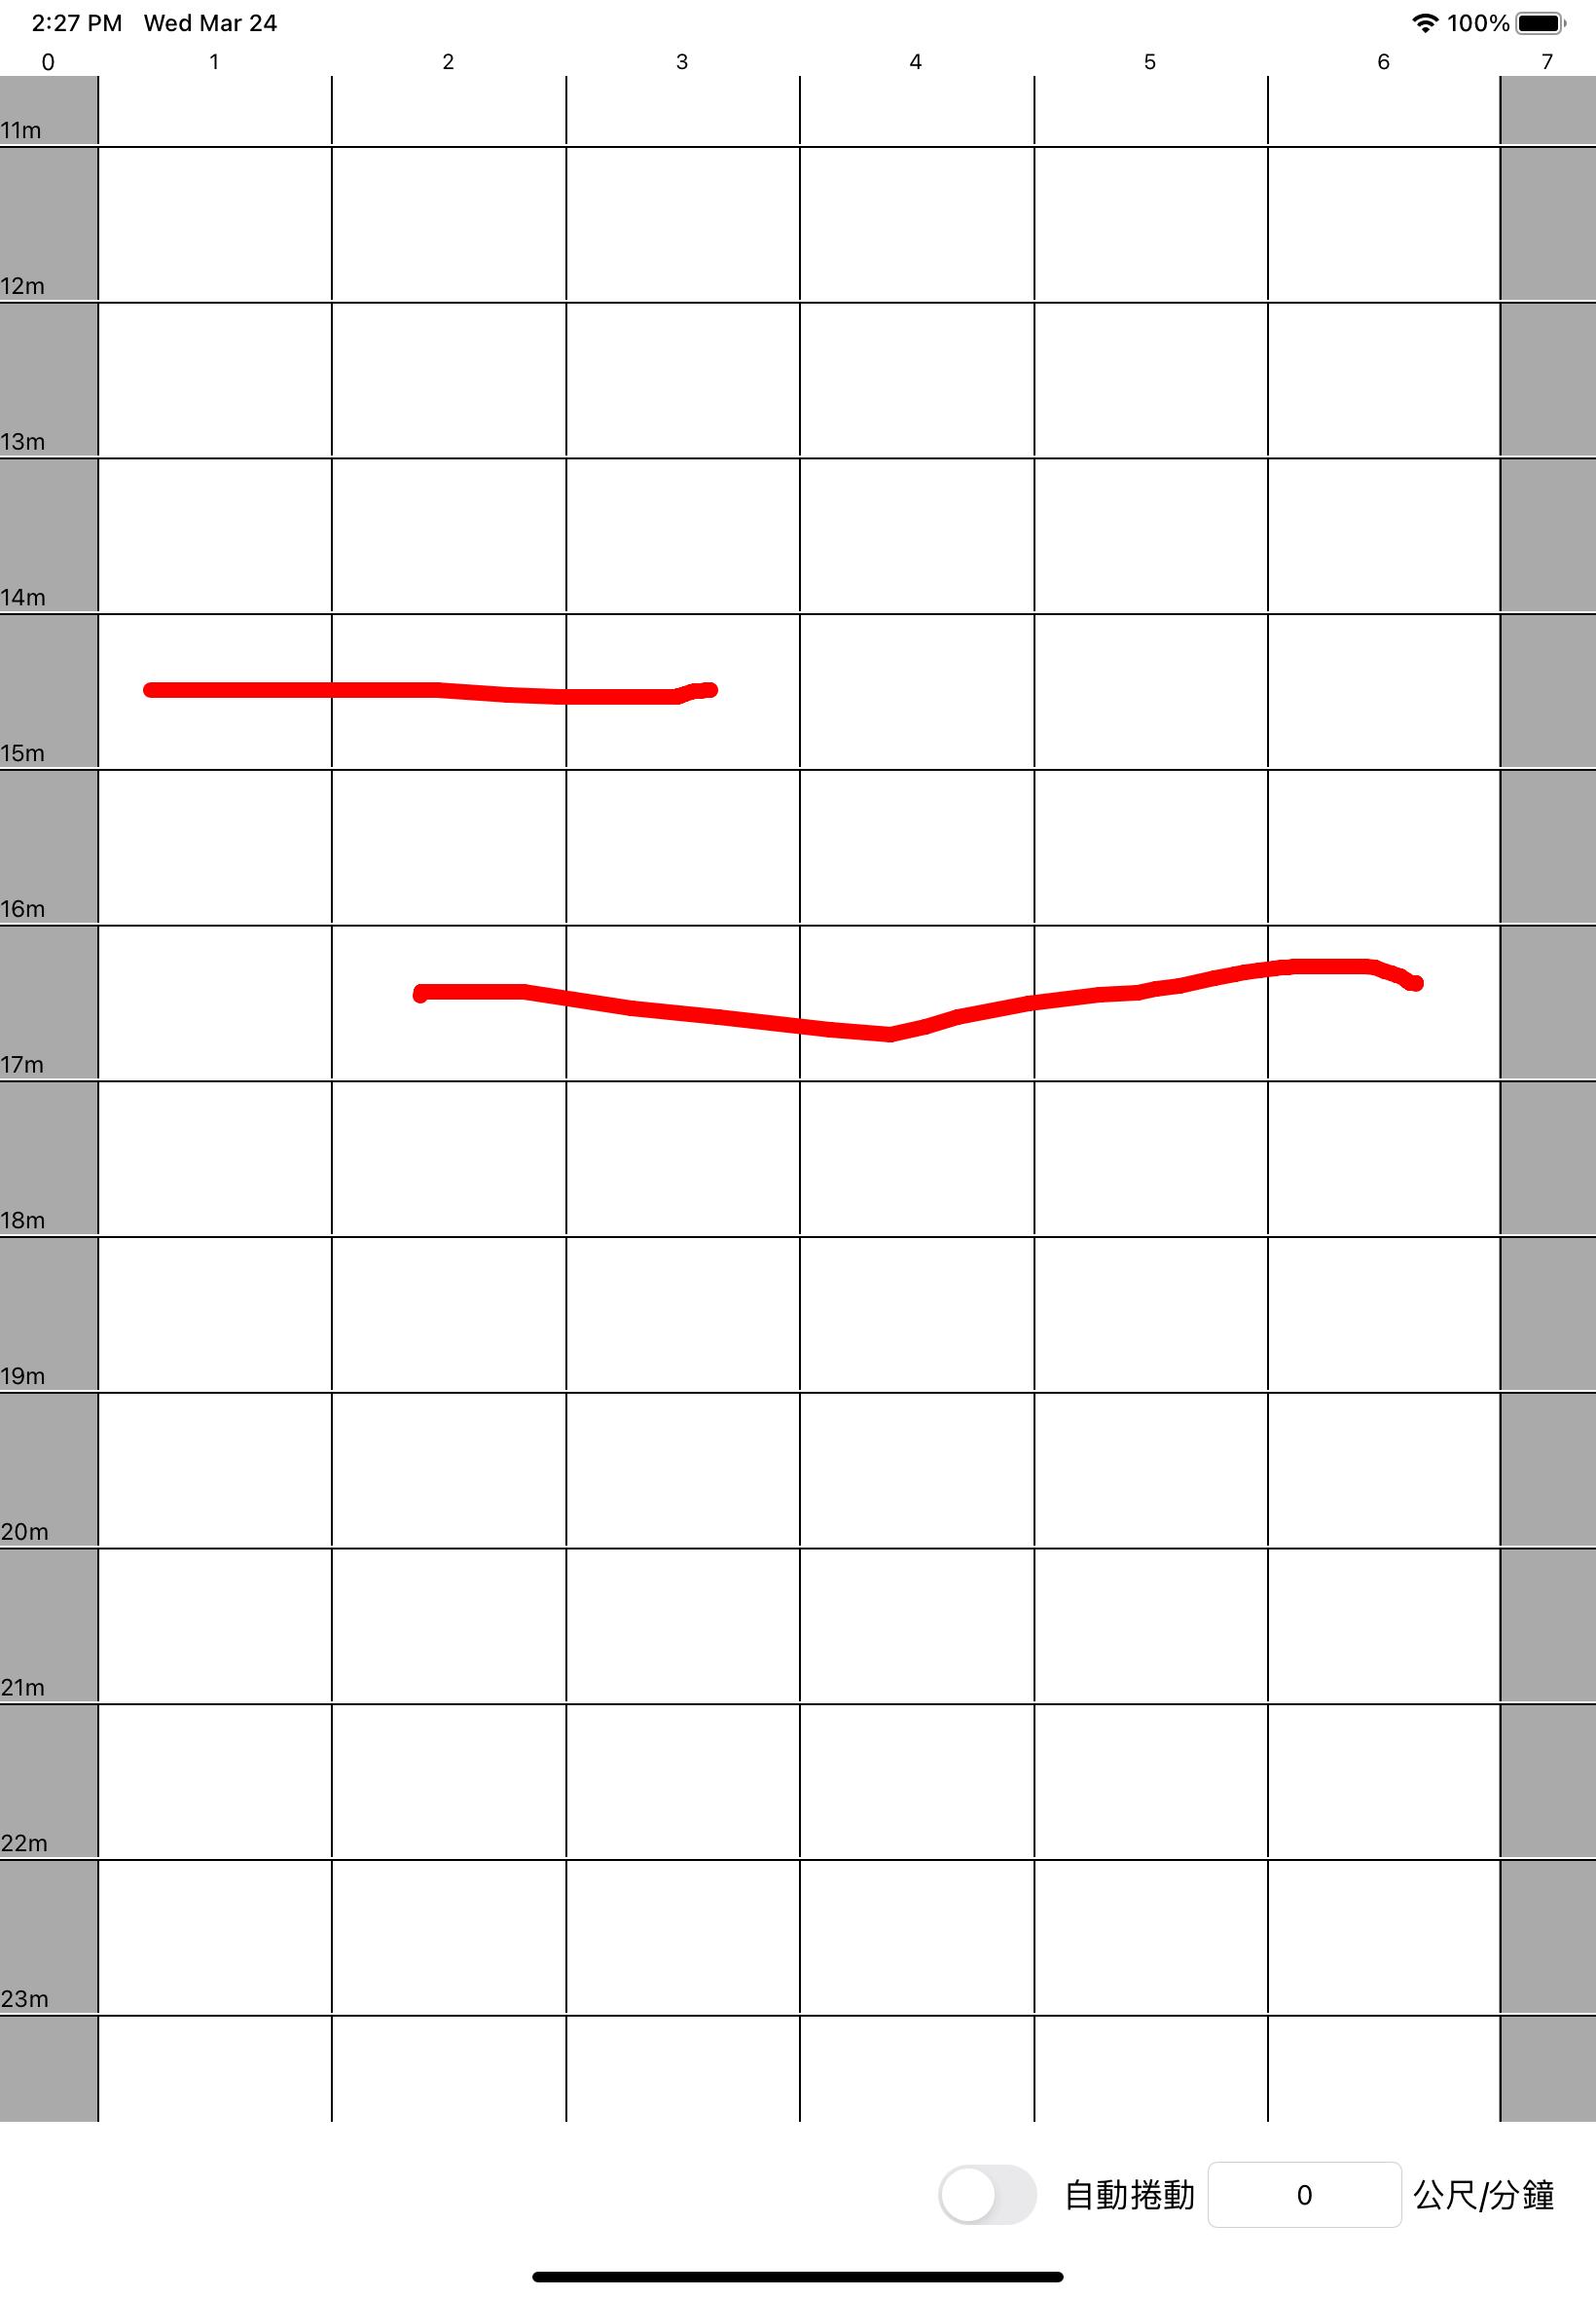
成品
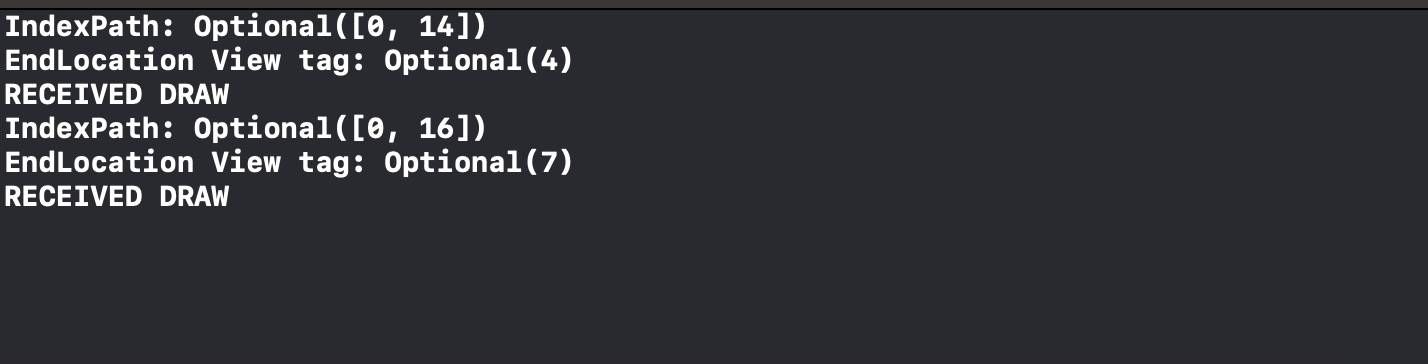
Console output抓到的indexPath和view tag
5. 補充:
測試touch的過程中,發現了畫圖的觸控有時會跟tableView捲動事件相衝導致操作起來不是很順暢,為了解決這個問題,我在touchesBegan跟touchesEnded裡有去調整開始觸控時tableView的isScrollEnabled狀態,來確保畫的觸控優先大於tableView的捲動事件。
最後附上我的成品給大家參考:
https://drive.google.com/file/d/1hOI7MAw0X5Q1ETaFILE-OkBwD1J3WdYX/view?usp=sharing