Connect Cloud SQL from Google Kubernetes Engine
Goal:
Set up a connection from a Google Kubernetes Engine (GKE) application to a Cloud SQL instance.
建立從 Google Kubernetes Engine (GKE) 應用程式到 Cloud SQL 實例的連線。
About connecting Google Kubernetes Engine to Cloud SQL:
To access a Cloud SQL instance from an application running in Google Kubernetes Engine, you can use either the Cloud SQL Auth proxy (with public or private IP) or connect directly using a private IP address.
The Cloud SQL Auth proxy is recommended to connect to Cloud SQL, even when using private IP. The Cloud SQL Auth proxy provides strong encryption and authentication using IAM, which can help keep your database secure.
從 Google Kubernetes Engine 中的應用程式存取 Cloud SQL 實例,您可以使用 Cloud SQL 認證代理(具有公共或私人 IP)或直接使用私人 IP 地址進行連接。
即使使用私人 IP,建議使用 Cloud SQL 認證代理來連接到 Cloud SQL。Cloud SQL 認證代理提供強大的加密和 IAM 驗證,可幫助保持資料庫的安全性。

Before begin:
To connect to Cloud SQL you must have:
- A GKE cluster, with the
kubectlthe command-line tool installed and configured to communicate with the cluster.
For help getting started with GKE, see Deploy an app to a GKE cluster.
For connecting using private IP, the GKE cluster must be VPC-native and peered with the same Virtual Private Cloud (VPC) network as the Cloud SQL instance.
一個已安裝並設定好與 GKE 叢集通信的 kubectl 命令行工具的 GKE 叢集。
如需有關開始使用 GKE 的幫助,請參閱在 GKE 叢集上部署應用程式。
若要使用私人 IP 進行連接,GKE 叢集必須是 VPC-native,並與 Cloud SQL 實例相同的虛擬私有雲(VPC)網路建立對等連接。 - An instance was created.
For help creating a Cloud SQL instance, see Creating Instances.
已建立一個實例。
如需協助建立 Cloud SQL 實例,請參閱「建立實例」。 - A PostgreSQL user account is configured on the instance.
Your application will use this account to connect to the database. For help with creating a user account, see Creating a user.
在此實例上已配置了一個 PostgreSQL 使用者帳戶。
您的應用程式將使用此帳戶來連接到資料庫。如需創建使用者帳戶的幫助,請參閱「創建使用者」。
Google Cloud APIs:
Enable the Google Cloud APIs necessary to run a Cloud SQL sample app on GKE.
- Compute Engine API
- Cloud SQL Admin API
- Google Kubernetes Engine API
- Artifact Registry API
- Cloud Build API
Set up Cloud SQL:
Create a Cloud SQL instance
Cloud Shell:
Before running the gcloud sql instances create command as follows, replace DB_ROOT_PASSWORD with the password of your database user.
在執行以下的 gcloud sql instances create 指令之前,請將 DB_ROOT_PASSWORD 替換為您資料庫使用者的密碼。
Optionally, modify the values for the following parameters:
可選擇修改以下參數的值:
- — database_version: The database engine type and version. If left unspecified, the API default is used. See the gcloud database versions documentation to see the currently available versions.
— 資料庫版本:資料庫引擎的類型和版本。如果未指定,則使用API默認值。請參閱gcloud數據庫版本文檔以查看當前可用的版本。 - — cpu: The number of cores desired in the machine.
— CPU:機器所需的核心數量。 - — memory: Whole number value indicating how much memory is desired in the machine. A size unit should be provided (for example, 3072MB or 9GB). If no units are specified, GB is assumed.
— 記憶體:整數值,表示所需的機器內存大小。必須提供一個大小 - — region: Regional location of the instance (for example asia-east1, us-east1). If left unspecified, the default
us-centralis used. See the full list of regions.
— 區域:實例的區域位置(例如asia-east1,us-east1)。如果未指定,則使用默認值us-central。請參閱完整的區域列表。
Run the gcloud sql instances create command to create a Cloud SQL instance.
執行 gcloud sql instances create 指令以建立 Cloud SQL 實例。
gcloud sql instances create quickstart-instance \
--database-version=POSTGRES_13 \
--cpu=1 \
--memory=4GB \
--region=us-central \
--root-password=DB_ROOT_PASSWORD
Cloud Console:
- In the Google Cloud console, go to the Cloud SQL Instances page.
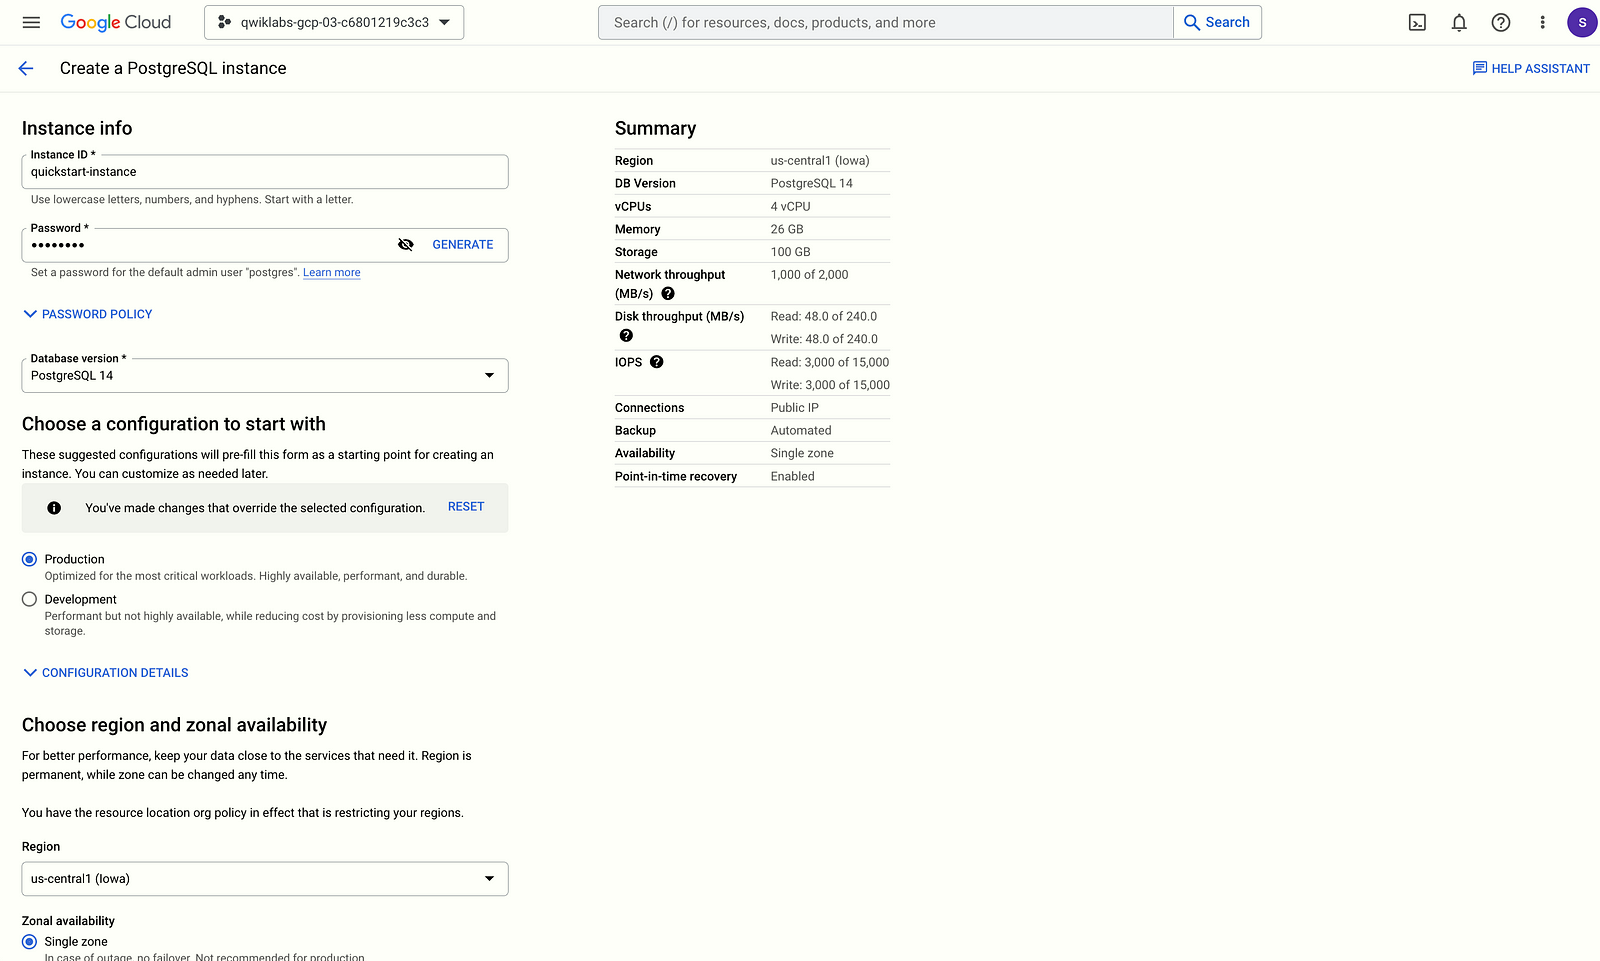
在 Google Cloud 控制台中,前往 Cloud SQL 實例頁面。 - Click Create Instance.
點擊創建實例。 - Click PostgreSQL.
點擊 PostgreSQL。 - Enter
quickstart-instancefor Instance ID.
輸入 Instance ID 以啟動快速開始實例。 - Enter a password for the postgres user. Save this password for future use.
為postgres用戶設置密碼。請妥善保存此密碼以供將來使用。 - Click the Single zone option for Choose region and zonal availability.
點擊「單一區域」選項以選擇地區和可用時區。 - Click and expand the Show Configurations section.
點擊展開「顯示配置」部分。 - In the Machine Type drop-down menu, select Lightweight.
在機器類型下拉選單中,選擇輕量級。 - Click Create Instance and wait until the instance initializes and starts.
點擊「創建實例」,等待實例初始化並啟動。
Create a database
Cloud Shell:
Run the gcloud sql databases create command to create a database.
gcloud sql databases create quickstart_db --instance=quickstart-instanceCloud Console:
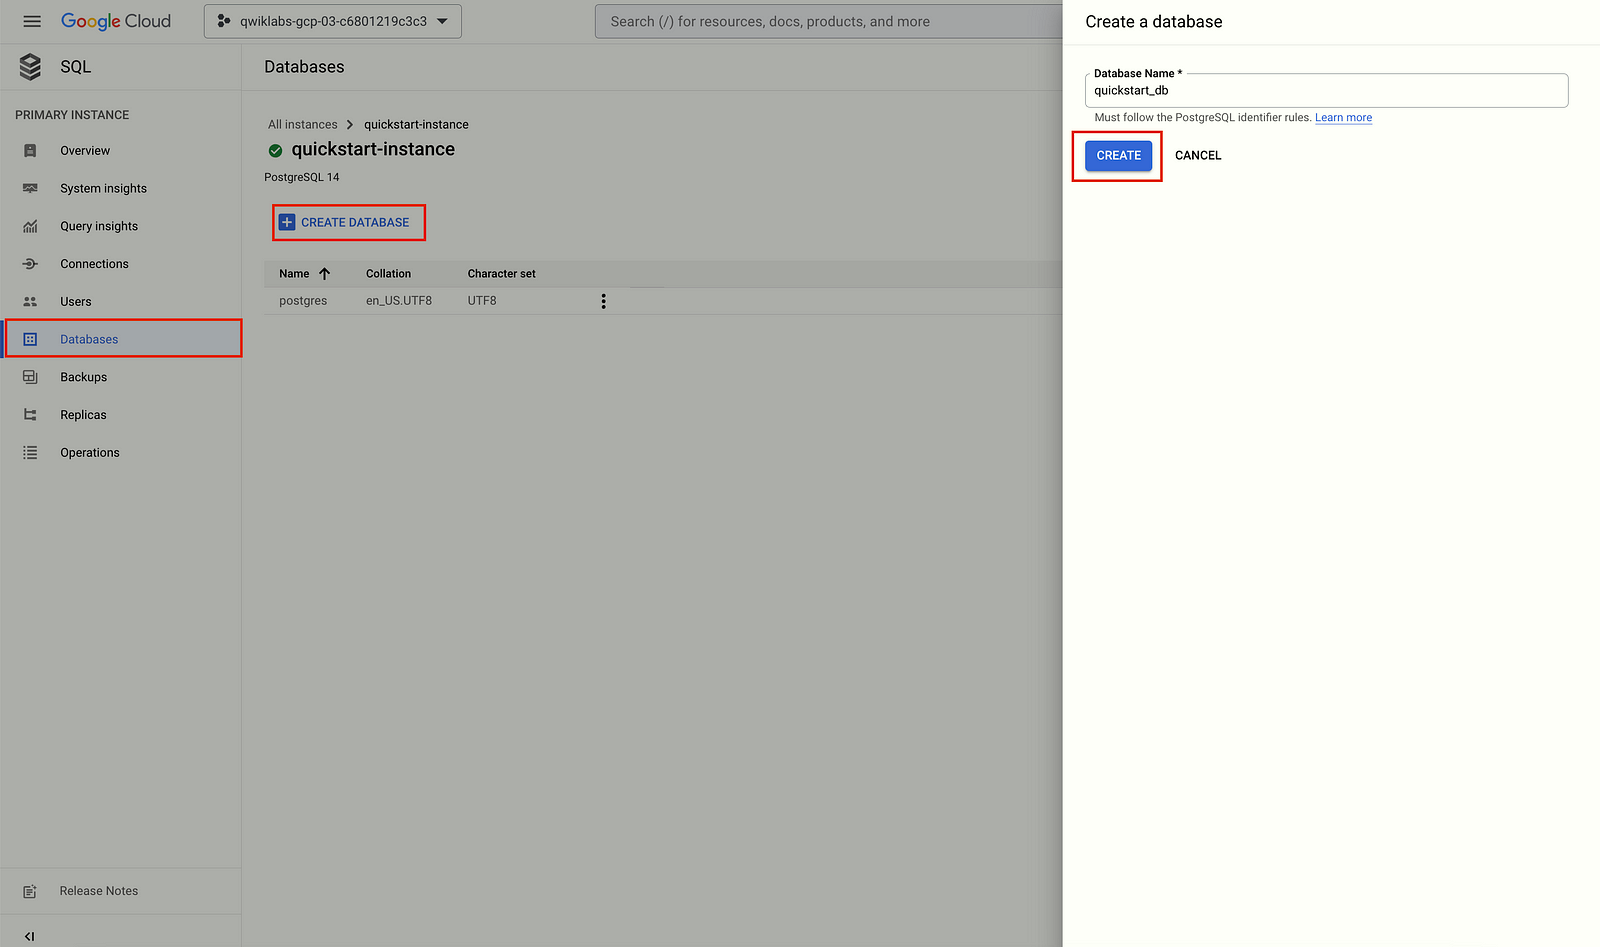
- In the Google Cloud console, go to the Cloud SQL Instances page.
- Select
quickstart-instance. - From the SQL navigation menu, select Databases.
- Click Create database.
- In the Database name field of the New database dialog box, enter
quickstart_db. - Click Create.
Create a user
Cloud Shell:
Before running the command as follows, replace DB_PASS with a password for your database user. Make a note of this for use in a later step of this quickstart.
在執行以下命令之前,請將DB_PASS替換為您的數據庫用戶密碼。請記下此密碼以供後續快速入門步驟使用。
Run the gcloud sql users create command to create the user.
gcloud sql users create quickstart-user \
--instance=quickstart-instance \
--password=DB_PASS
Cloud Console:
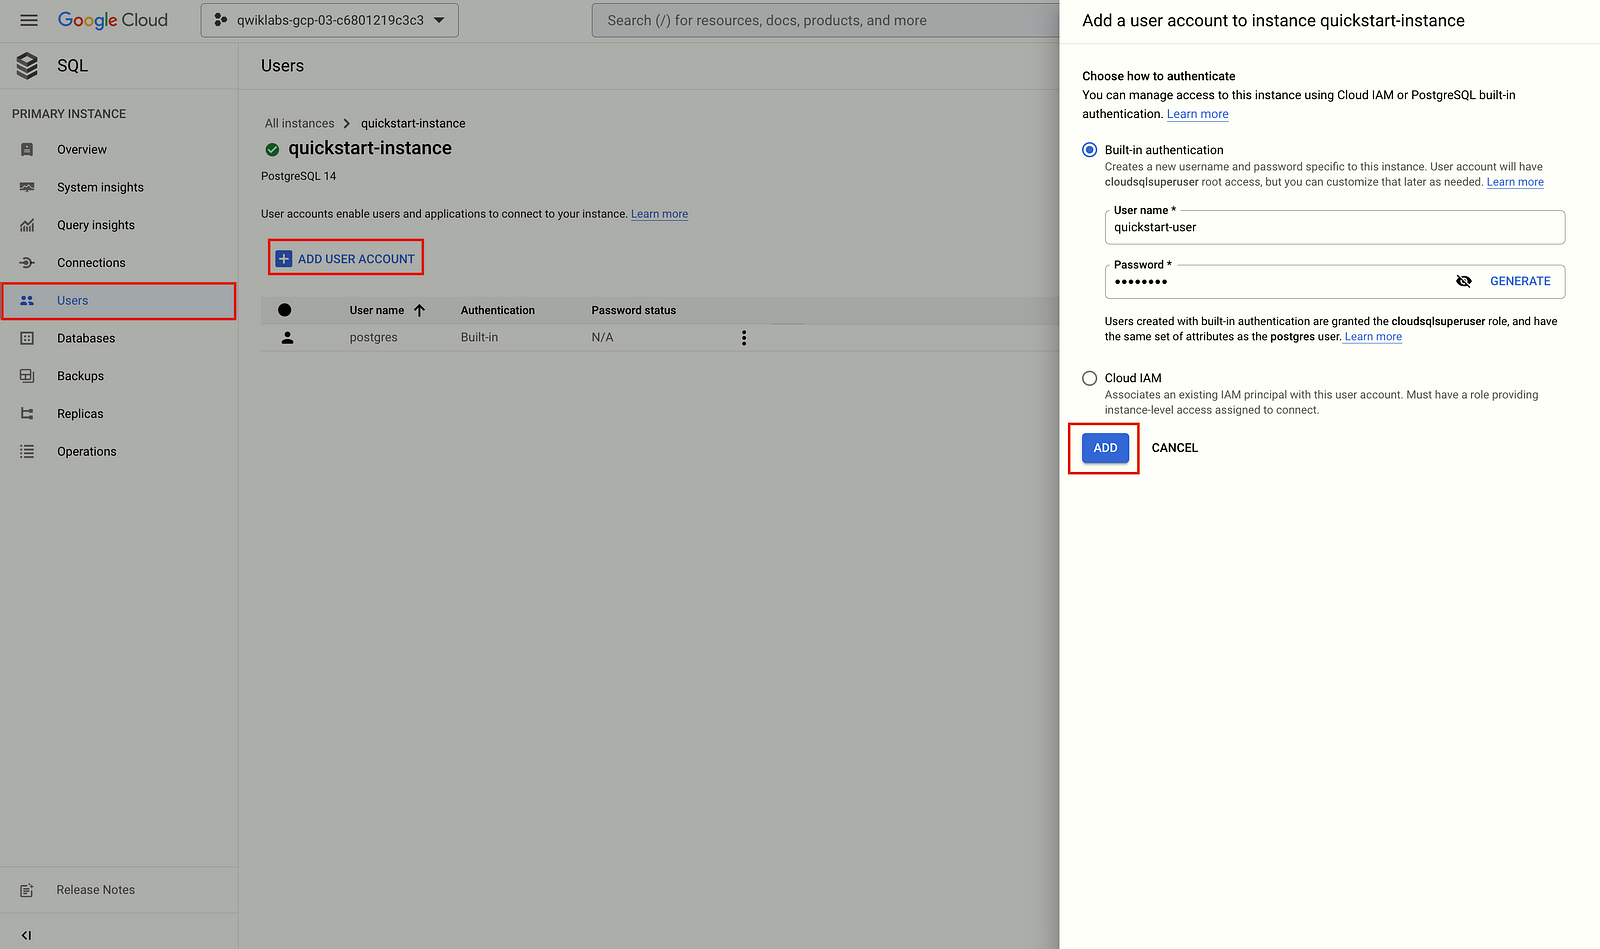
- In the Google Cloud console, go to the Cloud SQL Instances page.
- To open the Overview page of an instance, click the instance name.
- Select Users from the SQL navigation menu.
- Click Add user account.
- In the Add a user account to instance instance_name page, add the following information:
- Username: Set to
quickstart-user - Password: Specify a password for your database user. Make a note of this for use in a later step of this quickstart.
6. Click Add.
Create a GKE cluster:
A cluster consists of at least one cluster control plane machine and multiple worker machines called nodes. Nodes are Compute Engine virtual machine (VM) instances that run the Kubernetes processes necessary to make them part of the cluster. You deploy applications to clusters, and the applications run on the nodes.
一個叢集至少包含一台叢集控制平面機器和多個稱為節點的工作機器。節點是Compute Engine虛擬機(VM)實例,運行Kubernetes進程以使它們成為叢集的一部分。您將應用程序部署到叢集中,並且這些應用程序在節點上運行。
Cloud Shell:
Create an Autopilot cluster named gke-cloud-sql-quickstart:
gcloud container clusters create-auto gke-cloud-sql-quickstart \
    --region us-central1
Cloud Console:
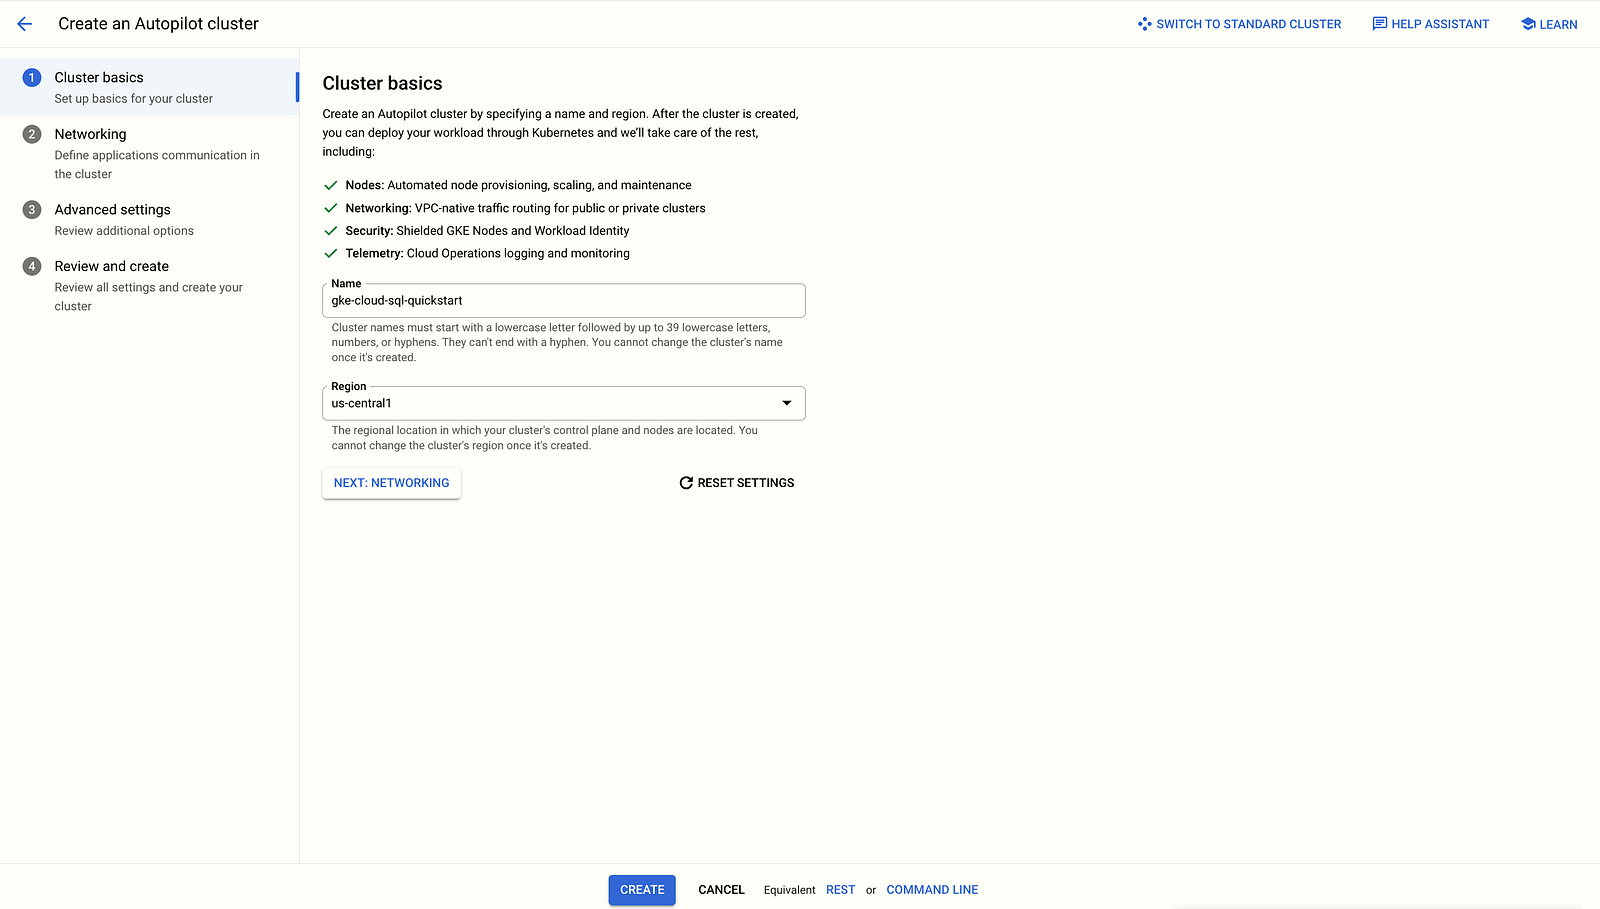
- In the Google Cloud console, go to the Google Kubernetes Engine page.
- Click Create.
- Click Configure for GKE Autopilot.
- For Name, specify the cluster name as
gke-cloud-sql-quickstart. - Click Create.
Enable the GKE cluster
Enable the GKE cluster you just created as the default cluster to be used for the remaining commands in this quickstart.
啟用您剛剛建立的 GKE 叢集,作為此快速入門中其餘命令使用的預設叢集。
Run the gcloud container clusters get-credentials command as follows to enable the GKE cluster.
gcloud container clusters get-credentials gke-cloud-sql-quickstart \
  --region us-central1
Set up a service account
Create and configure a Google Cloud service account to be used by GKE so that it has the Cloud SQL Client role with permissions to connect to Cloud SQL.
建立並配置一個 Google Cloud 服務帳戶,以供 GKE 使用,使其擁有 Cloud SQL 客戶端角色和連接到 Cloud SQL 的權限。
- Run the
gcloud iam service-accounts createcommand as follows to create a new service account:
執行以下 gcloud iam service-accounts create 指令以建立新的服務帳戶:
gcloud iam service-accounts create gke-quickstart-service-account \
  --display-name="GKE Quickstart Service Account"
2. Run the gcloud projects add-iam-policy-binding command, as follows to add the Cloud SQL Client role to the Google Cloud service, account you just created. Replace YOUR_PROJECT_ID with the project ID.
執行以下指令 gcloud projects add-iam-policy-binding,以新增 Cloud SQL Client 角色至剛剛建立的 Google Cloud 服務帳戶。請將 YOUR_PROJECT_ID 替換為您的專案 ID。
gcloud projects add-iam-policy-binding YOUR_PROJECT_ID \
  --member="serviceAccount:gke-quickstart-service-account@YOUR_PROJECT_ID.iam.gserviceaccount.com" \
  --role="roles/cloudsql.client"
3. The sample app uses logging, so run the gcloud projects add-iam-policy-binding command as follows to add the Log Writer role to the Google Cloud service account you just created. Replace YOUR_PROJECT_ID with the project ID.
範例應用程式使用日誌記錄,因此執行以下 gcloud projects add-iam-policy-binding 命令以將 Log Writer 角色新增至剛剛建立的 Google Cloud 服務帳戶。請將 YOUR_PROJECT_ID 替換為您的專案 ID。
gcloud projects add-iam-policy-binding YOUR_PROJECT_ID \
  --member="serviceAccount:gke-quickstart-service-account@YOUR_PROJECT_ID.iam.gserviceaccount.com" \
  --role="roles/logging.logWriter"
Create a Kubernetes service account configured to have access to Cloud SQL by binding it to the Google Cloud service account using Workload Identity.
使用工作負載身份識別,將 Kubernetes 服務帳戶綁定到 Google Cloud 服務帳戶,以便配置其可以訪問 Cloud SQL。
- Create a Kubernetes Service Account.
- Create the
service-account.yamlfile in Cloud Shell Editor. Replace<YOUR-KSA-NAME>withksa-cloud-sql.
cat <<EOF > service-account.yaml
# Copyright 2021 Google LLC
#
# Licensed under the Apache License, Version 2.0 (the "License");
# you may not use this file except in compliance with the License.
# You may obtain a copy of the License at
#
#      http://www.apache.org/licenses/LICENSE-2.0
#
# Unless required by applicable law or agreed to in writing, software
# distributed under the License is distributed on an "AS IS" BASIS,
# WITHOUT WARRANTIES OR CONDITIONS OF ANY KIND, either express or implied.
# See the License for the specific language governing permissions and
# limitations under the License.

# [START cloud_sql_postgres_databasesql_gke_quickstart_sa]
apiVersion: v1
kind: ServiceAccount
metadata:
  name: ksa-cloud-sql # TODO(developer): replace this value
# [END cloud_sql_postgres_databasesql_gke_quickstart_sa]
EOF
3. Run the kubectl apply command as follows in Cloud Shell:
kubectl apply -f service-account.yaml4. Run the gcloud iam service-accounts add-iam-policy-binding command as follows to enable IAM binding of the Google Cloud Service Account and the Kubernetes Service Account. Make the following replacements:
執行以下命令 gcloud iam service-accounts add-iam-policy-binding 以啟用 Google Cloud Service 帳戶和 Kubernetes Service 帳戶的 IAM 繫結。進行以下替換:
- YOUR_PROJECT_ID with the project ID.
- YOUR_K8S_NAMESPACE with
default, which is the default namespace for clusters created in GKE. - YOUR_KSA_NAME with
ksa-cloud-sql.
gcloud iam service-accounts add-iam-policy-binding \
  --role="roles/iam.workloadIdentityUser" \
  --member="serviceAccount:YOUR_PROJECT_ID.svc.id.goog[YOUR_K8S_NAMESPACE/YOUR_KSA_NAME]" \
  gke-quickstart-service-account@YOUR_PROJECT_ID.iam.gserviceaccount.com
5. Run the kubectl annotate command as follows to annotate the Kubernetes Service Account with IAM binding. Make the following replacements:
- YOUR_KSA_NAME with
ksa-cloud-sql. - YOUR_PROJECT_ID with the project ID.
kubectl annotate serviceaccount \
  YOUR_KSA_NAME  \
  iam.gke.io/gcp-service-account=gke-quickstart-service-account@YOUR_PROJECT_ID.iam.gserviceaccount.com
About Kubernetes Secrets:
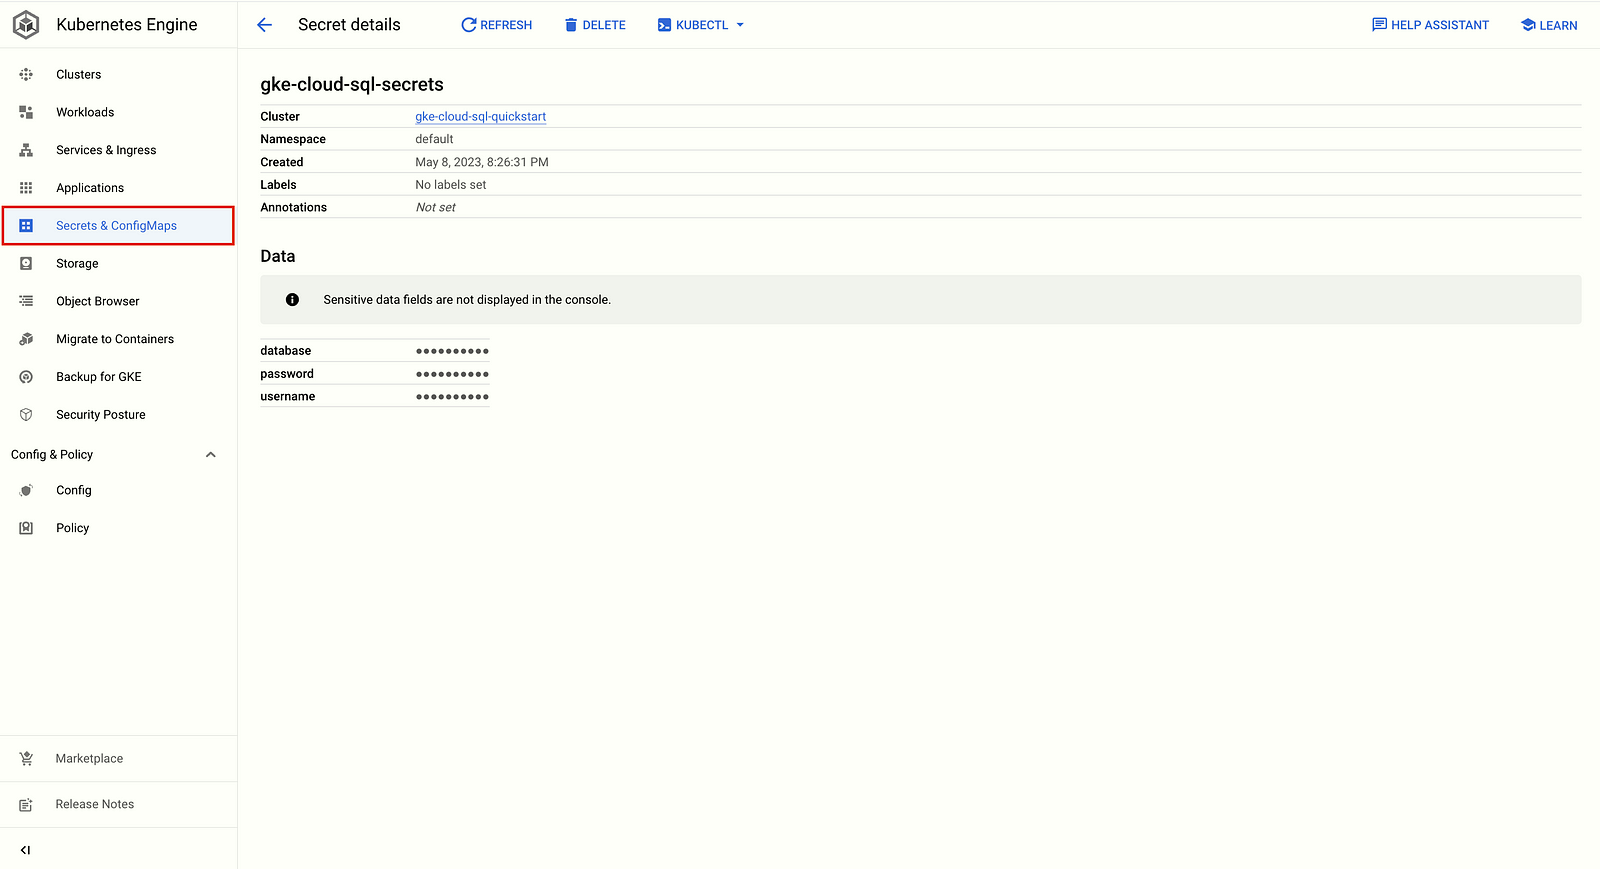
In Kubernetes, Secrets are a secure way to pass configuration details to your application. You can create a Secret with details such as your database name, user, and password which can be injected into your application as env vars.
在 Kubernetes 中,Secrets 是將配置細節安全地傳遞給應用程序的方法。您可以創建一個包含詳細信息(例如數據庫名稱、用戶名和密碼)的 Secret,並將其作為 env 變量注入到應用程序中。
There are many different ways Secrets can be used, depending on the connection type:
根據連接類型,Secrets可以有許多不同的使用方式:
- A database credentials Secret includes the name of the database user you are connecting as and the user’s database password.
資料庫憑證密碼包含您所連線的資料庫使用者名稱和該使用者的資料庫密碼。 - If connecting with the Cloud SQL Auth proxy, a Secret can be used to hold your service account’s credential file.
如果使用 Cloud SQL Auth 代理連接,可以使用 Secret 來保存您的服務帳戶憑證文件。 - If connecting with private IP, a Secret can be used to specify the private IP address of your Cloud SQL instance.
如果使用私有 IP 連線,可以使用 Secret 指定您的 Cloud SQL 實例的私有 IP 地址。
Create a Secret object:
Run the kubectl create secret generic command as follows to create Kubernetes secrets for the database, user, and user password to be used by the sample app. The values of each secret are based on the values specified in the previous steps of this quickstart. Replace DB_PASS with the password of the quickstart-user that you created in the previous Create a user quickstart step.
執行以下 kubectl create secret generic 命令,為範例應用程式建立 Kubernetes secrets 以使用資料庫、使用者和使用者密碼。每個 secret 的值都基於此快速入門先前步驟中指定的值。請將 DB_PASS 替換為您在上一個「建立使用者」快速入門步驟中創建的 quickstart-user 密碼。
- You create the Secret objects by using the
kubectl create secretcommand.
To create a database credentials Secret:
您可以使用 kubectl create secret 命令來創建 Secret 對象。
要創建數據庫憑證 Secret:
kubectl create secret generic gke-cloud-sql-secrets \
  --from-literal=database=quickstart_db \
  --from-literal=username=quickstart-user \
  --from-literal=password=DB_PASS
2. Once created, you can view the objects in the Configuration section of the Google Kubernetes Engine page in the Google Cloud console.
創建完成後,您可以在 Google Cloud 控制台的 Google Kubernetes Engine 頁面的「配置」部分中查看對象。
Build the sample app
- Run the following
gcloud artifacts repositories createcommand in Cloud Shell to create a repository in the Artifact Registry named gke-cloud-sql-repo in the same region as your cluster. Replace YOUR_PROJECT_ID with the project ID.
在 Cloud Shell 中運行以下 gcloud artifacts repositories create 命令,以在 Artifact Registry 中創建一個名為 gke-cloud-sql-repo 的存儲庫,並與您的集群位於同一區域。請將 YOUR_PROJECT_ID 替換為項目 ID。
gcloud artifacts repositories create gke-cloud-sql-repo \
  --project=YOUR_PROJECT_ID \
  --repository-format=docker \
  --location=us-central1 \
  --description="GKE Quickstart sample app"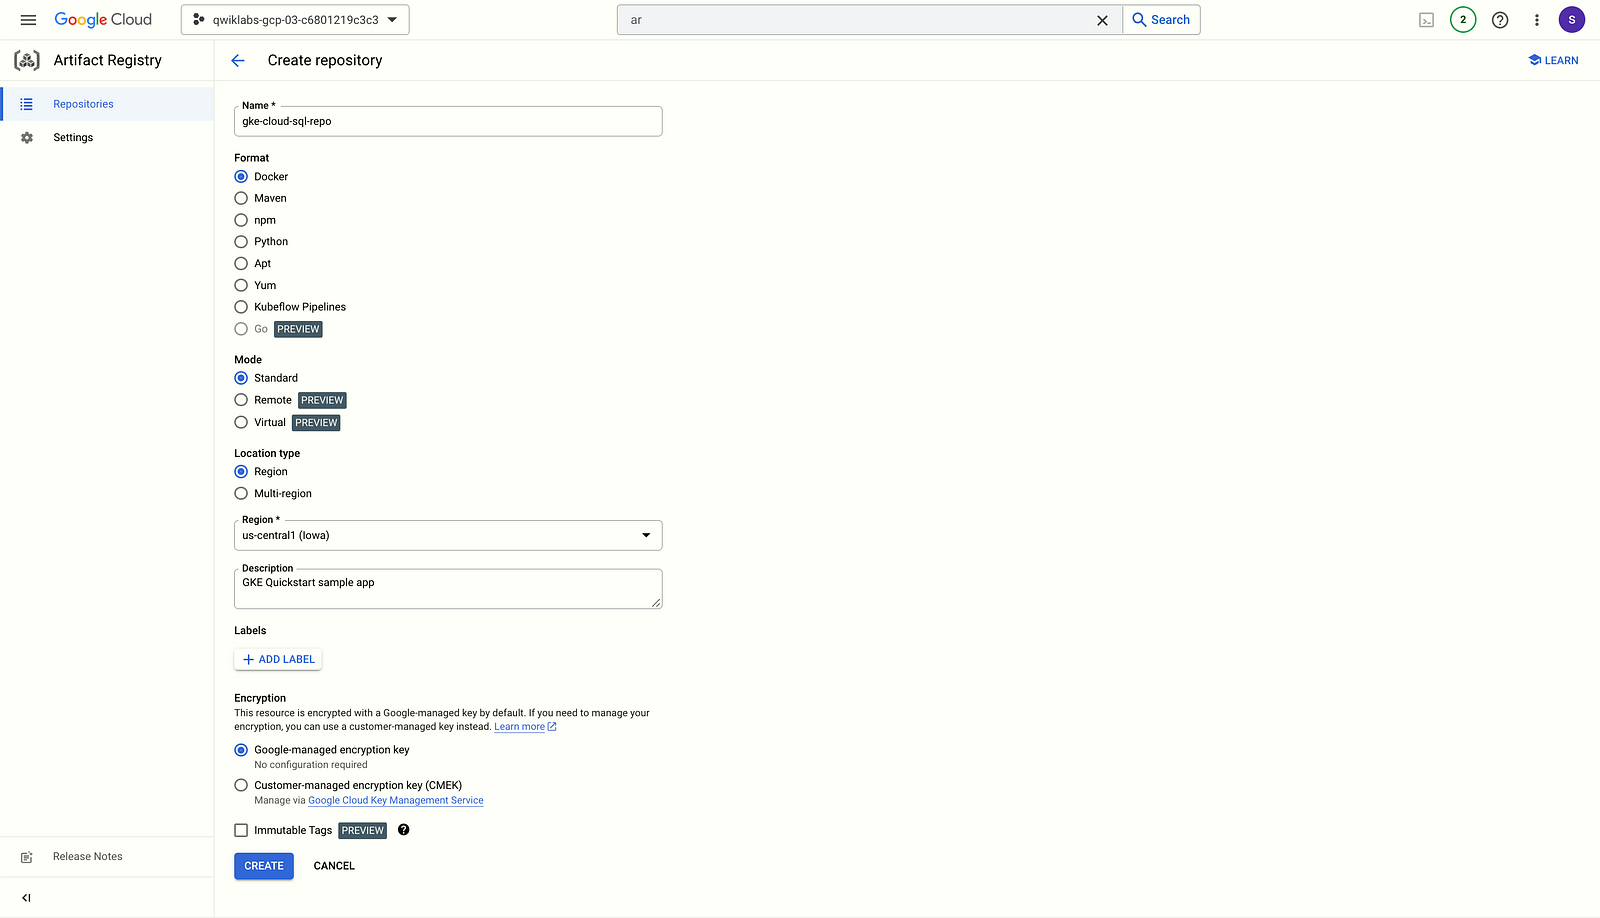
2. Create the main.py file in Cloud Shell Editor.
cat <<EOF > main.py
# Copyright 2018 Google LLC
#
# Licensed under the Apache License, Version 2.0 (the "License");
# you may not use this file except in compliance with the License.
# You may obtain a copy of the License at
#
#     http://www.apache.org/licenses/LICENSE-2.0
#
# Unless required by applicable law or agreed to in writing, software
# distributed under the License is distributed on an "AS IS" BASIS,
# WITHOUT WARRANTIES OR CONDITIONS OF ANY KIND, either express or implied.
# See the License for the specific language governing permissions and
# limitations under the License.

from flask import render_template, Response

import functions_framework

from app import get_index_context, init_connection_pool, migrate_db, save_vote

############ TABS vs. SPACES App for Cloud Functions ############

# initiate a connection pool to a Cloud SQL database
db = init_connection_pool()
# creates required 'votes' table in database (if it does not exist)
migrate_db(db)


@functions_framework.http
def votes(request):
    if request.method == "GET":
        context = get_index_context(db)
        return render_template("index.html", **context)

    if request.method == "POST":
        team = request.form["team"]
        return save_vote(db, team)

    return Response(
        response="Invalid http request. Method not allowed, must be 'GET' or 'POST'",
        status=400,
    )
EOF
3. Create the connect_tcp.py file in Cloud Shell Editor.
cat <<EOF > connect_tcp.py
# Copyright 2022 Google LLC
#
# Licensed under the Apache License, Version 2.0 (the "License");
# you may not use this file except in compliance with the License.
# You may obtain a copy of the License at
#
#     http://www.apache.org/licenses/LICENSE-2.0
#
# Unless required by applicable law or agreed to in writing, software
# distributed under the License is distributed on an "AS IS" BASIS,
# WITHOUT WARRANTIES OR CONDITIONS OF ANY KIND, either express or implied.
# See the License for the specific language governing permissions and
# limitations under the License.

# TODO (https://github.com/GoogleCloudPlatform/python-docs-samples/issues/8253): remove old region tags
# [START cloud_sql_postgres_sqlalchemy_connect_tcp]
# [START cloud_sql_postgres_sqlalchemy_sslcerts]
# [START cloud_sql_postgres_sqlalchemy_connect_tcp_sslcerts]
import os
import ssl

import sqlalchemy


def connect_tcp_socket() -> sqlalchemy.engine.base.Engine:
    """ Initializes a TCP connection pool for a Cloud SQL instance of Postgres. """
    # Note: Saving credentials in environment variables is convenient, but not
    # secure - consider a more secure solution such as
    # Cloud Secret Manager (https://cloud.google.com/secret-manager) to help
    # keep secrets safe.
    db_host = os.environ["INSTANCE_HOST"]  # e.g. '127.0.0.1' ('172.17.0.1' if deployed to GAE Flex)
    db_user = os.environ["DB_USER"]  # e.g. 'my-db-user'
    db_pass = os.environ["DB_PASS"]  # e.g. 'my-db-password'
    db_name = os.environ["DB_NAME"]  # e.g. 'my-database'
    db_port = os.environ["DB_PORT"]  # e.g. 5432

    # [END cloud_sql_postgres_sqlalchemy_connect_tcp]
    connect_args = {}
    # For deployments that connect directly to a Cloud SQL instance without
    # using the Cloud SQL Proxy, configuring SSL certificates will ensure the
    # connection is encrypted.
    if os.environ.get("DB_ROOT_CERT"):
        db_root_cert = os.environ["DB_ROOT_CERT"]  # e.g. '/path/to/my/server-ca.pem'
        db_cert = os.environ["DB_CERT"]  # e.g. '/path/to/my/client-cert.pem'
        db_key = os.environ["DB_KEY"]  # e.g. '/path/to/my/client-key.pem'

        ssl_context = ssl.SSLContext()
        ssl_context.verify_mode = ssl.CERT_REQUIRED
        ssl_context.load_verify_locations(db_root_cert)
        ssl_context.load_cert_chain(db_cert, db_key)
        connect_args["ssl_context"] = ssl_context

    # [START cloud_sql_postgres_sqlalchemy_connect_tcp]
    pool = sqlalchemy.create_engine(
        # Equivalent URL:
        # postgresql+pg8000://<db_user>:<db_pass>@<db_host>:<db_port>/<db_name>
        sqlalchemy.engine.url.URL.create(
            drivername="postgresql+pg8000",
            username=db_user,
            password=db_pass,
            host=db_host,
            port=db_port,
            database=db_name,
        ),
        # [END cloud_sql_postgres_sqlalchemy_connect_tcp]
        connect_args=connect_args,
        # [START cloud_sql_postgres_sqlalchemy_connect_tcp]
        # [START_EXCLUDE]
        # [START cloud_sql_postgres_sqlalchemy_limit]
        # Pool size is the maximum number of permanent connections to keep.
        pool_size=5,
        # Temporarily exceeds the set pool_size if no connections are available.
        max_overflow=2,
        # The total number of concurrent connections for your application will be
        # a total of pool_size and max_overflow.
        # [END cloud_sql_postgres_sqlalchemy_limit]

        # [START cloud_sql_postgres_sqlalchemy_backoff]
        # SQLAlchemy automatically uses delays between failed connection attempts,
        # but provides no arguments for configuration.
        # [END cloud_sql_postgres_sqlalchemy_backoff]

        # [START cloud_sql_postgres_sqlalchemy_timeout]
        # 'pool_timeout' is the maximum number of seconds to wait when retrieving a
        # new connection from the pool. After the specified amount of time, an
        # exception will be thrown.
        pool_timeout=30,  # 30 seconds
        # [END cloud_sql_postgres_sqlalchemy_timeout]

        # [START cloud_sql_postgres_sqlalchemy_lifetime]
        # 'pool_recycle' is the maximum number of seconds a connection can persist.
        # Connections that live longer than the specified amount of time will be
        # re-established
        pool_recycle=1800,  # 30 minutes
        # [END cloud_sql_postgres_sqlalchemy_lifetime]
        # [END_EXCLUDE]
    )
    return pool

# [END cloud_sql_postgres_sqlalchemy_connect_tcp_sslcerts]
# [END cloud_sql_postgres_sqlalchemy_sslcerts]
# [END cloud_sql_postgres_sqlalchemy_connect_tcp]
EOF
4. Create the app.py file in Cloud Shell Editor.
cat <<EOF > app.py
# Copyright 2022 Google LLC
#
# Licensed under the Apache License, Version 2.0 (the "License");
# you may not use this file except in compliance with the License.
# You may obtain a copy of the License at
#
#     http://www.apache.org/licenses/LICENSE-2.0
#
# Unless required by applicable law or agreed to in writing, software
# distributed under the License is distributed on an "AS IS" BASIS,
# WITHOUT WARRANTIES OR CONDITIONS OF ANY KIND, either express or implied.
# See the License for the specific language governing permissions and
# limitations under the License.

import datetime
import logging
import os
from typing import Dict

from flask import Flask, render_template, request, Response

import sqlalchemy

from connect_tcp import connect_tcp_socket


app = Flask(__name__)

logger = logging.getLogger()


def init_connection_pool() -> sqlalchemy.engine.base.Engine:
    # use a TCP socket when INSTANCE_HOST (e.g. 127.0.0.1) is defined
    if os.environ.get("INSTANCE_HOST"):
        return connect_tcp_socket()

    raise ValueError(
        "Missing database connection type. Please define one of INSTANCE_HOST, INSTANCE_UNIX_SOCKET, or INSTANCE_CONNECTION_NAME"
    )


# create 'votes' table in database if it does not already exist
def migrate_db(db: sqlalchemy.engine.base.Engine) -> None:
    with db.connect() as conn:
        conn.execute(sqlalchemy.text(
            "CREATE TABLE IF NOT EXISTS votes "
            "( vote_id SERIAL NOT NULL, time_cast timestamp NOT NULL, "
            "candidate VARCHAR(6) NOT NULL, PRIMARY KEY (vote_id) );"
        ))
        conn.commit()


# This global variable is declared with a value of `None`, instead of calling
# `init_db()` immediately, to simplify testing. In general, it
# is safe to initialize your database connection pool when your script starts
# -- there is no need to wait for the first request.
db = None


# init_db lazily instantiates a database connection pool. Users of Cloud Run or
# App Engine may wish to skip this lazy instantiation and connect as soon
# as the function is loaded. This is primarily to help testing.
@app.before_first_request
def init_db() -> sqlalchemy.engine.base.Engine:
    global db
    db = init_connection_pool()
    migrate_db(db)


@app.route("/", methods=["GET"])
def render_index() -> str:
    context = get_index_context(db)
    return render_template("index.html", **context)


@app.route("/votes", methods=["POST"])
def cast_vote() -> Response:
    team = request.form['team']
    return save_vote(db, team)


# get_index_context gets data required for rendering HTML application
def get_index_context(db: sqlalchemy.engine.base.Engine) -> Dict:
    votes = []

    with db.connect() as conn:
        # Execute the query and fetch all results
        recent_votes = conn.execute(sqlalchemy.text(
            "SELECT candidate, time_cast FROM votes ORDER BY time_cast DESC LIMIT 5"
        )).fetchall()
        # Convert the results into a list of dicts representing votes
        for row in recent_votes:
            votes.append({"candidate": row[0], "time_cast": row[1]})

        stmt = sqlalchemy.text(
            "SELECT COUNT(vote_id) FROM votes WHERE candidate=:candidate"
        )
        # Count number of votes for tabs
        tab_count = conn.execute(stmt, parameters={"candidate": "TABS"}).scalar()
        # Count number of votes for spaces
        space_count = conn.execute(stmt, parameters={"candidate": "SPACES"}).scalar()

    return {
        "space_count": space_count,
        "recent_votes": votes,
        "tab_count": tab_count,
    }


# save_vote saves a vote to the database that was retrieved from form data
def save_vote(db: sqlalchemy.engine.base.Engine, team: str) -> Response:
    time_cast = datetime.datetime.now(tz=datetime.timezone.utc)
    # Verify that the team is one of the allowed options
    if team != "TABS" and team != "SPACES":
        logger.warning(f"Received invalid 'team' property: '{team}'")
        return Response(
            response="Invalid team specified. Should be one of 'TABS' or 'SPACES'",
            status=400,
        )

    # [START cloud_sql_postgres_sqlalchemy_connection]
    # Preparing a statement before hand can help protect against injections.
    stmt = sqlalchemy.text(
        "INSERT INTO votes (time_cast, candidate) VALUES (:time_cast, :candidate)"
    )
    try:
        # Using a with statement ensures that the connection is always released
        # back into the pool at the end of statement (even if an error occurs)
        with db.connect() as conn:
            conn.execute(stmt, parameters={"time_cast": time_cast, "candidate": team})
            conn.commit()
    except Exception as e:
        # If something goes wrong, handle the error in this section. This might
        # involve retrying or adjusting parameters depending on the situation.
        # [START_EXCLUDE]
        logger.exception(e)
        return Response(
            status=500,
            response="Unable to successfully cast vote! Please check the "
            "application logs for more details.",
        )
        # [END_EXCLUDE]
    # [END cloud_sql_postgres_sqlalchemy_connection]

    return Response(
        status=200,
        response=f"Vote successfully cast for '{team}' at time {time_cast}!",
    )


if __name__ == "__main__":
    app.run(host="127.0.0.1", port=8080, debug=True)
EOF
5. Create the requirements.txt file in Cloud Shell Editor.
cat <<EOF > requirements.txt
Flask==2.1.0
pg8000==1.29.4
SQLAlchemy==2.0.12
cloud-sql-python-connector==1.2.2
gunicorn==20.1.0
functions-framework==3.3.0
EOF
6. Create the Dockerfile file in Cloud Shell Editor.
cat <<EOF > Dockerfile
# Copyright 2019 Google, LLC.
#
# Licensed under the Apache License, Version 2.0 (the "License");
# you may not use this file except in compliance with the License.
# You may obtain a copy of the License at
#
#    http://www.apache.org/licenses/LICENSE-2.0
#
# Unless required by applicable law or agreed to in writing, software
# distributed under the License is distributed on an "AS IS" BASIS,
# WITHOUT WARRANTIES OR CONDITIONS OF ANY KIND, either express or implied.
# See the License for the specific language governing permissions and
# limitations under the License.

# Use the official Python image.
# https://hub.docker.com/_/python
FROM python:3

# Copy application dependency manifests to the container image.
# Copying this separately prevents re-running pip install on every code change.
COPY requirements.txt ./

# Install production dependencies.
RUN set -ex; \
    pip install -r requirements.txt; \
    pip install gunicorn

# Copy local code to the container image.
ENV APP_HOME /app
WORKDIR $APP_HOME
COPY . ./


# Run the web service on container startup. Here we use the gunicorn
# webserver, with one worker process and 8 threads.
# For environments with multiple CPU cores, increase the number of workers
# to be equal to the cores available.
CMD exec gunicorn --bind :$PORT --workers 1 --threads 8 app:app
EOF
7. Run the gcloud builds submit command as follows in Cloud Shell to build a Docker container and publish it to Artifact Registry. Replace YOUR_PROJECT_ID with the project ID.
在 Cloud Shell 中運行以下 gcloud builds submit 命令,以構建 Docker 容器並將其發布到 Artifact Registry。請使用您的項目 ID 替換 YOUR_PROJECT_ID。
gcloud builds submit \
  --tag us-central1-docker.pkg.dev/YOUR_PROJECT_ID/gke-cloud-sql-repo/gke-sql .
Deploy the sample app
The deployed sample app connects to your Cloud SQL instance using the Cloud SQL proxy running in a Kubernetes sidecar pattern. The sidecar pattern is accomplished by deploying a workload with an additional container that shares the same Kubernetes pod as the sample app’s container.
部署的示範應用程式使用在 Kubernetes sidecar 模式下運行的 Cloud SQL Proxy 連接到您的 Cloud SQL 實例。透過部署一個具有額外容器的工作負載,該容器與示範應用程式容器共享同一個 Kubernetes Pod,從而實現了 sidecar 模式。
- Get the Cloud SQL instance connection name by running the
gcloud sql instances describecommand:
gcloud sql instances describe quickstart-instance --format='value(connectionName)'2. Create the deployment.yaml file in Cloud Shell Editor. Make the following replacements:
<YOUR_KSA_NAME>withksa-cloud-sql.<LOCATION>withus-central1.<YOUR_PROJECT_ID>with the project ID.<YOUR-DB-SECRET>withgke-cloud-sql-secrets.<INSTANCE_CONNECTION_NAME>with the Cloud SQL instance connection name retrieved from thegcloudcommand on the previous step. The format is project_id:region:instance_name. The instance connection name is also visible in the Cloud SQL instance Overview page.
cat <<EOF > deployment.yaml
apiVersion: apps/v1
kind: Deployment
metadata:
  name: gke-cloud-sql-quickstart
spec:
  selector:
    matchLabels:
      app: gke-cloud-sql-app
  template:
    metadata:
      labels:
        app: gke-cloud-sql-app
    spec:
      serviceAccountName: <YOUR-KSA-NAME>
      containers:
      - name: gke-cloud-sql-app
        # Replace <LOCATION> with your Artifact Registry location (e.g., us-central1).
        # Replace <YOUR_PROJECT_ID> with your project ID.
        image: <LOCATION>-docker.pkg.dev/<YOUR_PROJECT_ID>/gke-cloud-sql-repo/gke-sql:latest
        # This app listens on port 8080 for web traffic by default.
        ports:
        - containerPort: 8080
        env:
        - name: PORT
          value: "8080"
        - name: INSTANCE_HOST
          value: "127.0.0.1"
        - name: DB_PORT
          value: "5432"
        - name: DB_USER
          valueFrom:
            secretKeyRef:
              name: <YOUR-DB-SECRET>
              key: username
        - name: DB_PASS
          valueFrom:
            secretKeyRef:
              name: <YOUR-DB-SECRET>
              key: password
        - name: DB_NAME
          valueFrom:
            secretKeyRef:
              name: <YOUR-DB-SECRET>
              key: database
      - name: cloud-sql-proxy
        # This uses the latest version of the Cloud SQL proxy
        # It is recommended to use a specific version for production environments.
        # See: https://github.com/GoogleCloudPlatform/cloudsql-proxy
        image: gcr.io/cloud-sql-connectors/cloud-sql-proxy:latest
        args:
          # If connecting from a VPC-native GKE cluster, you can use the
          # following flag to have the proxy connect over private IP
          # - "--private-ip"

          # tcp should be set to the port the proxy should listen on
          # and should match the DB_PORT value set above.
          # Defaults: MySQL: 3306, Postgres: 5432, SQLServer: 1433
          - "--port=5432"
          - "<INSTANCE_CONNECTION_NAME>"
        securityContext:
          # The default Cloud SQL proxy image runs as the
          # "nonroot" user and group (uid: 65532) by default.
          runAsNonRoot: true
EOF
3. Run the kubectl apply command as follows in Cloud Shell to deploy the sample app:
kubectl apply -f deployment.yaml4. Create the service.yaml file in Cloud Shell Editor.
cat <<EOF > service.yaml
# Copyright 2021 Google LLC
#
# Licensed under the Apache License, Version 2.0 (the "License");
# you may not use this file except in compliance with the License.
# You may obtain a copy of the License at
#
#      http://www.apache.org/licenses/LICENSE-2.0
#
# Unless required by applicable law or agreed to in writing, software
# distributed under the License is distributed on an "AS IS" BASIS,
# WITHOUT WARRANTIES OR CONDITIONS OF ANY KIND, either express or implied.
# See the License for the specific language governing permissions and
# limitations under the License.

# [START cloud_sql_postgres_sqlalchemy_gke_quickstart_service]
# The service provides a load-balancing proxy over the gke-cloud-sql-app
# pods. By specifying the type as a 'LoadBalancer', Kubernetes Engine will
# create an external HTTP load balancer.
apiVersion: v1
kind: Service
metadata:
  name: gke-cloud-sql-app
spec:
  type: LoadBalancer
  selector:
    app: gke-cloud-sql-app
  ports:
  - port: 80
    targetPort: 8080
# [END cloud_sql_postgres_sqlalchemy_gke_quickstart_service]
EOF
5. Run the kubectl apply command as follows to add a load balancer in front of the deployment, so that you can access it through the internet:
kubectl apply -f service.yaml6. Run the kubectl get command as follows to get the service details:
kubectl get services7. Copy the External IP address once it becomes available in the service details, which may take a few minutes.
8. View the deployed sample app. Open a browser window and go to the service’s External IP address.