XamarinFroms 淺談DataBinding
XamarinFroms 淺談DataBinding
| 簡介 |
簡單了解DataBinding的方式 |
| 作者 |
張朝銘 |
1. 前言
l 本文件用來提供Xamrin Forms開發人員了解DataBinding的用意
l 開發工具使用Visual Studio 2017
l 適合Xamarin Forms初階開發者
2. 目的
3.本文
在APP開發中,我們經常需要撰寫由UI上取得使用者輸入的值這樣的程式碼,或者是撰寫程式碼將值設定到某個UI控制項上,這樣的程式碼經常會把UI控制項與邏輯混合的寫在一起,導致其耦合性高,不易測試,以及較難以維護,分工。
3.1傳統寫法
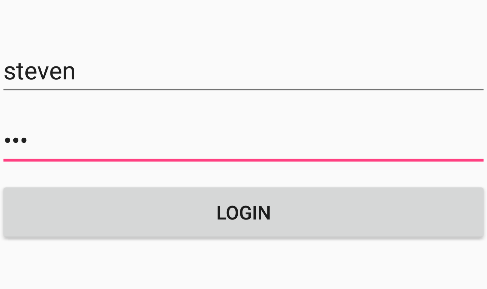
假設現有一登入畫面如下圖所示:
當使用者輸入的帳號密碼後,我們經常見到以下這樣的程式碼
this.btnLogin.Clicked += (sender, e) =>
{
if(string.IsNullOrEmpty( this.txtAccount.Text)||string.IsNullOrEmpty(this.txtPwd.Text))
this.DisplayAlert("提示", "請輸入帳號或密碼", "ok");
else
{
//呼叫Server端驗證..
}
};
這樣的寫法並無甚麼太大的問題,但其實他將資料的驗證邏輯跟UI控制項綁在一起了,如果登入的邏輯再複雜一些,就會導致邏輯的部分與UI耦合性更高,這些邏輯都必須要依賴著UI才有辦法運行。
3.2使用DataBinding
在使用DataBinding前,首先我們要了解組成DataBinding的三個元素
u Source:資料來源,可為任何物件
u Path:路徑,定義Binding到Source上的某個屬性
u Target:需為可被綁定的屬性
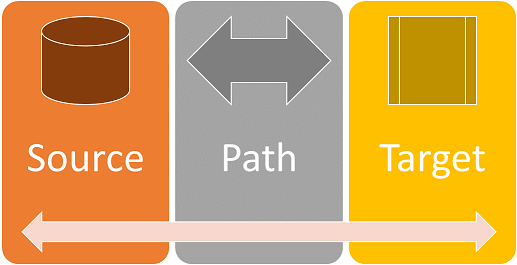
使用DataBinding目的,就是使用較為鬆散的關係降低資料來源與目標屬性兩者間的耦合度。並且讓Source指定的值自動的設定到Target中,而Target的值若有變化也會自動更新回Source上。

在前述的例子中,帳號與密碼使用的控制項Entry的Text屬性皆為可被繫結的屬性(BindableProperty)。
通常Source(資料來源)是由App內部產生,或者由外部讀取而來,為了這些資料所定義出來的類別通常稱為Model。
所以在前述的登入畫面中,會產生以下程式碼所示的資料模型:
public class AuthDataModel
{
public string Account { get; set; }
public string Passwrord { get; set; }
}
這個資料模型就可以定義成我們的Source,裡面的屬性則是會對應到Path上,滿足了DataBinding的三個條件後,就可開始實作DataBinding。
3.3實做DataBinding
在Xamarin Forms中若要達到DataBinding,可撰寫程式碼或者直接在XAML中定義,大部分情況下我們會直接在XAML中撰寫Binding,可省去非常多的程式碼。
在XAML中要做DataBinding時需要使用到擴充標記Binding。如下XAML片段所示
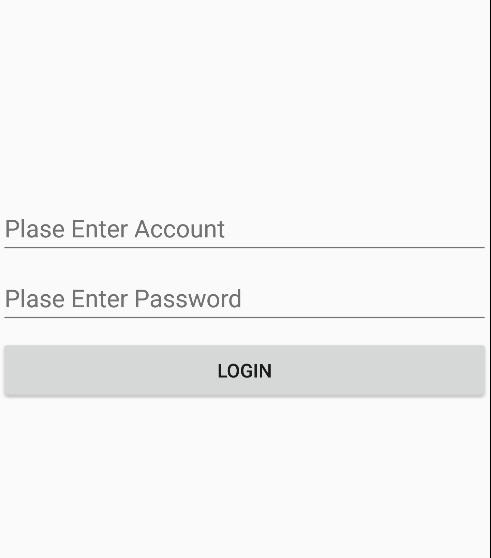
<Entry Placeholder="Plase Enter Account" x:Name="txtAccount" Text="{Binding Account}" />
Text就是Target,Binding Account指的就是Path,那麼Source呢?我們透過程式碼的方式將Source給予該控制項的BindingContext屬性。如下程式碼片段:
public MainPage()
{
InitializeComponent();
AuthDataModel model = new AuthDataModel();
this.txtAccount.BindingContext = model;
設定BindingContext的值就相等於給予這個控制項一個Binding Source,但如果頁面大部分都是使用相同的Source時,我們可將Source直接設定到Page的BindingContext屬性上,因為BindingContext是會一直向下傳遞的。
public MainPage()
{
InitializeComponent();
AuthDataModel model = new AuthDataModel();
this.BindingContext = model;
最後我們改寫一下Model以及ButtonClick的內容如下:
public class AuthDataModel
{
public string Account { get; set; }
public string Passwrord { get; set; }
public bool Valid()
{
return !(string.IsNullOrEmpty(this.Account) || string.IsNullOrEmpty(this.Passwrord));
}
public void Login() { }
}
public MainPage()
{
InitializeComponent();
AuthDataModel model = new AuthDataModel();
this.BindingContext = model;
this.btnLogin.Clicked += (sender, e) =>
{
if (model.Valid())
model.Login();
else
this.DisplayAlert("提示", "帳號或密碼未填", "OK");
};
}
最後執行的結果如下,由偵錯畫面中可以看到畫面上所輸入的值,將自動更新回Source上