Xamarin
Xamarin.Forms
Carousel
Xamarin.Forms 使用CarouselView
2018/12/31 15:44:54
1
1281
Xamarin.Forms 使用CarouselView
| 簡介 |
Xamarin.Forms 使用CarouselView |
| 作者 |
張朝銘 |
| 主題: |
Xamarin.Forms 使用CarouselView |
| 作者: |
Steven |
| 版本/產出日期: |
V1.0/2018.12.20 |
前言
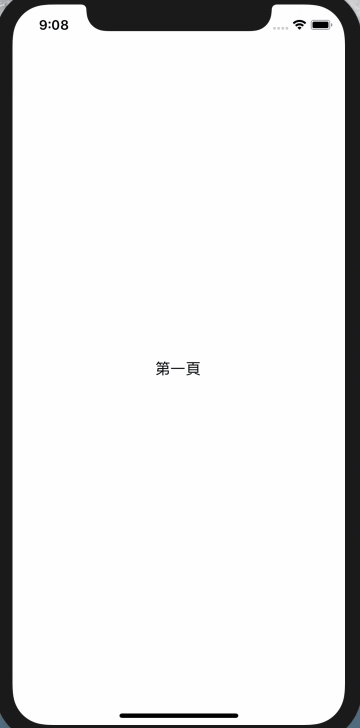
Xamarin.Forms提供了一種可以用滑動的方式來做頁面切換效果的CarouselPage,
它提供的是整頁切換的效果,但在專案中,我們常會需要只有畫面上的一部份需要此效果,
本篇介紹的就是使用第三方套件達成此功能的CarouselView。
它提供的是整頁切換的效果,但在專案中,我們常會需要只有畫面上的一部份需要此效果,
本篇介紹的就是使用第三方套件達成此功能的CarouselView。
首先由下方的圖片中,可以看到原本由Xamarin.Forms提供的換頁滑動效果:
需要進一步了解此控制項可以到網站上查看使用方式:
https://docs.microsoft.com/zh-tw/xamarin/xamarin-forms/app-fundamentals/navigation/carousel-page
但常常在案子中碰到的需求,使只有畫面中的一小部分要做滑動的效果,
例如廣告的輪播,或者資料的顯示等。
不過Xamarin.Forms上並沒有提供類似的控制項,
除了自己使用Renderer的方式由各平台進行實作外,
也可以下載第三方套件
https://github.com/alexrainman/CarouselView
該套件使用的方式類似使用ListView,
可以使用資料來源並套用已經設計好的Template。
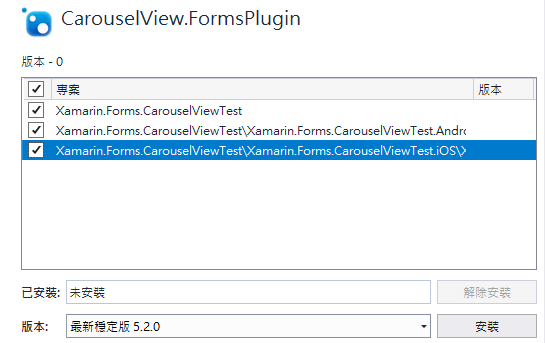
首先在Nuget中安裝CarouselView.FormsPlugin(Forms、Android、iOS都要裝)
接著在Android的MainActivity與iOS的AppDelegate中,
進行元件的初始化。
(研究過此處,只是做了個DateTime.Now放到變數內,應該僅是為了避免被最佳化..)
例如廣告的輪播,或者資料的顯示等。
不過Xamarin.Forms上並沒有提供類似的控制項,
除了自己使用Renderer的方式由各平台進行實作外,
也可以下載第三方套件
https://github.com/alexrainman/CarouselView
該套件使用的方式類似使用ListView,
可以使用資料來源並套用已經設計好的Template。
首先在Nuget中安裝CarouselView.FormsPlugin(Forms、Android、iOS都要裝)
接著在Android的MainActivity與iOS的AppDelegate中,
進行元件的初始化。
(研究過此處,只是做了個DateTime.Now放到變數內,應該僅是為了避免被最佳化..)
Android:
using CarouselView.FormsPlugin.Android;
...
        protected override void OnCreate(Bundle savedInstanceState)
        {
            TabLayoutResource = Resource.Layout.Tabbar;
            ToolbarResource = Resource.Layout.Toolbar;
            base.OnCreate(savedInstanceState);
            global::Xamarin.Forms.Forms.Init(this, savedInstanceState);
            CarouselViewRenderer.Init();
            LoadApplication(new App());
        }
iOS:
using CarouselView.FormsPlugin.iOS;
...
        public override bool FinishedLaunching(UIApplication app, NSDictionary options)
        {
            global::Xamarin.Forms.Forms.Init();
            CarouselViewRenderer.Init();
            LoadApplication(new App());
            return base.FinishedLaunching(app, options);
        }
接下來在XAML中,就可在畫面宣告並放入此控制項,
其中控制項的屬性中,
InterPageSpacing:代表每一個頁面的間距
Orientation:控制項滑動的方向
ItemsSource:資料來源
<ContentPage xmlns="http://xamarin.com/schemas/2014/forms"
             xmlns:x="http://schemas.microsoft.com/winfx/2009/xaml"
             xmlns:local="clr-namespace:Xamarin.Forms.CarouselViewTest"
              xmlns:ios="clr-namespace:Xamarin.Forms.PlatformConfiguration.iOSSpecific;assembly=Xamarin.Forms.Core"
              ios:Page.UseSafeArea="true"
             BindingContext="{local:DataModel}"
             xmlns:control="clr-namespace:CarouselView.FormsPlugin.Abstractions;assembly=CarouselView.FormsPlugin.Abstractions"
             x:Class="Xamarin.Forms.CarouselViewTest.MainPage">
    <StackLayout>
        <control:CarouselViewControl InterPageSpacing="30" Orientation="Horizontal" ItemsSource="{Binding Items}">
        </control:CarouselViewControl>
    </StackLayout>
</ContentPage>
接著我們可以為CarouselViewControl加入DataTemplate,
這裡有一點要注意,一般來說放入垂直方向StackLayout中的控制項,
會依照其內容長出適合的高度,
但在CarouselViewControl需要指定控制項的高度,才會正常顯示出來。
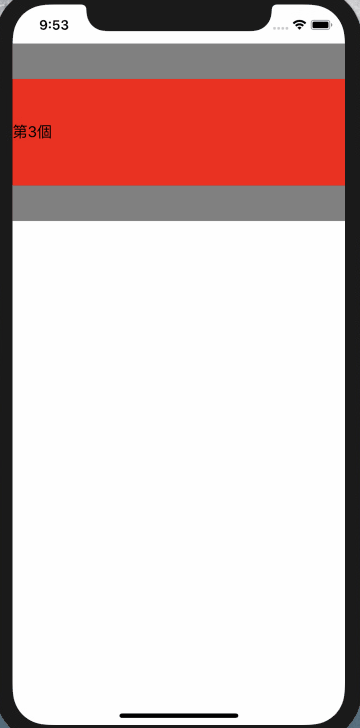
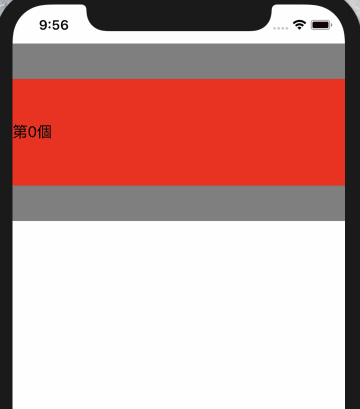
這裡額外將控制項背景改為紅色,並指定高度為200。
        <control:CarouselViewControl HeightRequest="200" BackgroundColor="Red"
                                     InterPageSpacing="30" Orientation="Horizontal"  ItemsSource="{Binding Items}">
            <control:CarouselViewControl.ItemTemplate>
                <DataTemplate>
                    <StackLayout>
                        <BoxView BackgroundColor="Gray"/>
                        <Label VerticalOptions="CenterAndExpand" Text="{Binding .}" />
                        <BoxView BackgroundColor="Gray"/>
                    </StackLayout>
                </DataTemplate>
            </control:CarouselViewControl.ItemTemplate>
        </control:CarouselViewControl>
頁面上的BindingContext設定為DataModel這個物件,
且將CarouselViewControl的ItemSources設為該物件的Items屬性,
並在DateTemplate中的Label去Binding其之值,
所以我們建立了一個DataModel類別與其Items屬性。
    public class DataModel
    {
        public List<string> Items { get; set; } = new List<string>();
        public DataModel()
        {
            for (int i = 0; i < 6; i++)
                this.Items.Add($"第{i}個");
        }
    }
接著就可以執行程式看到效果:
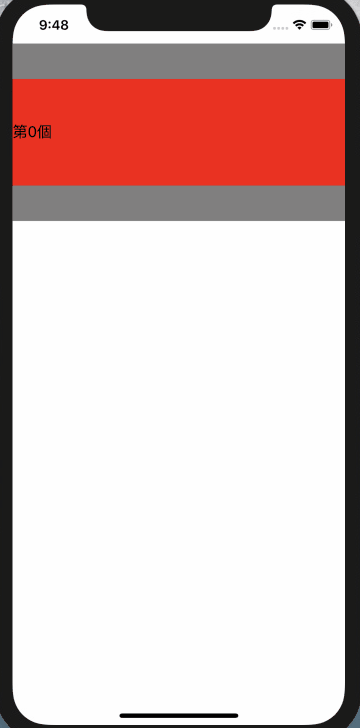
在滑動的過程中,每一頁中有一個間距,就是InterPageSpacing:
最後我們將Orientation改成垂直方向,看到效果會變這樣:
以上就是CarouselView控制項的介紹,
同時本篇使用的範例連結如下:

相關文章