iOS 如何做到Web一樣的系統閒置控制
主題: |
iOS 如何做到Web一樣的系統閒置控制 |
文章簡介: |
實作iOS app做到像Web般的系統閒置控制 |
作者: |
陳傑雄 |
版本/產出日期: |
V1.0/2017.10.19 |
1. 前言
• 本文將介紹有別於apple預設的iOS系統閒置控制模式(進入背景或休眠模式),iOS如何做到如Web般的系統閒置控制。
• 開發工具使用XCode 9。
• 本文件適用於Objective C開發。
2. 目的
• 了解如何利用UIApplication subclass來監聽使用者觸擊螢幕的動作,達到實作系統閒置的控制。
3. 開始前準備
本架構建立於以下版本的環境:
• XCode 9
• iOS 8以上
• Objective C
4. 新建一個UIApplication subclass
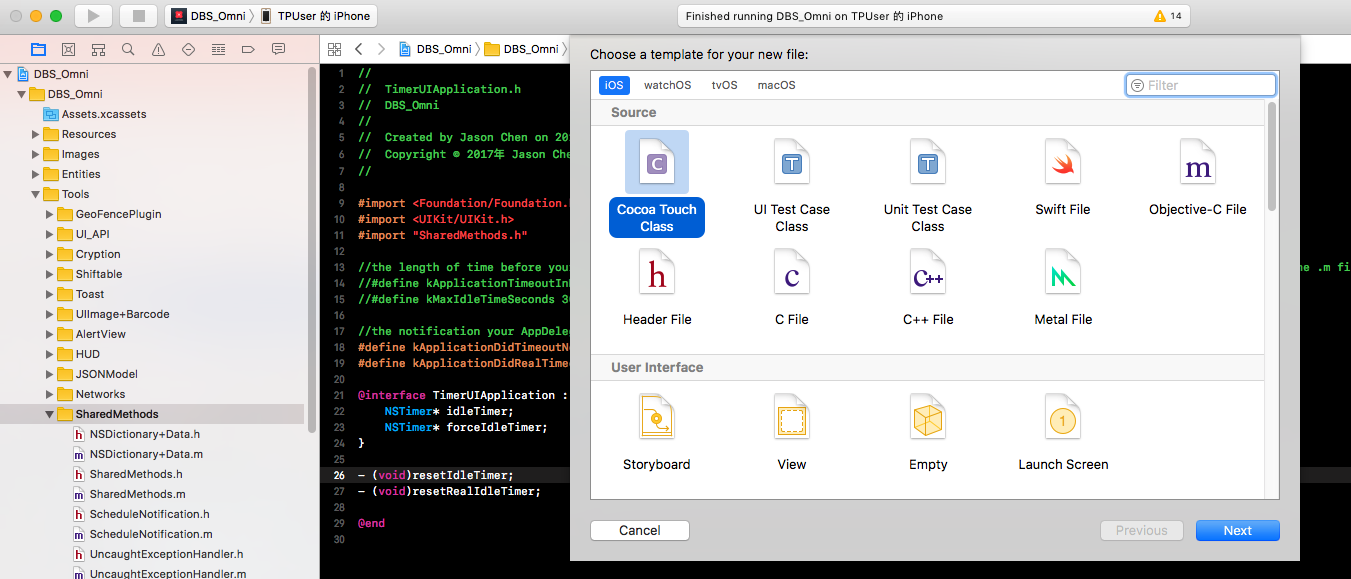
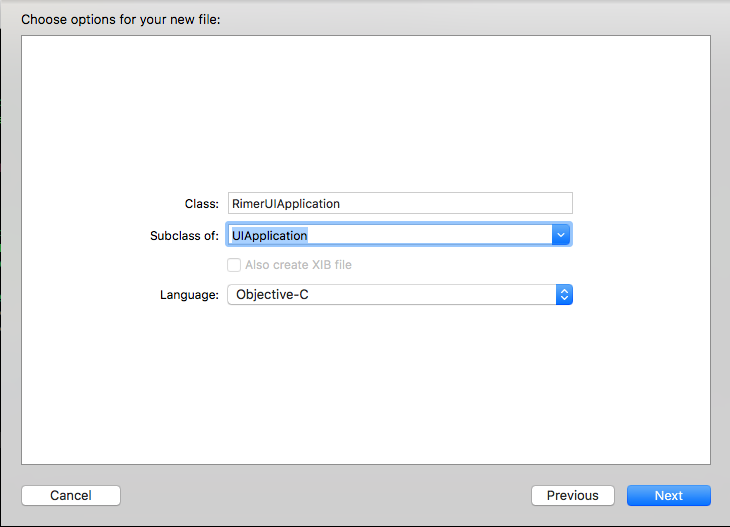
4.1、 在專案中,選擇新增檔案(File) -> 選擇Cocoa Touch Class -> 輸入Class名稱”TimerUIApplication”,選擇Subclass為”UIApplication”,Language選”Objective-C” -> 按”Next”,專案中會產生TimerUIApplication的.h和.m檔。
4.2、 開啟TimerUIApplication.h編輯:
kMaxIdleTimeSeconds是最大閒置的秒數
kApplicationDidTimeoutNotification是閒置逾時發出通知的notification name
#import <Foundation/Foundation.h>
#import <UIKit/UIKit.h>
#define kMaxIdleTimeSeconds 300.0
#define kApplicationDidTimeoutNotification @"CardPlusIdleTimeoutAlert"
@interface TimerUIApplication : UIApplication {
NSTimer* idleTimer;
}
- (void)resetIdleTimer;
@end
4.3、 開啟TimerUIApplication.m編輯:
-(void)sendEventUIEvent *)event 是用來監聽使用者是否又觸擊螢幕,如果螢幕被觸擊,timer會重置。
-(void)idleTimerExceeded 是用來發送notification給接收端,以kApplicationDidTimeoutNotification告知閒置時間已到。
#import "TimerUIApplication.h"
@implementation TimerUIApplication
//here we are listening for any touch. If the screen receives touch, the timer is reset
- (void)sendEvent:(UIEvent *)event {
[super sendEvent:event];
if (!idleTimer) {
[self resetIdleTimer];
}
NSSet* allTouches = [event allTouches];
if ([allTouches count] > 0) {
UITouchPhase phase = ((UITouch *)[allTouches anyObject]).phase;
if (phase == UITouchPhaseBegan) {
[self resetIdleTimer];
}
}
}
//as labeled...reset the timer
- (void)resetIdleTimer {
NSUserDefaults* userDefaults = [NSUserDefaults standardUserDefaults];
if (idleTimer) {
[idleTimer invalidate];
}
// calculate timeout in seconds
int timeout = [kMaxIdleTimeSeconds intValue];
idleTimer = [NSTimer scheduledTimerWithTimeInterval:timeout target:self selector:@selector(idleTimerExceeded) userInfo:nil repeats:NO];
}
//if the timer reaches the limit as defined in kApplicationTimeoutInMinutes, post this notification
- (void)idleTimerExceeded {
[[NSNotificationCenter defaultCenter] postNotificationName:kApplicationDidTimeoutNotification object:nil];
}
@end
4.4、 改寫main.m:
為了達到全域監聽,所以我們要改寫原來的專案預設的main.m內容,先import剛剛新增的TimerUIApplication.h,然後在程式進入點main(int argc, char * argv[])中將TimerUIApplication載入即可。
#import <UIKit/UIKit.h>
#import "AppDelegate.h"
#import "TimerUIApplication.h"
int main(int argc, char * argv[]) {
@autoreleasepool {
return UIApplicationMain(argc, argv, NSStringFromClass([TimerUIApplication class]), NSStringFromClass([AppDelegate class]));
}
}
4.5、 接下來編輯AppDelegate.m:
-(void)applicationDidTimeoutAlert:(NSNotification *)notif 前端依照實際狀況來實作在系統閒置超過時間時要做什麼事。
- (void)applicationDidTimeoutAlert:(NSNotification *)notif {
NSLog (@"time exceeded!!");
}
在didFinishLaunchingWithOptions接收TimerUIApplication的notification,再接收到通知時,轉呼前面的applicationDidTimeoutAlert,提醒使用者系統已經閒置太久。
#import "AppDelegate.h"
#import "TimerUIApplication.h"
@interface AppDelegate ()
@end
@implementation AppDelegate
#pragma mark - synthesize
@synthesize window = _window;
- (BOOL)application:(UIApplication *)application didFinishLaunchingWithOptions:(NSDictionary *)launchOptions {
// receive idle timeout notification
[[NSNotificationCenter defaultCenter] addObserver:self selector:@selector(applicationDidTimeoutAlert:) name:kApplicationDidTimeoutNotification object:nil];
}
以上,大功告成。
當使用者開啟App後,一旦觸摸到螢幕,timer計時器就會重置並重新計時,一直到計時器達到設定的閒置時間,就會觸發notification,通知接收端彈出Alert提醒或是強制登出系統,這就要依照實際情形來時做了。
5. 參考來源
• TIMERUIApplication-https://github.com/robin2013/TIMERUIApplication